.svg)
.svg)

What is reverb?
Reverb allows musicians and audio engineers to achieve a sense of space with their sounds, and is easily one of the most popular and important effects used in music. Yet, despite this, there are many elusive aspects to the effect, from why it occurs in the real world to how the various types of reverb plugins we see in the DAW differ from one another.
In this in-depth guide, we turn our attention towards reverb, exploring its definition, common types, parameters, best practices, and more.
See the table of contents below to easily navigate from section to section.
What you’ll learn:
- The definition of reverb
- How reverb sounds
- The different types of reverb
- How to use reverb
- Best reverb plugins
- Tips and techniques
Feeling ready? Let’s dive into the world of reverb!
The definition of reverb
Reverb is a phenomenon that occurs when sound waves are reflected in a space, in such a way where it creates the effect of a sound persisting even after it’s produced.
The music producers and engineers who are reading this might primarily think of reverb as an audio effect that we use when making music in the DAW. However, keeping this definition in mind, the reality is that we hear reverb every day in the world around us.
Whether it’s the walls in our room or the small objects sitting on our desk, most of our surroundings reflect sound to various extents. While we usually don’t actively perceive it, at any given moment we’re bombarded by the countless sonic reflections that bounce off of these surfaces.
That said, in certain environments the reflections are prominent enough that they become audible. Let’s imagine an empty hall for an example. If we stand in this space and clap, we hear a mixture of direct sound (sound that travels straight to our ears) and reflected sound (sound that radiates, bounces off of walls and other objects, and travels back to our ears). Reverb is the persisting sound that’s created by the sum of these decaying reflections.
When we navigate the world around us, we interpret this mixture of reflections to perceive the nature of the space we’re in. Thus, we mostly use reverb in our music to simulate spaces—although there are plenty of other creative uses for it too.
Reverb vs. delay
Before we move on, it’s important to note that those who are familiar with delay, or echo, might find the definition of reverb similar to it, and potentially confuse the two. While both delay and reverb are characterized by decaying reflections, the difference lies in the fact that with delay, you can audibly hear the individual reflections, while with reverb they blend into a continuous sound.
What does reverb sound like?
Let’s take a listen to what reverb sounds like in the context of music. Below is a vocal sample without any reverb:
And here’s what it sounds like when we add some reverb with an audio plugin:
Notice how the latter sounds like it was recorded in a large space. While the effect is highly noticeable in this example, it can also be used in far more subtle ways.
Reverb types
These days, most of the reverbs we use when producing music are digital emulations. Unless you have access to the exact physical space that you want to capture your sound in, or a studio space equipped with a reverb chamber, massive plate, or outboard gear, chances are you’re going to be primarily relying on audio plugins.
This isn’t necessarily a bad thing, though. Whether they’re simulating real-world spaces or achieving otherworldly effects, modern reverb plugins can sound quite convincing for a fraction of the cost. When browsing through them, you might notice that there are several different reverb types that are particularly common. We list the most popular types below, with a brief explanation of what makes each one unique.
Hall reverb
Hall reverb is marked by the unique sound that comes from being in concert halls, which usually have a smooth and long decay time (around 1.8 seconds or more). There are plenty of famous concert halls out there such as the Berlin Symphony Hall and Boston Symphony Hall, and many hall reverb plugins try to recreate these spaces.
Chamber reverb
Chamber reverb is the distinct effect that comes from intentionally-designed spaces called reverb chambers. While their characteristics can vary greatly, these are often suitable for creating lush, washed-out sounds.
Plate reverb
Plate reverb is achieved via a device that vibrates a sheet of metal when a sound activates the surface. It was particularly popular in the ’60s, and both analog versions and digital emulations are still widely used today. The effect is known to work well with vocals and drums in particular.
Spring reverb
Like plate reverb, spring reverb originates from a physical device that generates vibrations—though instead of a plate, it relies on small springs that vibrate when a dry signal passes through a transducer. Excelling at making mid-range and high frequencies shine, spring reverb is often used on instruments like guitars.
Convolution reverb
Convolution reverb makes use of an impulse response, which is a recorded sample of an existing acoustic environment. This impulse response essentially captures and re-applies the reverberant behavior of a particular space. Anyone can create an impulse response of an acoustic space and load it into a convolution reverb—though doing it well is more difficult.
Room reverb
Last but not least, we have the trusty and self-explanatory room reverb. While its character can vary depending on the space that’s being recorded or emulated, room reverbs are great for achieving a subtle effect with generally shorter decay times and closer reflections.
How to use reverb: Understanding key parameters
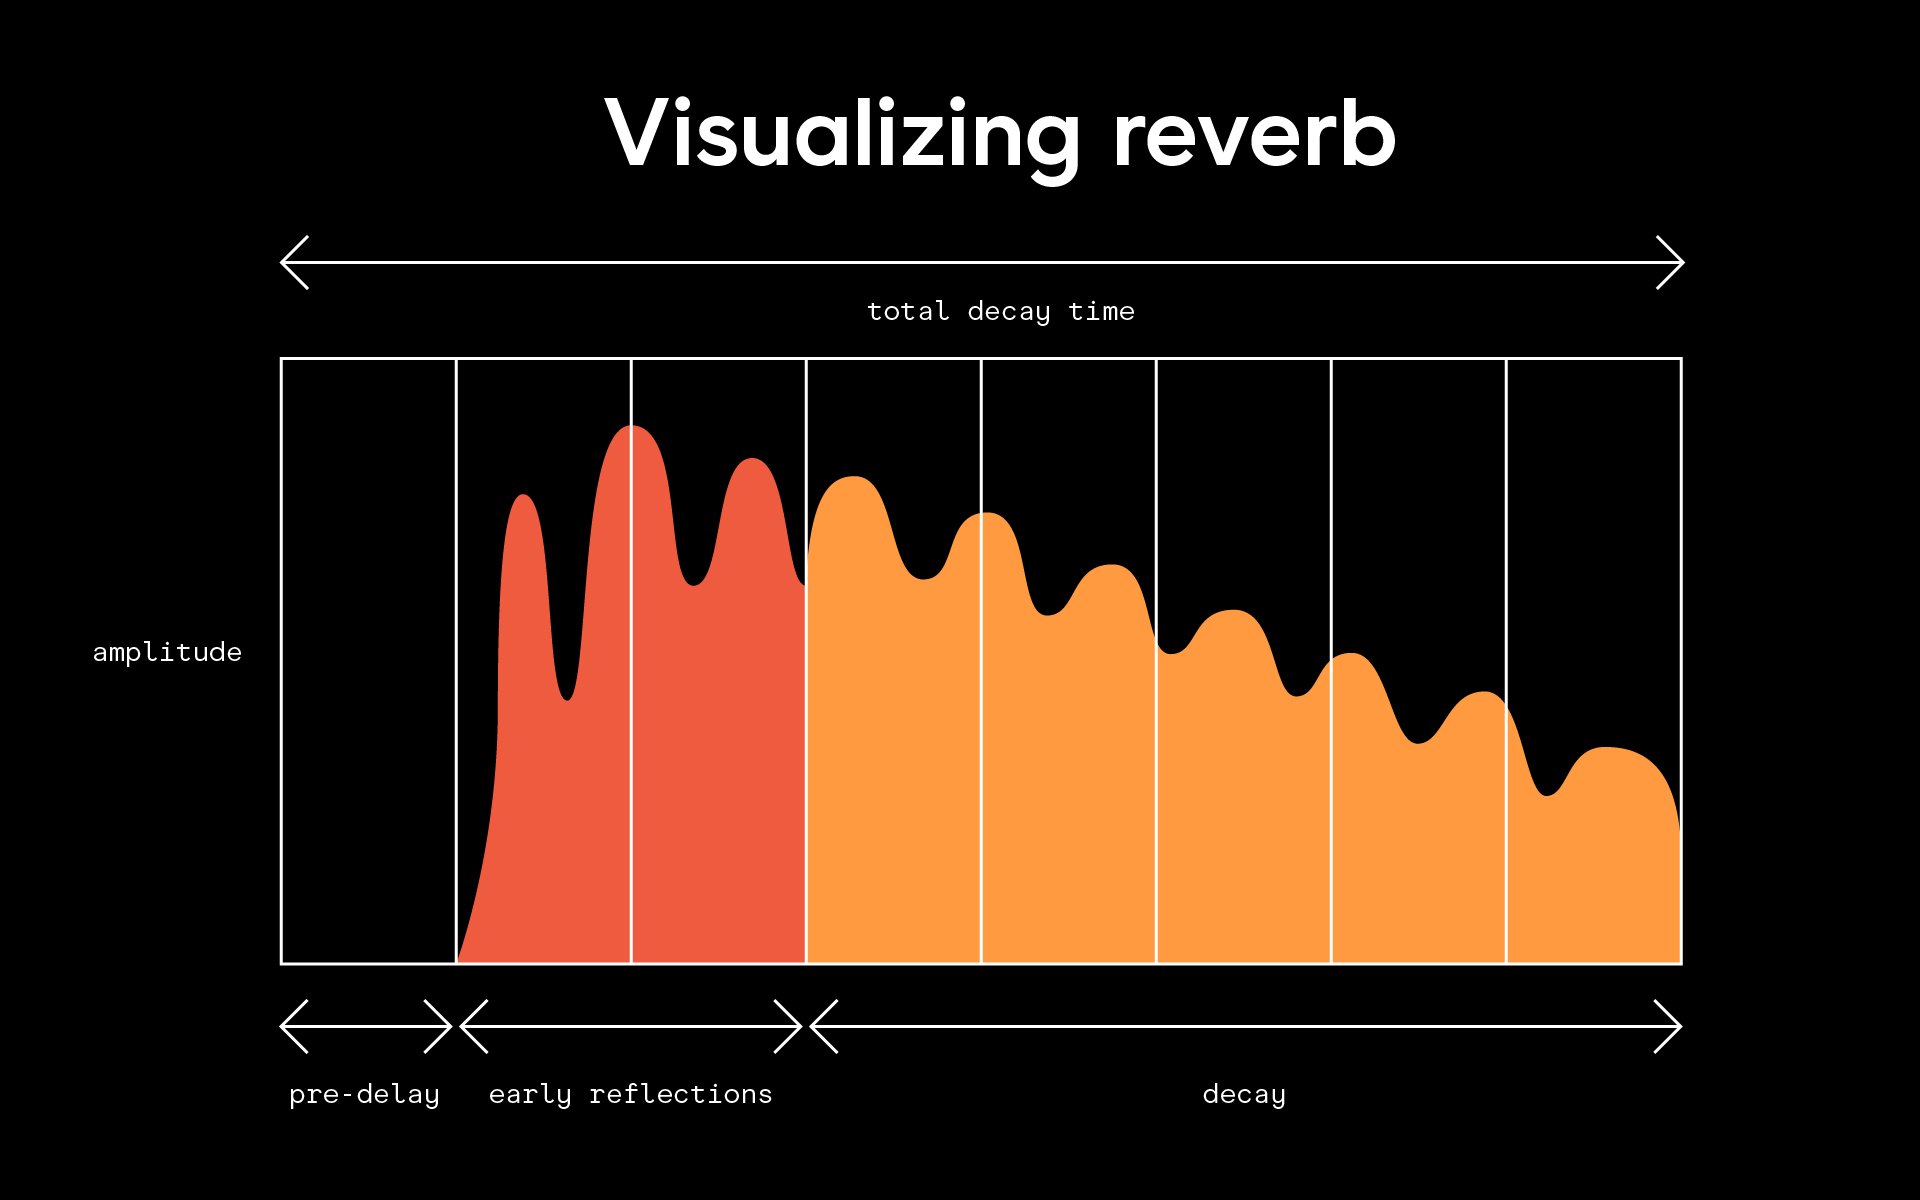
Although there are many reverb types out there, they all share a number of core parameters. Understanding how each of these impacts your sound will be key in helping you figure out how to use reverb in the best way for your specific creative context. Below, we define and visualize the relationship between some of these characteristics:
Decay
Also known as the reverb time, RT60, or reverb tail, decay tells you how long it takes for a reverb to fall by a certain level (60 dB, to be exact). The longer the decay time, the longer you’ll hear the effect linger in your mix.
Early reflections
Early reflections are the first group of reflections that occur when sound waves hit an object. More pronounced early reflections will perceptually place your listener in a small room, while a lower early reflection level will place your listener further away in your acoustic space.
Pre-delay
The pre-delay is the amount of time it takes for a sound to leave its source and create its first reflection. Having a slight pre-delay allows you to separate the dry and wet signals, and prevents the reverb from masking the original signal. A reverb with a significant pre-delay will cause the listener to perceive that they’re in a big space.
Filter
Most reverbs have the ability to use some sort of a filter to attenuate high and low frequencies. If you find that your reverbs sound too bright or too metallic, try filtering them with a low-pass filter at around 4 – 8 kHz. Similarly, using a high-pass filter can help clean up your reverb and reduce muddiness.
Dry / wet balance
The dry / wet balance setting on reverb plugins (sometimes also referred to as the mix) allows you to adjust the balance between the dry (original) and wet (reverb) signals. If you’re using a reverb as an insert, use the mix setting to adjust the dry / wet ratio. If you’re using it as an aux send on a track, set the reverb mix to 100% so that you would only hear the wet signal.
Best reverb plugins
Now that we understand what reverb is, how it sounds, some popular types, and its key parameters, you might be wondering what specific plugins you should use to dive into using it firsthand.
What’s key to note here is that all major DAWs have built-in stock reverb plugins available—and whether it’s Logic Pro’s Space Designer or Studio One’s MixVerb, many of these sound great and offer all the fundamental features you need to get started with the effect.
That said, if you want to access a wider range of sounds beyond what’s available in your DAW or utilize more advanced features, below are some of the best reverb plugins from third-party sources that are worth considering, organized by free and paid options.
Free reverb plugins
The amount of sonic exploration that can be done with free and stock plugins alone can’t be overstated. Below are two free reverb plugins that have stood the test of time, along with a hidden gem that might be lesser-known.
- Supermassive by Valhalla: Also featured in our compilation of top free plugins, Valhalla’s Supermassive is a free effects unit that’s widely beloved for its ability to create swelling and otherworldly reverbs and decays. With 20 unique modes available, it’s great for sculpting reverbs that make a statement.
- TAL-Reverb-4 by TAL: If you’re looking to emulate a more vintage sound, TAL-Reverb-4 is definitely worth trying out. Using its simple-to-use interface, you can easily control the room size, EQ the effect, and dial in its signature lo-fi character.
- Spacer by Spectral Plugins: Spectral Plugins is a manufacturer that unfortunately ceased operations, but upon doing so they made the generous decision to perpetually offer all their plugins for free. Originally $119, Spacer provides advanced capabilities including algorithmic, convolution, and granular reverbs that are typically hard to find in free options.
Paid reverb plugins
Because reverb will make an appearance in virtually every track you work on, if you have the funds available, it could be worth investing in one that really excites you. Whether it’s AI capabilities or industry-leading processing, here are a few of the many plugins that justify their price points, in no particular order.
- Neoverb by iZotope: Crafted by the forward-thinking minds behind Ozone and Neutron, Neoverb is an intelligent reverb that listens to your tracks to offer solid starting points while providing the user full creative control for fine tuning. You can try it for free and rent-to-own it for $9.99/mo, or purchase it outright for $99.
- REV Plate-140 by Arturia: Arturia are industry leaders in circuit-accurate modeling, and with the REV Plate-140 they put their talents on full display, faithfully emulating the legendary unit. You can try it for free and rent-to-own it alongside a host of Arturia’s other reverbs and effects units for $24.99/mo via FX Collection 4, or purchase the individual plugin for $99.
- Crystalline by Baby Audio: Adored by the engineers behind the likes of Dua Lipa, Diplo, and Rihanna, this next-generation algorithmic reverb packages advanced features in a highly intuitive UI. You can try it for free and rent-to-own it for $4.95/mo, or purchase it outright for $99.
- SuperPlate by Soundtoys: Soundtoys’ plugins seem to always be rising in popularity, and it’s easy to see why—this plate reverb emulation combines classic sounds and a skeuomorphic UI with cutting-edge algorithms that enable unmatched realism and versatility. It’s currently available on their site for $149, and it could be worth keeping an eye out for their seasonal sales.
- Pro-R 2 by FabFilter: Last but certainly not least, no conversation around great reverb plugins would be complete without Fabfilter’s Pro-R 2—the plugin’s natural sound and sleek UI are an indispensable piece of countless studios across the world. The plugin is $179 by itself, but is also included in a number of FabFilter’s bundles.
Tips and techniques for getting the most out your reverbs
Let’s close by discussing some more contextual tips and techniques that can help you get the most out of all the different ways that you can use reverbs.
Use aux tracks to preserve resources
To preserve CPU resources, it’s often wise to share a single instance of your reverb plugin across multiple instruments. To do so, simply create an aux track and have the plugin as an insert on that track with the mix setting at 100%. This allows you to send many instruments to the same reverb, instead of putting duplicative instances of the same plugin on each individual track—we cover this approach in more detail in the guide below:
Find a balance
In isolation, reverb almost magically makes everything sound better. However, using too much reverb or having too long of a decay time can quickly blur and muddy your mix. For example, a percussive sound may come across as less dynamic when drenched in reverb.
Therefore, use the effect wisely and with intention. If you find a sound disappearing in the mix or lacking definition, try changing your settings or not feeding it any reverb at all.
Get creative
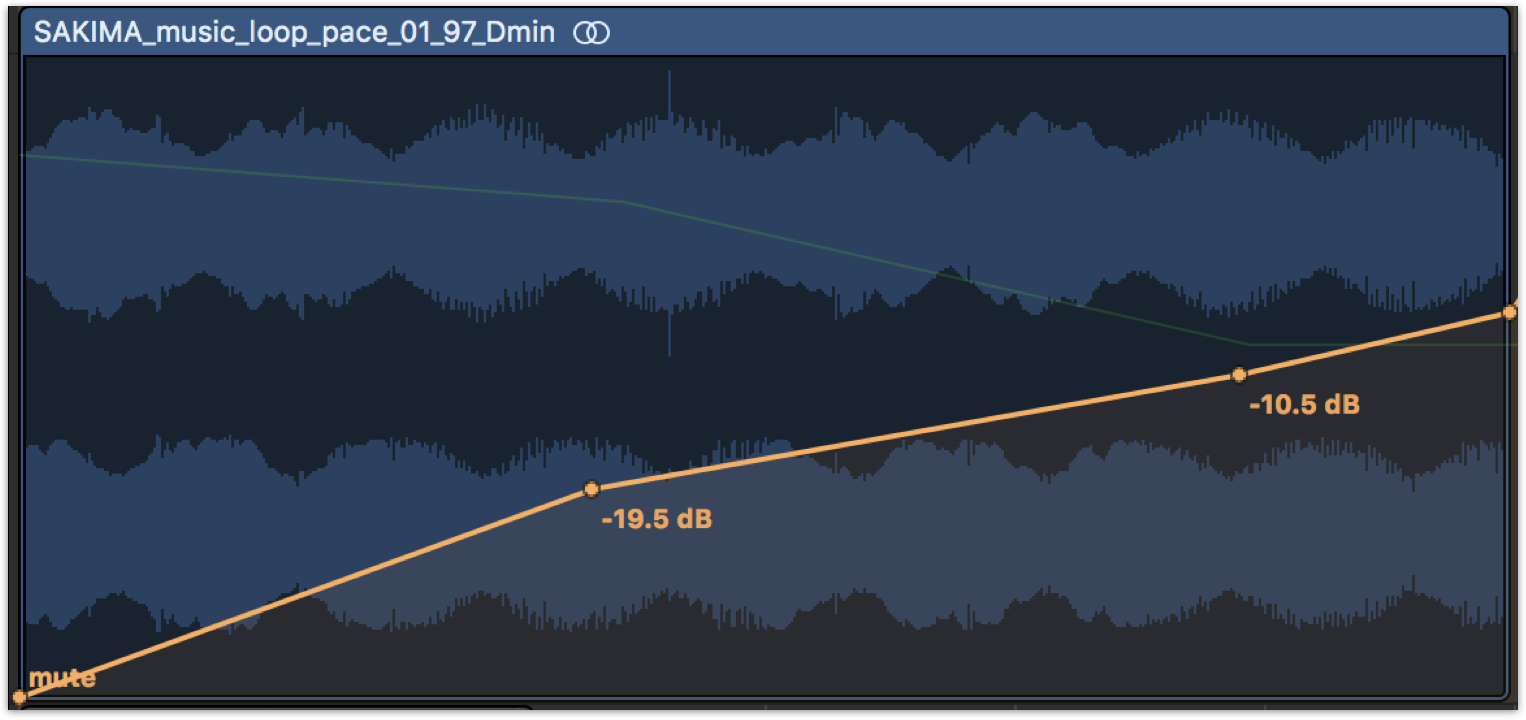
While reverb is typically used to achieve a fairly concrete goal in creating a sense of space, don’t let that limit your creativity—whether it’s reversing the effect, applying a gate to it, or automating its individual parameters, there are tons of ways to use reverb as a more prominent sound design tool that are worth keeping in mind.
Automating the amount of reverb applied to a sample can make it feel as though it’s slowly being brought out of focus.
What is reverb: Conclusion
Hopefully this article gave you a better understanding of the definition of reverb, its common types, and how it can be applied in music. When used effectively, reverb can be that special touch that glues your sounds together, brings out their best qualities, and takes your listener into a new space.
Do you have any questions about how reverb works? What effects would you like to see us explore next? Start a conversation with us on the Splice Discord.
Try reverb plugins from leading manufacturers for free, and then rent-to-own them until they’re yours:
November 8, 2024