.svg)
.svg)

Illustration: Michael Haddad
Audio busing is an essential tool for optimizing your recording, production, and mixing workflows.
In this article, let’s cover the basics of audio busing, how to set buses up in the DAW, advanced techniques, and the practical uses of this tool in your productions.
What you’ll learn:
- The basics of audio busing
- How to set up bus tracks in your DAW
- The different types of audio busing and routing
- Advanced techniques for mix busing
Feeling ready? Let’s dive in!
The basics of audio busing
What is audio busing?
Audio busing is a technique used to keep your session organized, save CPU resources, and process multiple tracks with one single effect rather than applying the effect to each track individually.
Busing can often be a confusing concept, and much of that confusion comes from the wealth of terms used to describe the process—almost every DAW has a different approach to busing. To keep it as simple as possible, audio busing consists of three main parts: (1) the source track which contains the original signal, (2) the bus which transports the signal, and (3) the bus track which receives the signal.
First, let’s talk about the source track. This is the original track you want to add effects to or route somewhere else. Any track can be a source track, and you can route multiple source tracks to one bus track.
A bus is the connector between the source track and the bus track, and acts as a virtual patch cable. Buses can be used as sends, inputs, and outputs in your DAW.
Lastly, we have the bus track. A bus track is a track in your DAW that receives signal from one or more other source tracks via a bus. Bus tracks are used to apply effects or act as submixes to control and organize multiple source tracks at once. You may have heard bus tracks referred to as aux / auxillary tracks or return tracks as well.
How does audio busing work?
Audio busing works by using a bus to route the signal from your source track to your bus track. This happens in two primary ways:
- Adding a bus on the send of the source track. This will duplicate the signal on the source track and route it to the input of the bus track. This technique is used for applying effects like reverb, delay, and parallel compression, and can also be known as parallel processing.
- Adding a bus on the output of the source track. This will re-route the entire output of the source track to the input of the bus track. This technique is used for creating submixes and mix buses.
You’re already inherently using bus tracks if you’re producing music in your DAW. The master bus (also known as the two-bus, stereo bus, stereo out, main outs, etc.) is the default bus that all of your tracks have as their output. The master bus is routed to the master fader in your DAW, and then routed to your monitors or headphones. You can use your master bus / master fader to gain stage, monitor your overall output level, and add effects on your entire mix.
Parallel processing: Adding a bus on the send of the source track
Imagine you have a mix with drums, bass, guitars, synths, and vocals, and you want them to all sound like they’re in the same space. Adding individual reverbs to each track would be time consuming, difficult to adjust, and bad for your CPU.
But, if you add the same bus on the sends of each of these tracks, you can send them all to the same reverb on a bus track.
This process is best used when you want to add effects but still want control of the unprocessed signal. Because sends duplicate the signal from the source track, the output of the source tracks will remain routed to your master bus. This allows you to balance your dry signal (the original source tracks routed to your master bus) and your wet signal (the amount on each send going to the bus track with your effects).
Wet signal vs. dry signal
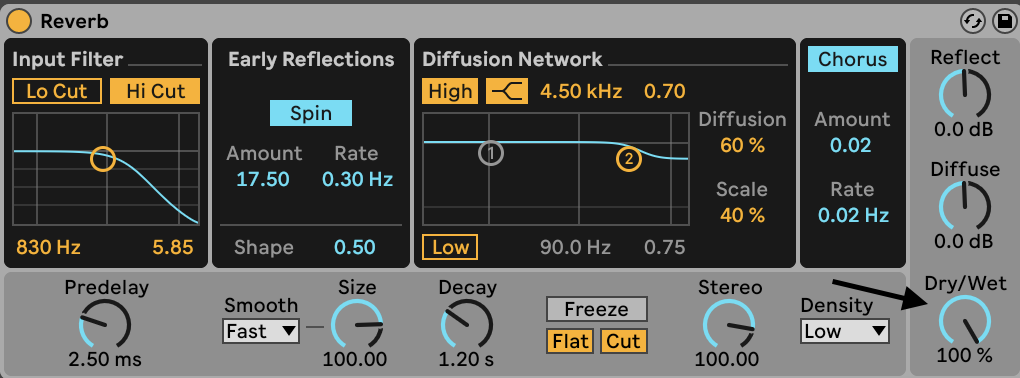
Wet signal refers to processed audio (sounds with added processing like reverbs or delays) and dry signal refers to unprocessed audio. When you use buses on sends, the source track contains the dry signal and the bus track contains the wet signal. When working with any effects this way, make sure the plugin on the bus track is set to 100% wet so you don’t hear any dry signal on the bus track.
Pre-fader vs. post-fader
When you add buses on sends, you may have the option to make them pre- or post- fader. Pre-fader sends are independent of the volume / pan / mute / solo of the source track. Post-fader sends are the opposite, and are tied to the source track.
Therefore, if you’re using a pre-fader send and mute your source track, it won’t mute the signal being sent on the bus to the bus track. A post-fader send will follow whatever the source track does.
Submixes: Adding a bus on the source track output
Submixes are used to organize multiple source tracks and / or process them together. Let’s say you have 16 background vocal tracks, and you want to control and process them all together without adding 16 individual EQs or managing 16 different faders at once. Route the outputs of these 16 source tracks to the same bus to control them with one bus track.
This technique is best used when you want to process tracks together, but don’t need as much individual control of wet / dry, as you might in parallel processing.
How to set up bus tracks in your DAW
As we mentioned earlier, different DAWs have different approaches to busing. Let’s take a look at how to set up bus tracks in some of the most popular DAWs: FL Studio, Ableton Live, Pro Tools, and Logic Pro.
How to set up a bus track in FL Studio
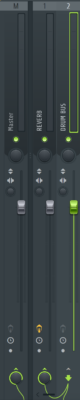
First, create your bus track by choosing an unused track in FL Studio and giving it a name (I called mine “REVERB”). Next, click to select your source track. To use a bus as a send, simply click the triangle at the bottom of the bus track while you have your source track selected.
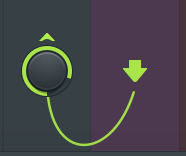
After you click the triangle, you’ll see a digital cable being routed from your source track to your bus track, and also to the master bus. Use the newly created knob to control how much signal you’re sending to the bus track (in this case, a reverb).
To create a submix, follow the same initial steps. After you’ve created the connection between your source track and your bus track, right click on the triangle above the newly created knob and choose “Route to this track only.”
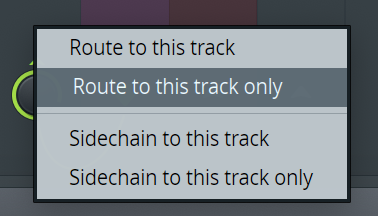
The output of your source track is no longer routed directly to the master bus, but to your bus track instead for processing. You can also use this technique to route multiple source tracks to one bus track.
How to set up a bus / return track in Ableton Live
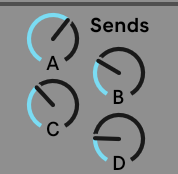
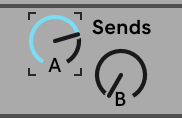
Ableton Live refers to bus tracks as “return tracks.” Ableton starts with two sends and return tracks ready-to-go for applying effects. To use a bus as a send, turn up the knob in the “sends” section of your source track. This will send signal to the corresponding return track (a reverb in this example).

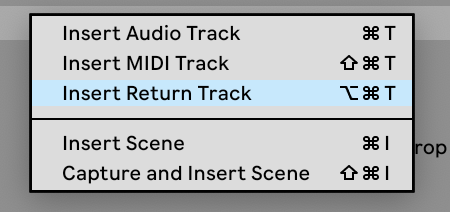
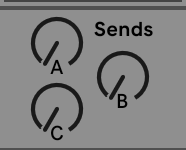
If you want to add another send and return track in Ableton, right click at the top of your mixer and choose “Insert Return Track.” This will add an additional knob to your sends and create the corresponding return track. Add any effects to your new return track.
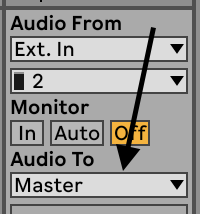
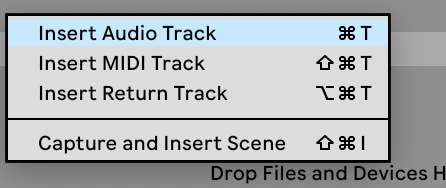
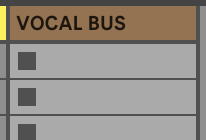
To create a submix, add a new audio track by right clicking at the top of your mixer, and give it a name. I called mine “VOCAL BUS.” This is your bus track.
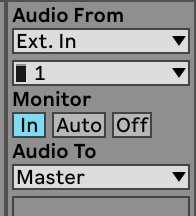
In the “Audio To” or output section of your source track(s), choose your newly created bus track as the destination.

Make sure your bus track has input monitoring turned on so you can hear everything being sent to it.
If you’d like to try out Ableton Live, new users can get Ableton Live 11 Lite for free after starting a Splice subscription for a limited time.
How to set up an aux track in Pro Tools
Pro Tools uses the term “aux track” for bus tracks. To use a bus as a send, add a new bus in the “SENDS” section of your source track.

Create a new aux track in Pro Tools by selecting “Track” → “New” in the menu bar. Set the input of the new aux track to be the bus you chose earlier. Add any effects to the newly created aux track.

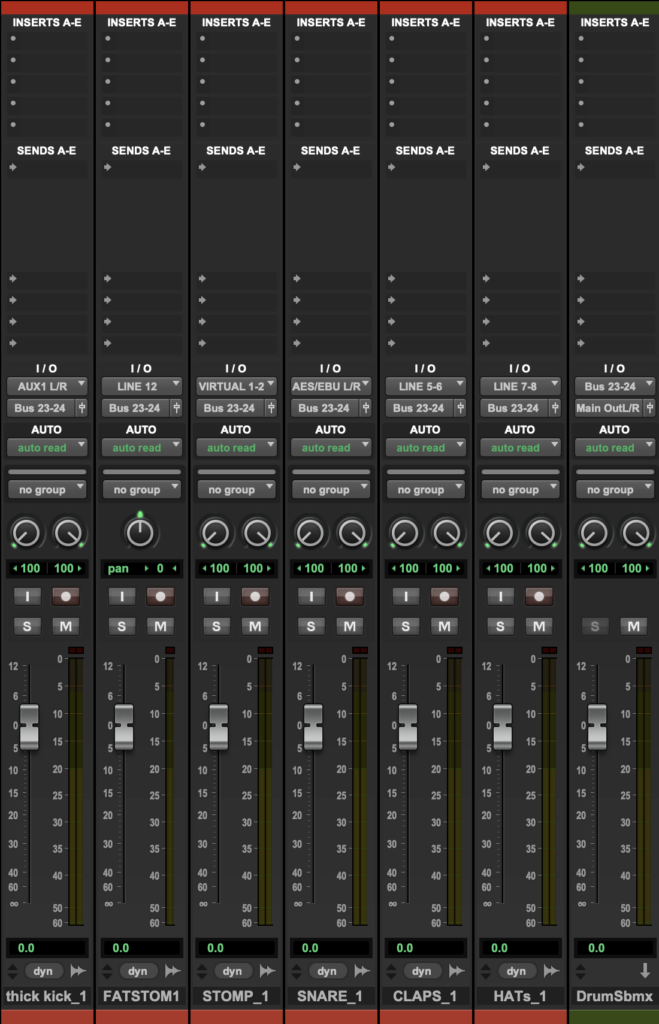
To create a submix, change the outputs of your source tracks to a new bus and use the same bus for all of them. Create a new aux track in Pro Tools by selecting “Track” → “New” in the menu bar. Set the input of the new aux track to be the bus you chose earlier.
Don’t forget to solo-safe your aux tracks to hear them when soloing source tracks with command + click (control + click on PC) on the solo button of the aux track.
How to set up a bus track in Logic Pro
Bus tracks in Logic Pro are also called “aux tracks.” Logic Pro creates aux tracks automatically when buses are added as sends.
To use a bus as a send, click on the “sends” section on your source track and choose a bus.

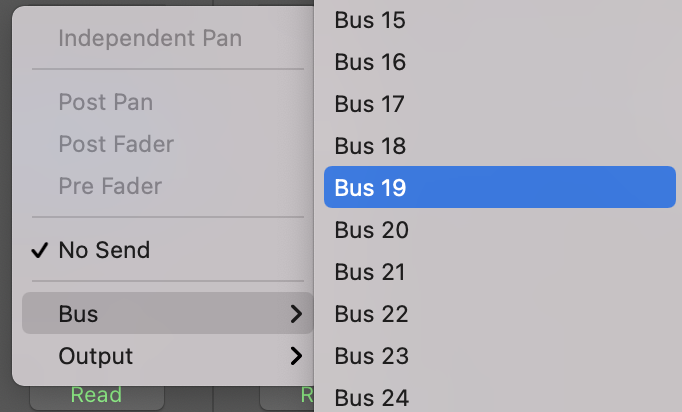

A new aux (bus) track will be created automatically with the bus set as its input. Add any effects to the newly created aux track.

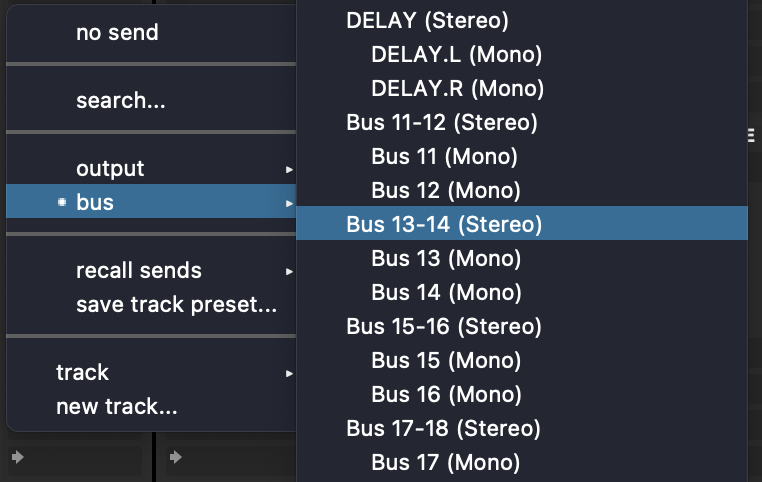
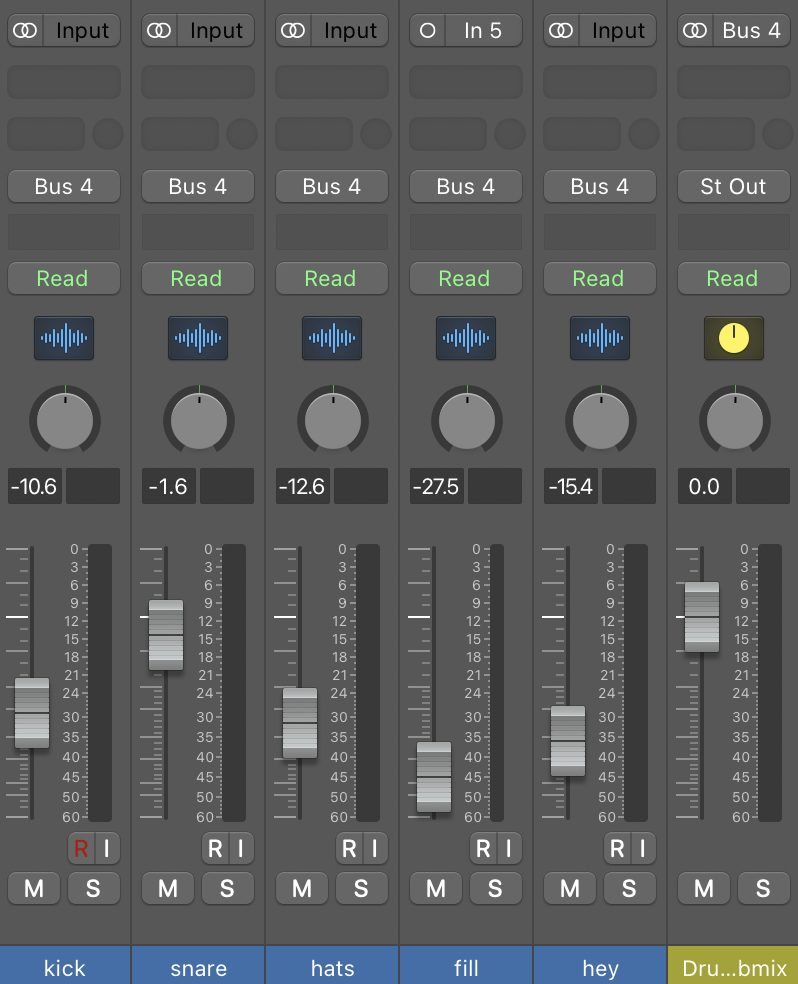
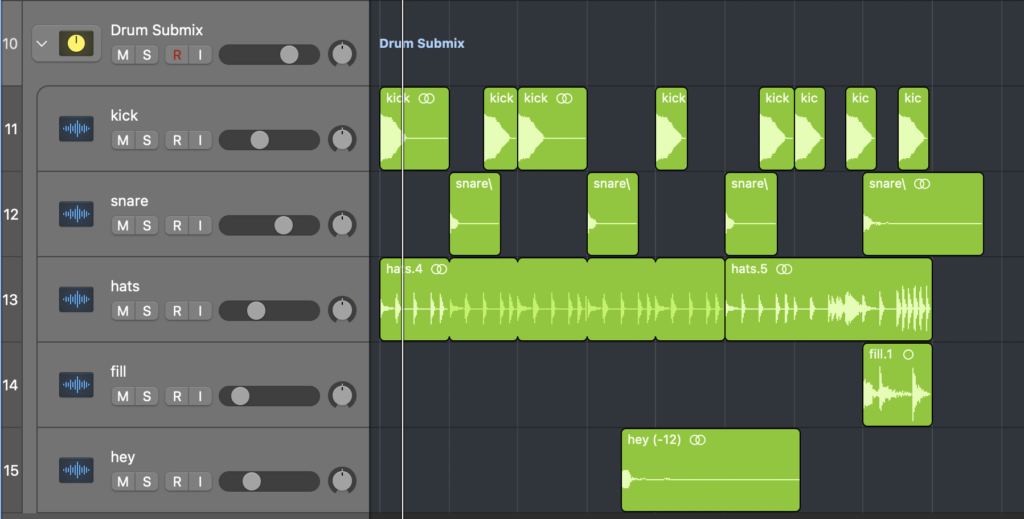
To create a submix, highlight all of the source tracks you want to submix to the aux track, and click and hold on the output to choose a new bus. A new aux track will be created with the bus as its input.
In Logic Pro, you can also create a “Summing Stack” which also works like a submix. Highlight all of the tracks you would like to be in the summing stack, and use the key command shift + command + D to create a new stack. The source tracks will now be routed to the input of the summing stack for processing.

The different types of audio busing and routing
Stereo bus vs. mono bus
You may have the option to choose either stereo or mono when creating a bus and a bus track in your DAW. Generally, bus tracks used as reverb or submix tracks tend to be in stereo, especially if your source tracks are panned. On the other hand, if you’re using a mono tape delay plugin, for example, the bus track can be mono.
If you’re not sure which option to choose, default to stereo. Stereo bus tracks can still receive and play mono signals, while the opposite isn’t true.
Bus automation
Bus automation adds another level of control to your mixes. Instead of automating volume or effects on multiple individual source tracks, you can use the bus track to control them all. For example, if you have a string orchestra with many source tracks routed to a bus track, you can create dynamic changes for the whole ensemble just by automating the volume of the submix.
You can also automate your sends to create effects like reverb swells or automated delays.
Parallel compression
Parallel compression is another technique that utilizes buses on sends. For parallel compression, use a bus on a send to a bus track with a heavy compressor on it. Mix your dry signal (the source track) with your wet signal (the bus track with heavy compression) to finesse your sound.
Sidechaining
Sidechaining is another type of bus processing you can use in your production. If you want to use your kick drum’s transients to activate a compressor on your bass, choose a bus on a send on your source track (the kick) but don’t create a bus track. If your DAW creates a bus track automatically, either delete or mute it. Add a compressor plugin to your bass track and choose the same bus as the “sidechain” or “key input” on the compressor. Change the parameters of the compressor to adjust the intensity of the effect.
Advanced techniques for mix busing
Drums
Drums benefit from almost all types of bus processing. Use a submix to control all parts of the kit on one fader. Add a compressor to your drum submix to apply drum bus compression, or a saturator to give the whole kit some grit. Use a bus on a send to a plate reverb for the snare and toms. Add another bus on the sends of the drum submix itself to apply parallel compression to the entire kit.
Be careful with your routing and know exactly where each part of the kit is routed to. Don’t put reverb on the entire drum submix if you don’t want reverb on absolutely everything; instead, use reverb sends on the individual tracks to choose exactly which parts of the kit to send to the reverb.
Vocals
Vocals also benefit from bus processing. Use buses on sends for effects like reverb, delay, and chorus. Automate the reverb sends to create excitement in your mix with vocal throws that grow on certain words and then get dialed back. Use parallel compression to mix heavy compression with a natural dynamic performance. Create a backing vocal submix for all of your vocal layers and EQ them together.
Guitar
Guitar layers also benefit from using submixing to control them on one track. Submix to a stereo bus track to process panned mono guitars all at once with a compressor. Add a bus send on the guitar submix to add a room reverb to all of the guitars at once.
You can add amp simulators on a submix of guitars, but sometimes it’s advisable to put these on individual source tracks if you want finer control of individual tone.
Session organization
Busing is a game-changer for session organization and your CPU. Use submixes for all similar instruments to control them on one fader. Use bus sends to create a single ambient reverb “room” so that all of your instruments sound like they’re in the same space. Route music, sound effects, and dialog on their own submixes to control the overall balance of a film mix on three faders.
How do you use busing in your productions? Start a conversation with us on the Splice Discord.
Explore more tips and tutorials on key concepts pertaining to mixing:
February 17, 2023


