.svg)
.svg)


Illustration: Michael Haddad
What is mixing in music?
Mixing is the process of enhancing and blending together the individual elements that make up a song. While composition is all about making cool rhythms, memorable melodies, and colorful chord progressions, mixing places the focus on more elusive sonic aspects like making the whole picture sound clear, exciting, and dynamic.
While there’s no use in putting lipstick on a pig (i.e. a great mix can’t ‘save’ a terrible composition), the value of learning how to mix music effectively can’t be understated: A great mix not only helps create a commercial-sounding end product, but also plays a key role in elevating the emotional impact of a track.
In this article, let’s learn how to mix music by exploring the process’ key steps, tools, techniques, and more. Feel free to use the table of contents below to easily navigate from section to section:
Table of contents: How to mix music
Feeling ready? Let’s dive into the world of mixing!
How to mix music: The 3 key steps
There are three key steps that you’ll want to engage with when approaching mixing music: (1) setting levels, (2) panning, and (3) adding effects.
You might not do these in this exact sequence, and other processes beyond these could also take place—for example, you might go back to the arrangement and add a new layer, or decide to cut out an instrument entirely (we call this “muting” a track) to achieve a more clear or balanced result. But, in 99% of instances, you’ll be doing some amount of these three things when you mix.
With that said, let’s explore each of these steps in more detail below.
Step 1: Setting levels
If everything is loud, nothing is loud—setting the level, or loudness, of individual elements in your track is one of the most fundamental steps in mixing.
There are two main ways to set levels in a DAW: (1) using a fader and (2) via automation. Let’s explore each method and their pros and cons.
Using faders for mixing music
In the timeline / arrangement view of most DAWs, you’ll see a fader that looks something like this next to each of your tracks:

You may also see your faders laid out in a dedicated mixer view, which typically looks something like this:
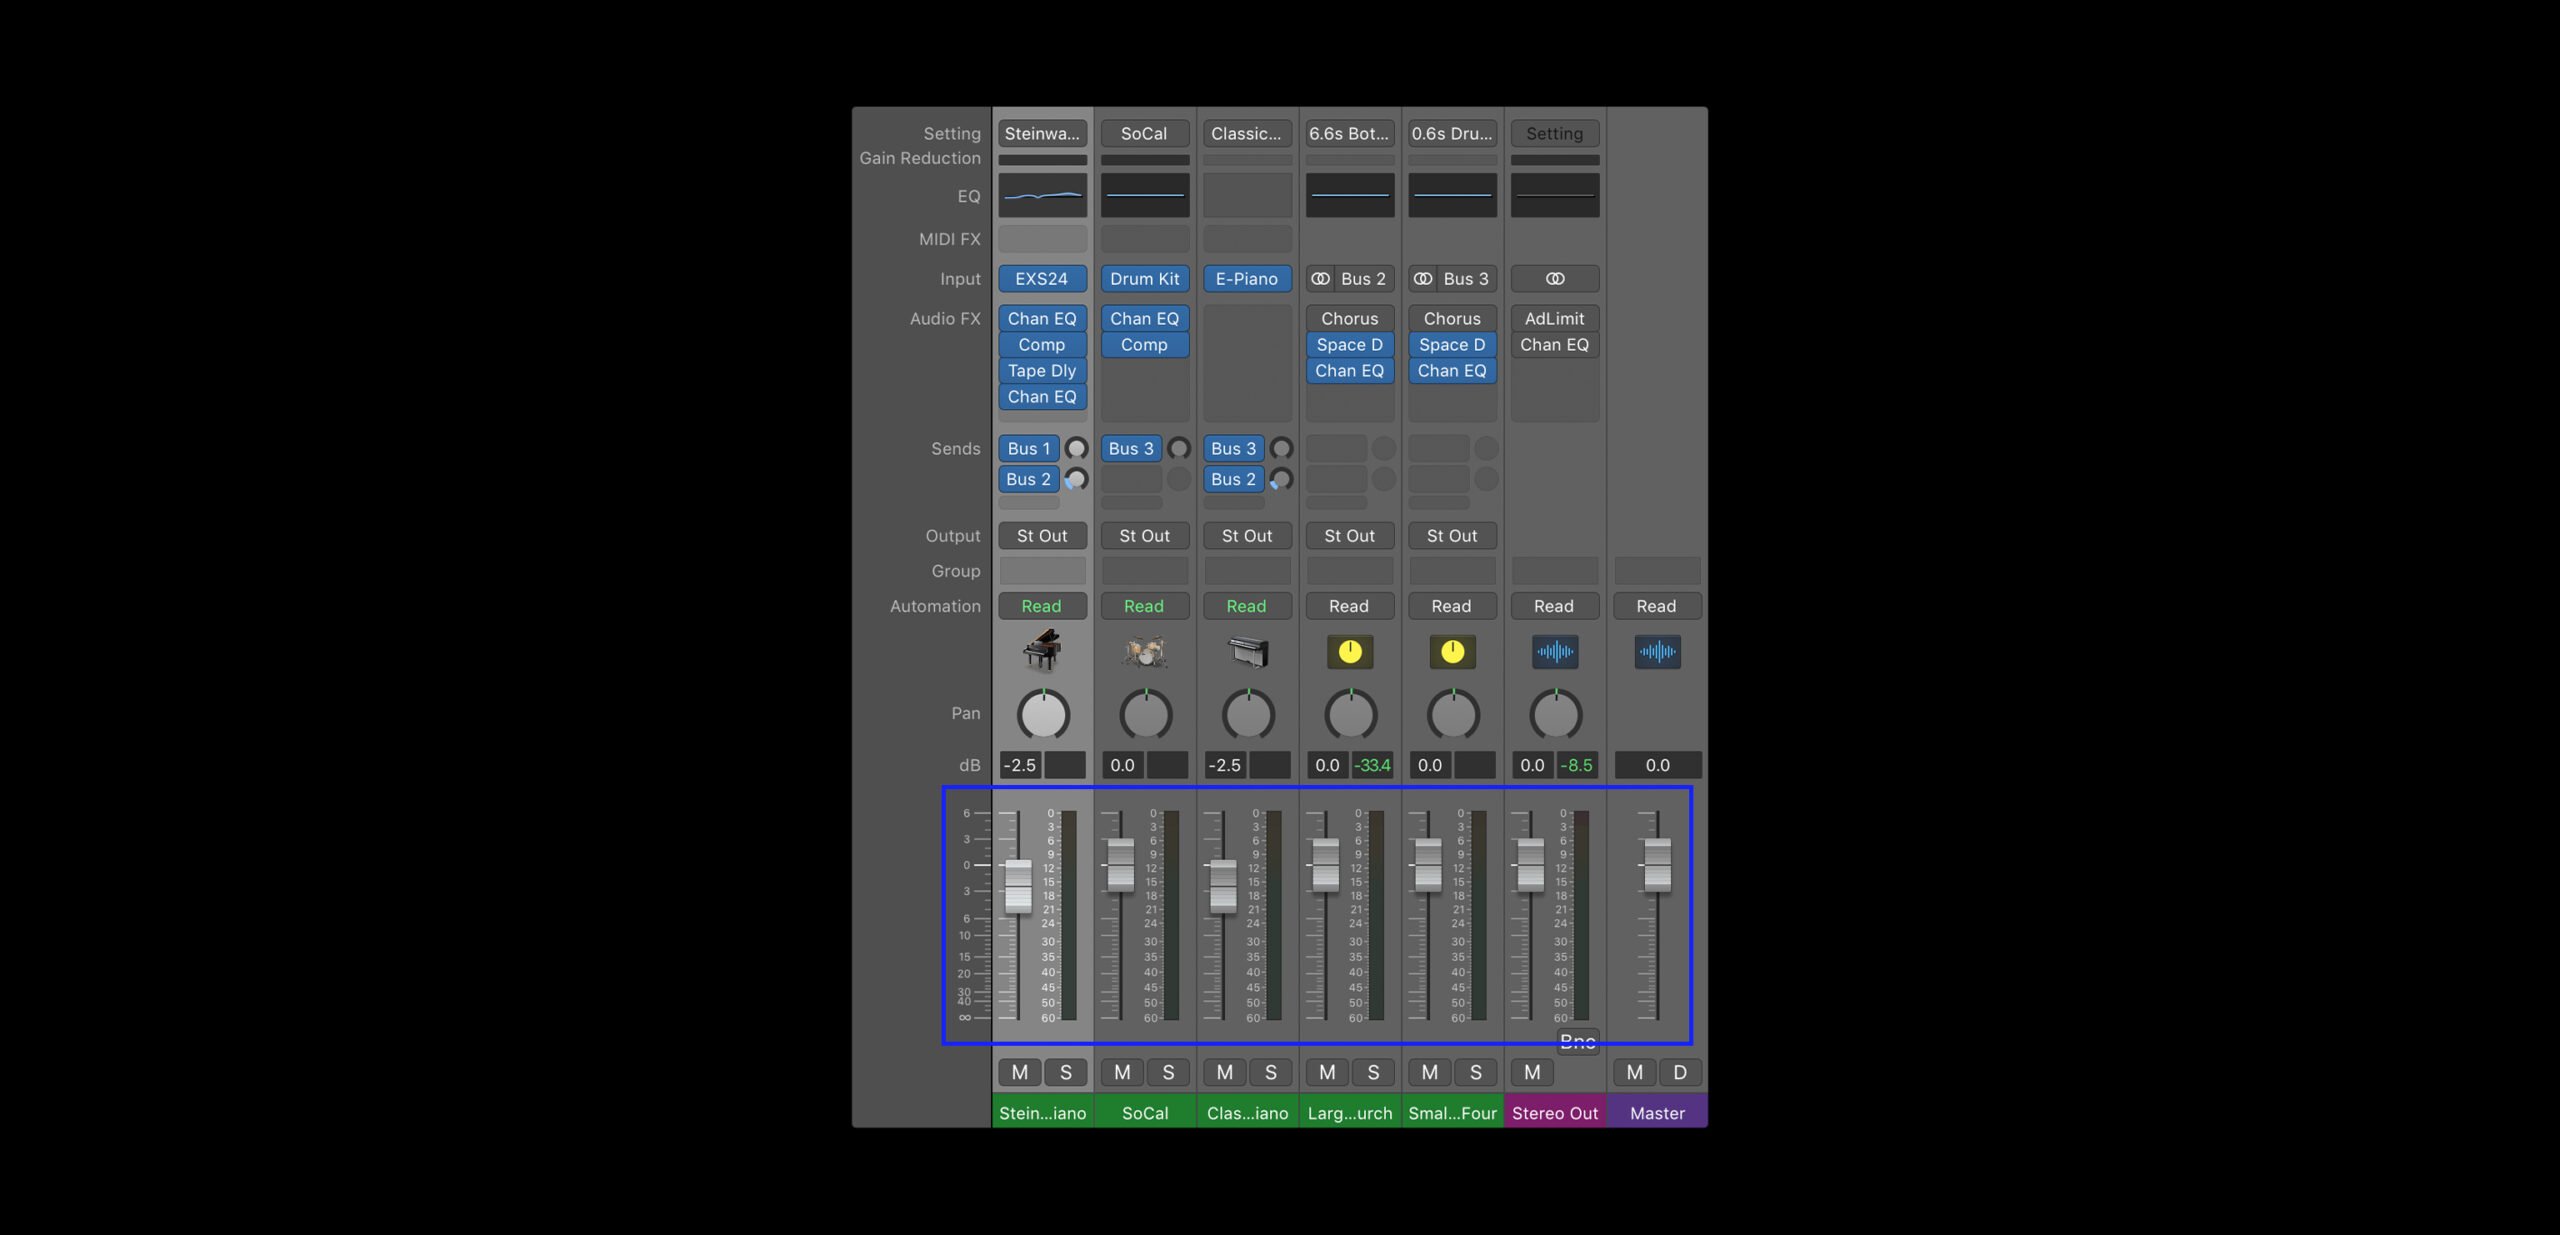
If you click and drag the fader in either direction, you’ll see a value expressed in decibels (dB) go up or down accordingly. Decibels are the unit used to express level, and in most (if not all) DAWs, a new track’s fader will be set to 0.0 dB by default.
If you play your song as you adjust the fader, you’ll hear the track’s volume change in real time:
Try adjusting the fader until the track seems to be at the right volume in relation to the rest of your mix. Faders are particularly useful for quickly setting the single, unchanging level of an individual track. For many elements of your mix, the fader alone will do just fine.
However, there may be a few components of your mix that need to change in volume depending on the part of the song. For example, maybe the guitars are a soft background element during the verses, but amp up in loudness during the chorus. Now, you could create separate tracks for the ‘verse guitar’ and ‘chorus guitar,’ and set their levels independently. However, another common solution would be to use automation.
Using automation for mixing music
As the name suggests, automation is a technique that allows you to automatically adjust a specific parameter (in our case, level) across time. All DAWs will have some form of an automation curve feature, which lets you adjust a parameter at specific moments in time by drawing in points and lines that vertically represent different values. Conveniently, the parameter that these features display by default will most likely be track volume.
Below, see how an automation edit allows us to change the volume midway through the drum part. Notice how the fader moves accordingly without us having to touch it:
Another thing that automation curves can be used for is to create fade-ins and fade-outs, which can be done by stretching out the distance between two points:
While automation curves are extremely helpful in mixing, do note that once you create some points, you won’t be able to use the fader (outside of during real-time playback) to set levels, as it’ll snap to whatever points you created. While there’s a workaround to this that we’ll touch on in a bit, generally use automation with intention for this reason.
How to approach setting levels in a mix
While the concept of setting levels is relatively simple, getting them right is really half the battle (if not more) when it comes to achieving a good mix.
Really think about what you want your song’s main focus to be as you tackle this step. For a pop record, maybe it’s the vocals; for a house track, it might be the kick drum. A piano might be a background element during the majority of a song, but maybe it needs to come to the forefront for a solo halfway into the track.
No matter what it may be, identify your priority, and then set the rest of the levels in relation to it.
Watch out for clipping
An important thing to keep in mind as you set levels is the master fader. In every DAW, you’ll find this one fader that displays the combined level of all of your tracks.
As a general rule, make sure that the level displayed on this fader never exceeds 0.0 dB, since that’s the upper limit for how high you can push your levels before the audio starts clipping, or distorting (essentially, you’ll get noises in your audio that are—outside of very niche artistic circumstances—unwanted).
Advanced techniques: Gain plugins
Faders and automation curves are truly all you need to set levels. That said, while we won’t be covering them in detail for this introductory guide, there are a few more advanced techniques that can be explored as you continue to learn how to mix music.
One is assigning a gain plugin (we’ll get to the concept of audio plugins a bit later) to a track, and automating it instead of your fader. This allows you to create curves, while still keeping the fader available at your fingertips for adjusting the overall level (including any automation).
Another technique is editing the clip gain of audio clips, which is another way to dynamically change levels without touching your fader, or even drawing curves for that matter.
Don’t worry too much about these techniques for now, as you’ll naturally come across them as you continue to learn how to mix music; just know that there are more neat tricks out there to be explored.
Step 2: Panning
Another key step of mixing is using panning to arrange the stereo image, or the balance of the perceived spatial locations of your sounds.
When you listen to your favorite song, you’ll probably notice that certain sounds are coming from the left or right side of your speakers / headphones, while others seem to be hitting you from both sides equally (or from what perceptually feels like ‘the middle’).
These are decisions that the mixing engineer made, often with one of two broad intentions: (1) to create a sense of spaciousness and clarity in the mix, or (2) to achieve some sort of creative effect (ex. maybe a drum fill moves from the left side of the mix to the right side to add excitement and simulate the drummer moving across the kit).
When you create new tracks in your own project, you might’ve noticed that they’re all placed in the center of the stereo image by default. Even if the levels are balanced, if every track is sitting in the center, things can start to feel two-dimensional and crowded; you might find that it’s hard to make out the lyrics, the synth solo might get drowned out by the piano, etc.
This is where panning comes in.
What is panning?
Panning is the technique we use to assign individual tracks to specific positions in our stereo image. We can pan tracks to the following locations:
- Hard left: 100% of the audio comes from the left speaker.
- Hard right: 100% of the audio comes from the right speaker.
- The center: The level is equally distributed to the left and right speakers.
- Anywhere in between: More level is on one side than the other, but some amount is reproduced on both.
Generally, you’ll probably keep a few things in the center, and the rest of the tracks will be somewhere between the center and the hard left or hard right.
How to use panning when mixing music
In order to set the panning of a sound in our mix, we use a tool called the pan knob. In most DAWs, you’ll find this near the fader.

Simply turn the knob in either direction, and as you do, you’ll hear the sound move across the stereo image (if you’re on your phone, you might need to use headphones for this one):
Tips for panning
Like most things, panning should be used creatively to help convey whatever you want to achieve with your music. That said, below are a few general guidelines to follow if you aren’t sure how to get started.
- Balance is king: In most cases, we want roughly the same amount of overall level coming from both sides of our mix, even if different instruments live on each side. Therefore, work with an overall sense of equilibrium in mind.
- Some elements tend to stay in the middle: Lead vocals, the kick, the snare, and the bass tend to be left in the center (or very close to it). This is because these are usually elements that ground us in a song, and it can feel odd to have them coming from just one side.
- Other elements are panned more often: On the other hand, guitars, synths, pianos, and keys are quite often panned. In fact, if you’re using piano software instruments, you’ll often find that they have a degree of auto-panning, with the higher notes sounding on the right and the lower notes sounding on the left. Meanwhile, a drum software instrument might have the kick and the snare in the center, and the hi-hats, cymbals, and toms pre-panned to simulate their location in a real kit.
- Hard panning makes a statement: Hard panning is definitely used, but is generally used sparingly. This is because it can sometimes be a little jarring if executed poorly.
Ultimately, the best way to get better at panning is to simply actively listen to a lot of music you enjoy, and take note of what you hear. As you learn how to mix, you might find that you either over-pan or under-pan at first. But, you’ll soon hit your stride—and before you know it, you’ll be making adjustments to the stereo image on the fly.
Advanced techniques: Widening, automation, and more
Like leveling, there are a few advanced techniques that can be explored, even if we don’t cover them in detail today. Some examples are widening (using psychoacoustic tricks to make your sounds feel ‘wider,’ even if they’re perceptually in the middle), automation (we can also employ our new friend for panning to create a sense of movement), and stereo tremolo (an audio effect that can be used to create musically-timed movements in panning).
With setting levels and panning covered, let’s dive into the third concept: using audio plugins.
Step 3: Adding effects
Last but not least, a key part of mixing music is using audio plugins to add effects that meet a wide array of different needs.
What are plugins in music?
In both music production and the world of software at large, plugins are devices that extend the functionality of a program. In our case, audio plugins are devices (that either come with the DAW or can be purchased from a third party) that serve one of these specific functions:
- Software instruments: Plugins that allow you to create music with virtual instruments (you might already be using these if you have synths or instrument emulations that are playing your MIDI melodies, drum grooves, or chord progressions for you).
- Effect plugins: Plugins that don’t perform the music, but instead apply some sort of processing on your tracks to alter their sound.
- Utility plugins: Plugins that don’t apply processing, but aid you in some other way by providing visual metering, control over gain, etc.
When mixing music, we’ll largely be relying on the latter two: effect and utility plugins. Today, we’ll specifically be focusing on four effect plugin types that are essentials for mixing: (1) EQ, (2) delay, (3) reverb, and (4) compression.
How to install plugins in your DAW
Before we dive into each, note that all DAWs are pretty much guaranteed to have some built-in version of these four effects—see below for how to install and load them up in the most popular workstations:
With that covered, let’s dive into each of the effects we mentioned above in more detail, starting with EQ.
EQ

EQ (a shorthand for equalization) is an incredibly useful tool in music production that allows us to control the balance between the many frequencies that make up the timbre, or sonic character, of a sound. It’s typically used it to make things sound brighter, bassier, clearer, etc.
Even if you’ve never used it in the music creation process, there’s a good chance you’ve played with some form of EQ before, whether it’s the bass and treble knobs on a stereo system or the equalizer settings on a streaming service or your phone’s music app.
What EQ looks like
Most DAWs come with a multi-band EQ plugin that looks something like this:
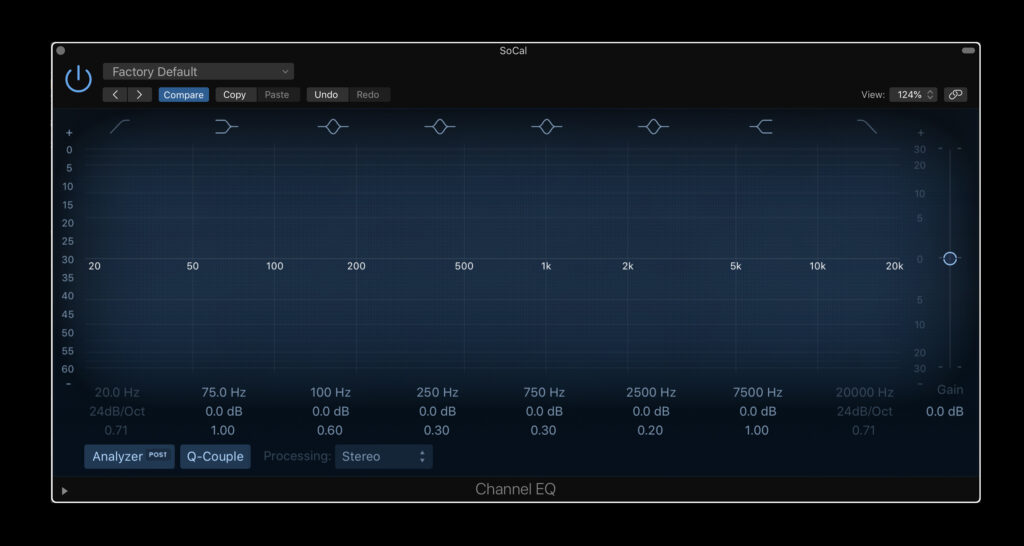
The x-axis represents frequency—we see that this EQ (and most EQs) covers the full range of human hearing, which is roughly 20 Hz – 20 kHz. The y-axis is decibels, which we covered when talking about levels.
Taking these two axes into consideration, what an EQ essentially provides us is volume faders across the full frequency spectrum. We can use it to draw in boosts and cuts to increase or decrease the level of certain frequency ranges.
How EQ sounds
A listen is worth a thousand words. Let’s hear how adjustments in EQ impact the sound of our drums from before in real time:
How to mix music using EQ
There are no hard rules for using EQ in your mixes, and the best way to get good at it is to experiment with it firsthand. That said, we’ve highlighted some particularly common use cases below:
- To correct something: EQ is often used to bring out the best of a performance and to attenuate the less desirable elements. If your vocal performance lacks definition, you can give the higher frequencies a boost to make it feel more clear and crisp. On the other hand, if it sounds too harsh or hissy, you can reduce these same frequencies for a more well-rounded sound.
- To create space for something else: In general, instruments will sound clearer in your mix if they’re not competing for attention with a million other elements that reside in the same frequency range. If you have a bass guitar and a kick drum, for example, you can use EQ to boost and cut different frequency ranges within the lower end so that each sound has its own sonic range where it can shine.
- To achieve a creative effect: EQ can also be used in more extreme ways for creative purposes; for example, cutting all frequencies below 2 kHz can make your audio sound like it’s playing out of a cheap radio, while if you cut everything above it, it can feel like you’re listening to something underwater. We can even use automation to change parameters over time to simulate something being gradually brightened or drowned out.
- To achieve balance: For the most part, mixes sound the best when they have some content across our full range of hearing. We often use EQ with this macro perspective in mind, making sure our overall track sounds full and engaging.
For more on EQ, check out our dedicated guide below:
Delay
Delay is an effect that takes a piece of audio, holds onto it, and then plays it back after a specified amount of time. The most familiar application of this effect is echo, a type of delay where the output is fed back into the input multiple times, with the volume decreasing after each iteration.
How delay sounds
Here’s what a vocal sample sounds like without any delay:
…And here’s what it sounds like after some delay is applied:
The parameters of delay
When you use a delay plugin, you might come across a number of parameters. Here’s what each one means:
- Delay time: This value determines how long it takes for a single delay to occur, typically expressed in either milliseconds (ms) or beat divisions (1/4, 1/8, 1/16, 1/32, etc) that sync with your project’s BPM.
- Feedback: This is the percentage of the signal that you’d like to put back into the input of your delay after each iteration—the more feedback, the greater the number of echoes, and the more gradually they’ll fade.
- Mix: The mix describes the balance between the dry (the original audio) and wet signals (the effected audio).
- Low cut / high cut: These parameters let you EQ low or high frequencies out of your delayed signal.
How to mix music using delay
When you’re first using a delay for mixing, you might want to keep the following things in mind:
- Watch the feedback: While we typically expect echoes to fade over time, if the feedback percentage is higher than 100%, the delays will actually get louder than the original audio. This can create an infinite loop where things just keep getting louder and louder (until you cut the audio off), so unless you’re looking for that effect, make sure you keep the percentage below 100%.
- Be selective: Try to resist the urge to add delay to everything, as if used excessively, it can reduce the clarity in your mix. A little bit of delay goes a long way.
- Get creative: Delays can be used to achieve really neat musical effects like call-and-responses, rhythmic patterns, and harmonies. Don’t be afraid to experiment and have fun with your delays!
Reverb
Reverb is one of the most popular effects in music, and it’s actually just a specific kind of delay. With reverb, the delays are so close together in time and so densely packed together that you can’t tell them apart from each other (unlike an echo), which creates the lush perceptual effect of a sound lingering just a bit longer in space.
We hear reverb in the real world every day. Most of our surroundings reflect sound, and at any given moment we’re bombarded by these sonic reflections. For example, if you stand in an empty hall and clap, you hear a mixture of direct sound (sound that travels straight to your ears) and reflected sound (sound that radiates, bounces off of walls and other objects, and travels back to your ears).
The mixture of these reflections is the reverb, and our brains interpret it to perceive the nature of the space we’re in. Thus, we mostly use reverb in our mixes to simulate spaces (although there are plenty of other creative uses for it).
How reverb sounds
Here’s the same sample from before, which also happens to have no reverb:
…And here’s what it sounds like with reverb:
The parameters of reverb
Although there are many types of reverbs out there, they tend to share a few common core parameters:
- Decay: Also known as the reverb time, RT60, or reverb tail, this parameter tells you how long it takes for a reverb to fade by a certain level (60 dB).
- Early reflections: Early reflections are the initial group of reflections that happen when sound waves hit an object. More pronounced early reflections will perceptually place your listener in a small room, while a lower early reflection level will place your listener further away.
- Pre-delay: The pre-delay is how long it takes for a sound to leave its source and create its first reflection. A reverb with a significant pre-delay will cause the listener to feel like they’re in a large space.
Note that a lot of reverb plugins also have low cut / high cut and mix parameters, which do the same thing they do in delays.
How to mix music using reverb
When you’re first using reverb as you learn how to mix, you might want to keep the following things in mind:
- Be selective: Like delays, excessive reverb can reduce the clarity in your mix. Something might sound amazing with tons of reverb on it in isolation, but always keep the full song in mind, since that’s what really matters at the end of the day.
- Don’t use too many different reverbs: As we mentioned earlier, reverbs help us simulate a virtual space. For this reason, things will (generally) sound more consistent if you stick to using no more than a few different reverbs in your mix.
- Auxiliary tracks: This is a more advanced technique that we won’t dive into today, but know that you can preserve CPU resources by sending a bunch of tracks to one “auxiliary” track that contains your reverb plugin. This is less important for beginners, but it’ll become a very valuable trick as your projects’ track counts increase.
For more on reverb, check out our dedicated guide below:
Compression

Compression makes a track more consistent in level. More specifically, it reduces the overall dynamic range (the difference between the loudest and softest elements) of a piece of audio by detecting when it goes above a specified level, and then bringing it down by a specified amount only when that threshold is exceeded.
How compression sounds
As always, taking a listen will help us better understand the written definition.
Here’s what a sample sounds like without any compression applied:
…And here’s what it sounds like after some compression:
What compression looks like
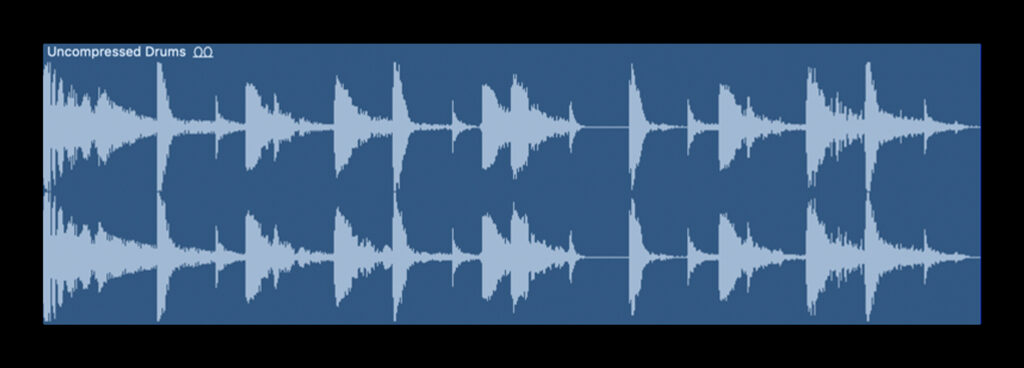
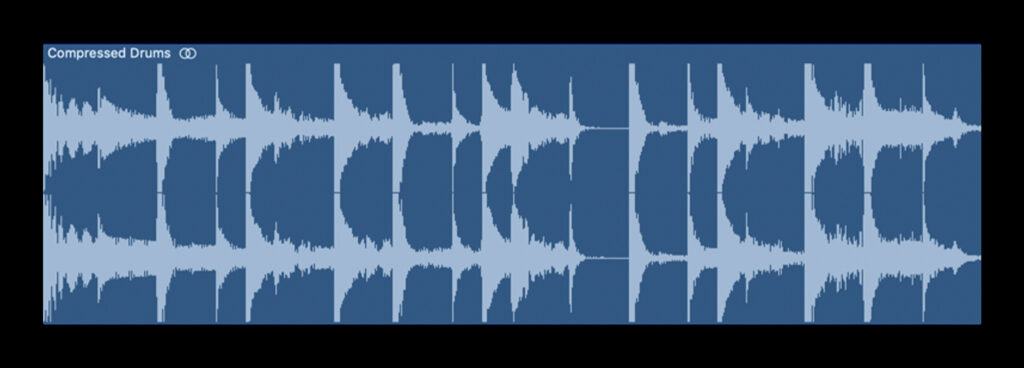
Compared to the other effects we explored, compression might feel a lot more subtle since differences in dynamic range can be harder to hear for beginners when compared to things like delay and reverb. However, if we listen carefully to the example above, we can hear that while there’s a significant difference in level between the hi-hats and the kick / snare in the uncompressed groove, all of the elements are much more even in the compressed version.
This is visually reinforced when we compare the two waveforms:
The parameters of compression
Though there are always exceptions, most compressors share a common set of parameters:
- Threshold: The threshold determines the level (in decibels) at which the compressor starts compressing.
- Ratio: The ratio determines how much the level is brought down, once the signal exceeds the threshold. As an example, if the threshold is set to -20 dB, the input signal hits -16 dB, and the ratio is set to 2:1, the output signal will be attenuated to -18 dB. Because the input surpassed the threshold by 4 dB, the 2:1 ratio cuts this value in half, resulting in the output. The lower the threshold and the higher the ratio, the more pronounced your compression will be.
- Attack: The attack, measured in milliseconds, determines how quickly the compressor pulls the input signal down to the full ratio value after it exceeds the threshold.
- Release: The opposite of the attack, the release represents the total time it takes for the signal to return to an uncompressed state.
- Make-up gain: Most compressors have a make-up gain knob that allows us to turn our sound back up in volume, since compression inherently reduces level.
How to mix music using compression
If compression feels significantly more complex than the other effects we explored, don’t worry—that’s because it is! If you don’t use it in your projects at first, that’s totally okay, but we cover it here because in reality, it’s one of the most commonly-used effects in music production.
Below are just some of the many reasons mixing engineers reach for compression:
- To ‘glue’ elements together: If a sound is sticking out from the rest of the mix, a bit of compression can often help make things feel more blended together with the whole.
- To make leveling easier: If setting a more even-sounding level is your goal, using compression to deal with unintentional fluctuations for you can save loads of time and headache in comparison to trying to manually draw in volume automation.
- To make things louder: This might seem a little counterintuitive, since compression makes things softer by definition. However, once we use the make-up gain to bring up the level, we’ll actually be able to reach levels that are overall louder than before; because we tamed the peaks in our waveform, we can push the overall audio to higher levels before running into distortion.
For more on compression, check out our dedicated guide below:
How to mix music: Conclusion
The truth is, learning how to mix music is a lifelong journey, and there’s always more to learn. For example, while we covered four effects that are used to some extent in almost every production, there are dozens of other effects that are also used all the time, though more situationally. That said, less is more (especially when you’re first learning how to mix), and this article should supply you with all of the key tools you need to get started.
As you make more music, you’ll probably start to find yourself doing some mixing as you write, tweaking some levels and adding an effect or two on the fly. Although some may advocate for this mix-as-you-go approach while others will opt to save the bulk of it for a dedicated session (or pass off their song to a professional mixing engineer), know that there’s no wrong way to approach mixing—don’t be afraid to iterate, experiment, and have fun!
Try industry-leading mixing plugins for free via Rent-to-Own:
May 28, 2025


