.svg)
.svg)


Illustration: Daniel Zender
De-essing is an incredibly important part of the vocal production process, and you’ll likely see a de-esser on nine out of ten vocal chains.
Although de-essers may seem like simple “set it and forget it” plugins on the surface, they’re often overused, underutilized, or simply misunderstood by many music producers. In this article, let’s go over the basics of de-essing and how you can use a de-esser to take your vocal productions to new heights.
Feel free to use the table of contents below to quickly navigate to a particular section.
What you’ll learn:
- What is de-essing?
- What is sibilance?
- Why are de-essers needed?
- De-esser parameters
- How to use de-essing plugins
- Where to put it in the effects chain
- Should you de-ess manually?
Feeling ready? Let’s dive in!
Voice to verse—anywhere. With the addition of Splice Mic, you can instantly test and record ideas, explore genres, and unlock new creative possibilities, all from the Splice mobile app.
What is de-essing?
De-essing is the process of reducing the volume of sibilance (s’s and t’s, or “esses”) in a vocal recording.
What does a de-esser do?
A de-esser is a frequency-dependent compressor that detects the high frequencies where sibilance occurs, and attenuates them once they become louder than a specified threshold.
Types of de-essers (wide-band vs. split-band)
There are two main types of de-essers: wide-band and split-band. Wide-band de-essers attenuate the entire signal when the threshold is exceeded. On the other hand, split-band de-essers only attenuate the specified frequency range where the sibilance lives.
While the threshold and reduction amount (more on these later) play the greatest role in shaping a de-esser’s sound, wide-band de-essers are effective for more pronounced results, whereas split-band de-essers generally sound more transparent.
What does de-essing sound like?
Here’s a vocal sample without a de-esser:
And here’s the same sample with a de-esser added:
What is sibilance?
Sibilance is a bright, high-frequency sound that’s caused by certain consonants like s’s, t’s, d’s, and z’s (also known as “esses”) while speaking, rapping, or singing. The frequency range of sibilance is different for every voice—language, dialect, and accent also play a part in how intense or subtle sibilances sound on a recording. Harsh sibilance can be the result of the type of microphone used on the recording, the EQ that boosts the brightness or high mids of a vocal, or just the natural sound of esses that a vocalist has.
Why do you need a de-esser?
A de-esser is best used on a vocal recording where sibilance is loud and prominent, as it makes the vocal less harsh and easier on the listener’s ears. Many professional recordings will feature a de-esser somewhere on the vocal chain.
Even though de-essers are very helpful, you might not always need to use one. Overly harsh sibilance doesn’t always occur on every vocal recording or with every vocalist. Using your ear is incredibly important in deciding whether or not you should use a de-esser. But, if the sibilance is bothering you, especially when mixing on headphones, try a de-esser!
De-esser parameters
De-essers have pretty straightforward and simple parameters, but it takes a lot of experimentation and a tuned ear to dial them in correctly and get the best result.
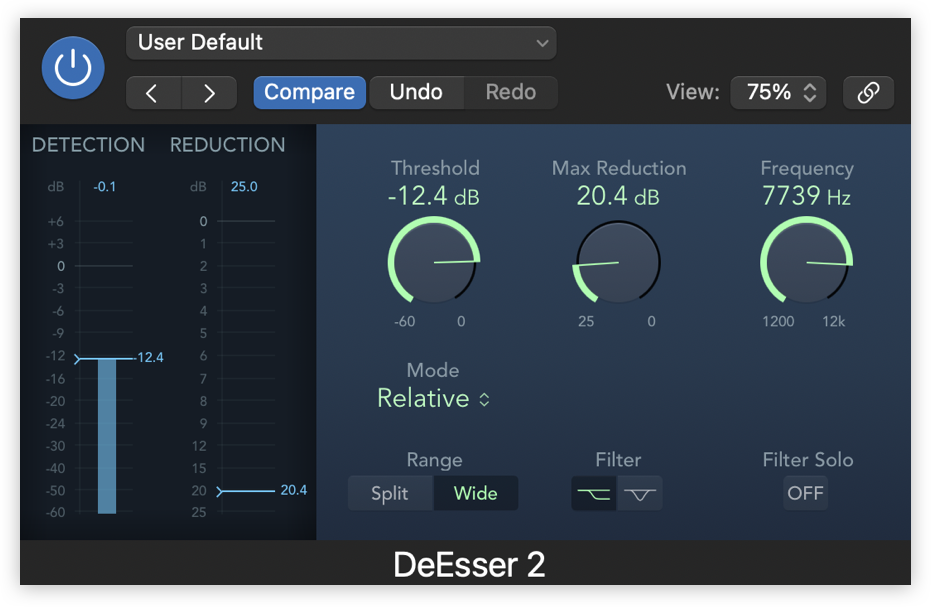
How to find the right frequency on a de-esser
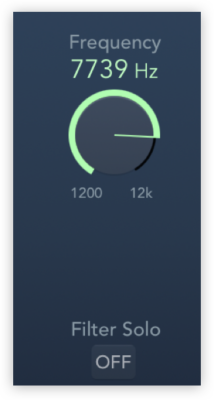
The frequency or frequency range parameter on a de-esser is used to identify exactly where the sibilance is that you want to reduce. Some de-essers have a target frequency and the plugin determines how wide the range is, while other de-essers allow you to set the range more precisely.
Although every voice is different, sibilance usually exists in the 2 – 12 kHz range, with the most offensive esses usually happenning around 5 – 8 kHz. Adjust the frequency parameter to pinpoint where the sibilance is occurring on the vocal you’re working with.
Some de-essers have a “listen” function that allows you to isolate or solo the target frequency and fine-tune it to exactly where you prominently hear sibilance. Adjust the frequency to where you hear the esses the loudest.
Here’s what it sounds like:
Plugins like iZotope’s Nectar can scan and automatically identify the precise range of sibilance for you to make this process even easier.

How to set the threshold on a de-esser

The threshold on a de-esser is similar to the threshold on a compressor: Any audio signal that’s louder than the threshold will be compressed or reduced in volume.
A lower threshold on a de-esser will make the plugin more sensitive and reduce more esses. Too low of a threshold could potentially reduce sibilance that isn’t actually a problem for the listener—it can even reduce other sounds in the voice that aren’t very sibilant. Meanwhile, too high of a threshold might not take care of sibilance at all.
Be intentional and use your ear when setting your threshold. Set it to a place where you can see or hear esses being reduced, but nothing more. Your goal is to have some reduction, but not so much that it changes the timbre, diction, or performance of the vocalist. Always take breaks between listens, and if you start to hear the de-esser working too much, bring the threshold up.
How much gain reduction should a de-esser have?
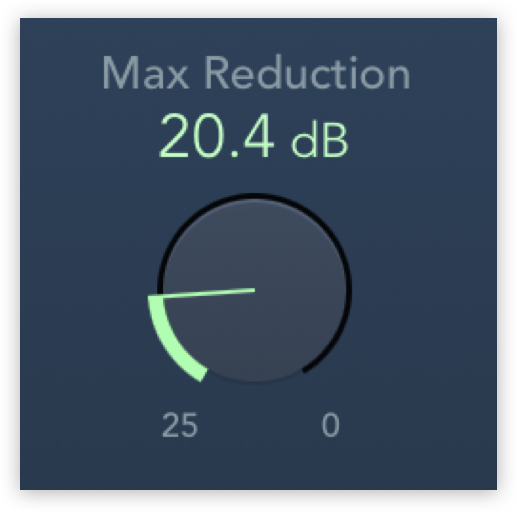
The gain reduction is how much an ess is reduced when it peaks over the threshold. Some de-essers have predetermined gain reduction, while others allow you to set the maximum amount of reduction.
When a de-esser has a maximum reduction or range parameter, it means you can choose the maximum amount any ess is reduced. So, if an ess is getting 10 dB of gain reduction naturally but you set your max reduction to 4 dB, the reduction amount will never exceed 4 dB.
Don’t go too low on the threshold or reduce too much of the sibilant frequencies. Doing so could make your vocal sound dark, or give the vocal an artificial lisp like Daffy Duck or Sylvester the Cat! 3 – 4 dB of gain reduction on a de-esser is pretty normal, and can be up to 10 dB for very loud esses.
Again, use your ears. The de-esser should soften the sharpness of the sibilance, but not be too obvious.
How to use a de-esser plugin
Using a plugin is the easiest way to de-ess. Loop a section of the vocal where the esses are most prominent. Use the “listen” function or your ear to set the target frequency where the esses are occurring.
Then, set the threshold to determine how sensitive the de-esser is and at what level you want to start reducing the esses. Adjust the max reduction if you feel like the esses are being reduced too much. Listen back both in solo and in the context of the mix, and adjust accordingly.
Where to put a de-esser in the effects chain
Where your de-esser lands on a vocal chain is often debated and ultimately up to the individual. However, it’s generally recommended to put the de-esser before a compressor and after an EQ. Since de-essers use dynamic changes to identify what needs to be reduced, a compressed vocal could make it harder for the de-esser to work because the peaks of the esses have already been smoothed slightly.
If you’re adding any brightness on an EQ, you also want the de-esser to take that into account when reducing sibilance. Adding an EQ after a de-esser with a boost in the high mids could undo all your de-essing work!
If you find that the de-esser is getting most of your esses but not all, don’t be afraid to automate. It’s rare that one de-esser will take care of all of the sibilances in a vocal performance, and automation is commonly used to make sure every harsh ess is taken care of.
Should you de-ess manually?
Because of how unpredictable sibilance can be, some producers and engineers prefer to manually reduce esses in a recording. This is possible by identifying the harsh sibilance in the waveform itself in your DAW, cutting the audio and separating the ess, and reducing the volume with clip gain or a similar process. This process is more time consuming, but can allow for a more customized and thorough result.
Do you prefer to use de-esser plugins, or reduce sibilance manually? Where does your de-esser come in on your channel strip? Start a conversation with us and an ever-growing community of music creators via the Splice Discord.
Use Nectar’s industry-leading de-esser alongside other specialized tools for vocal mixing:
April 23, 2026


