.svg)
.svg)


Illustration: Franco Égalité
Want to know the secret to recording flawless vocals?
Spoiler alert: It’s vocal comping.
Most vocalists don’t record songs in one take. That’s not to say that they can’t—countless singers put on seriously impressive live performances all the time. But when it comes to recording music, for many, impressive simply isn’t enough—the vocals have to be absolutely perfect.
That means perfect pitch, timing, delivery, emotion, and energy at every millisecond for the entire duration of a song. That’s quite a tall order, even for the most skilled singers.
Instead of putting unnecessary pressure on vocalists and spending endless hours in the studio trying to get one impeccable take, recording engineers make use of a process known as vocal comping. In this article, we explore what vocal comping is, break down how it works, and share tips for how to comp vocals effectively.
What you’ll learn
Let’s get started!
What is vocal comping?
Vocal comping (short for ‘compiling’) is the process of recording a few takes of the song and splicing together only the best parts. The end result features the singer’s best work, while still sounding like it was done in one take.
Is vocal comping cheating?
If comping vocals feels like cheating, it’s not. Vocal comping is utterly ubiquitous in today’s music industry—from bedroom producers to major label engineers, it’s used by absolutely everyone. In fact, without comping, you would have a very difficult time achieving the same production quality you hear on streaming platforms and the radio.
Now, there are ways to do vocal comping well and ways to do it poorly (i.e. make it obvious that you spliced together two takes). That’s why we’re sharing tips and tricks for how to comp vocals that you can use in your own productions to achieve professional and natural-sounding results.
Voice to verse—anywhere. With the addition of Splice Mic, you can instantly test and record ideas, explore genres, and unlock new creative possibilities, all from the Splice mobile app.
How to comp vocals
The process for comping vocals can be divided into four steps—(1) recording, (2) selection, (3) cleanup, and (4) final check—since there are things you can do at each of these stages to improve your final results. Feel free to use the table of contents below to jump to a specific section.
The 4 steps for vocal comping:
Now, without further ado, let’s take a look at how to record vocals that will allow for flawless comping!
Step 1: Recording
Great vocal comping starts in the recording booth—here are some things to keep in mind.
Record in sections
Instead of having the singer sing the entire song for each take, record a few takes of the first verse, then move on to the first chorus, and so on.
This isn’t a hard-and-fast rule, and you should ultimately follow the singer’s preference. But, generally speaking, recording in sections like this creates better-sounding and more consistent takes. There are a couple of reasons for this:
- The more time the singer spends in the booth, the more tired their voice will get. If you have them sing the whole song for each take, the first verse of take one will probably sound very different from the first verse of take eight. When you try to splice the two together, there may be a noticeable difference in the singer’s tone, emotion, or energy level. On the other hand, if you have them sing take after take of the same short section, they’re more likely to maintain consistency across all takes.
- Some sections may require more takes than others. For example, a difficult bridge might need eight takes, while the first verse might only need three. Asking the singer to sing the first verse eight times when you really don’t need it will simply tire them out. It’s better to stop when you have what you need and preserve their energy and voice for more difficult sections.
Pro tip: When recording each section separately, have the singer start singing from the last line of the previous section. This gives them a little time to adjust and get in the zone, and helps create more natural transitions between sections.
Use a vocal comp sheet
You can record as many takes as you need, and then listen through all of them and choose the best bits to compile together. However, this approach requires a lot of time. Not to mention, you’ll likely get ear fatigue and stop recognizing subtle differences between takes.
A much better way to comp vocals is to note down your preferences during the recording process. For this, you’ll need a vocal comp sheet.
Simply print off or write out the lyrics of the song and leave space to note down your favorite takes. Alternatively, you can create a chart with a cell for each take and rate the singer’s performance as they sing.
The rating system you use is up to you—most people like to use a scale from one to ten or something like:
- U: unusable
- M: maybe
- G: good
- V: very good
- D: definitely this one
Here’s a comp sheet template you can use. Simply type in the lyrics of your song (one line per row) and print the sheet to use during your recording session. You can even use it digitally on your computer.

Doing this will save you hours. When you’re finished recording, simply refer to your vocal comp sheet and start with your highest-rated takes. You can still listen through a few takes for certain phrases, but it’s definitely better than having to listen to every take of every phrase.
Coach the singer
A common mistake that recording engineers and producers often make is asking the singer to simply “sing it again.” If you already have a few takes, one more take sung in exactly the same way won’t add anything to the song.
Instead, give the singer a few suggestions on how they can make the next take a little better—maybe they can emphasize the consonants, pay attention to timing, or enunciate more. If you’re not sure what notes you can give, simply invite the singer to experiment and try something new (for example, using head voice instead of chest voice on certain phrases).
Getting the singer to find their best voice will serve the song well and make your job of putting together a great vocal track that much easier.
Don’t record too many takes
It can be tempting to record as many takes as possible. After all, the more options you have, the better, right?
Not necessarily. Remember that singers and their voices get fatigued after a while, so take eight and nine will probably sound worse than take three and four. Not to mention, asking the singer to repeat the same section again and again might make them feel like they’re not doing a very good job, affecting their self-confidence and, ultimately, how well they perform.
You can use the first few takes to get the singer warmed up and in the zone, but following that, try to limit the number of takes you record to somewhere around four to six.
Step 2: Selection
Once you’ve completed the recording process, it’s time to select the best takes and compile them together into one track. If you took good notes during the recording session, this part should be fairly easy, but here are a few helpful tips:
Listen with the full mix
When listening through different takes and making your selections, be sure to listen to them in the context of the full mix. This will ensure that you’re choosing takes that match the rest of the song in terms of timing and energy.
Prioritize performance
When making your choices, consider the singer’s tone, emotion, energy, and your overall impression (i.e. gut reaction).
Prioritize the singer’s performance over the technical aspects of the recording—things like slight deviations in pitch, timing that’s a bit off, or small artifacts (clicks and pops) can easily be fixed later with an audio repair plugin, but you can’t edit a mediocre performance into a great one.
Sometimes, things like a small voice crack or a word that’s whispered instead of sung can bring a lot of emotion to the song, so don’t be quick to discard these takes because they’re not ‘perfect.’ As a general rule, think about keeping takes that add something special to the song, rather than eliminating ones that are different and seeing what’s left.
Look for longer sections when vocal comping
Longer sections tend to sound more natural, so try to avoid comping takes word by word. Instead, start with takes that have a complete phrase or line you can use, and then fine tune them as necessary. For example, you might need to switch out a single word within that phrase, or replace a second-long section because of a click or pop.
Borrow from other parts of the song
You might come across a section where none of the takes you recorded are usable. Before you try to get the singer back into the studio to re-record, see if there’s an identical section you can steal from somewhere else in the song. For example, if you need a phrase for the second chorus, see if you can grab it from one of the takes you have for the first one.
Just make sure the two sections match in energy, and the borrowed phrase won’t feel out of place. Also, be sure to use a different take than the one you ultimately chose in the other section (unless you don’t mind having identical vocals in two parts of the song).
Step 3: Cleanup
Once you know which takes you want to splice together, it’s time to create seamless transitions. Here’s how:
Look for silence or consonant sounds
The best place for vocal comping is, of course, where the vocalist isn’t singing. First and foremost, look for empty spaces between phrases or even individual words.
If this isn’t possible, the other option is to create transitions over consonant sounds that create enough noise to mask the comp. These are sounds like S, Sh, F, V, Th, P, and so on.
Avoid creating transitions on open vowels—the vibrations in the singer’s voice will often sound too different and the comp will almost always be noticeable.
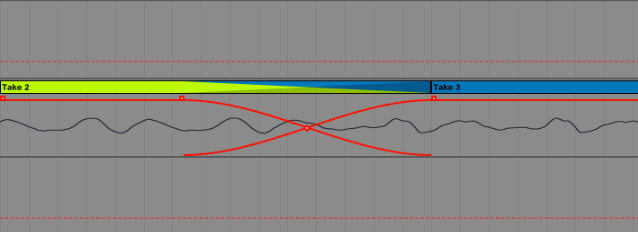
Adjust the timing
In order to create the cleanest transition possible, you might need to align the two takes before splicing them together, so that they happen at the exact same time.
Simply eyeballing like in the example below will probably be enough.

If you still hear a click where the two takes meet each other, you can try going down to the waveform level and making sure everything is lined up there. If the waveform jumps suddenly, you’ll hear an artifact, so make a slight adjustment to the timing of one of the clips until the two waveforms meet in the same place.
Here’s a before and after. The first example produces an audible click. In the second example, the second clip was cropped and moved slightly to the left to create a seamless transition.

Use crossfades when needed
Sometimes, no matter how hard you try to find a good transition or how much you adjust the timing, you can still hear where the comp happens.
As a last resort, you can add a crossfade to the transition. This will use volume automation to gradually fade out the end of the first clip while simultaneously fading in the beginning of the second one.
Most DAWs automatically add a small crossfade to all transitions, but if you need to, you can play around with its length and intensity until you reach the desired effect.
Just don’t rely on the crossfade too much, as it can sound a bit unnatural when overdone.
Pay attention to breaths
One area you can’t overlook when vocal comping is the singer’s breath.
You can absolutely place a transition right before, right after, or even in the middle of a breath. Just make sure the two breaths from the two takes are aligned and have a similar length, so you don’t end up with a double breath or one that sounds unnaturally long or short.
While we’re on the topic of breaths, most recording engineers edit them slightly to make sure they’re not too distracting. This can mean lowering their volume, removing them at the start of a new line, or removing them altogether from harmonies or a fast-paced chorus.
Some songs don’t have a single breath in them. This is a stylistic choice that may or may not work with your genre of music, but it’s a neat trick to try out if it serves the song well.
Step 4: Final check
Once you’ve gone through the entire song and compiled your vocal takes, it’s time to do a quality check and make sure everything is in perfect shape.
Solo your comped vocals
Earlier, we recommended that you do your vocal comping in the context of the full mix, and that makes sense when you’re choosing which takes to compile. However, when it comes time to do a final check, it’s important to solo the vocal track and make sure you can clearly hear any transitions that still need fixing.
Some transitions that stand out when the vocal track is soloed will be masked by other instruments in the mix. That said, if you ever plan to share the acapella track with others for remixing or sync licensing, the track should be as clean as possible.
Listen to the full mix (with your eyes closed)
As a final check, listen to the full mix, but close your eyes or take them away from the screen, so that you’re not looking at and anticipating the transitions.
If nothing stands out or feels off, then your work is complete!
Adjust as necessary
Vocal comping can be a lengthy process and often requires a bit of back and forth.
Last but not least, if you find any transitions that still sound off, go back and use any of the tips in the previous section. If none of them work, don’t hesitate to go back to the selection stage and audition a few more takes.
Vocal comping takes patience and practice
Vocal comping can take up to a few hours, so have patience, take breaks, and don’t rush through the process.
As you complete more and more projects, you’ll find your preferred workflow and things will start to go a lot faster. For example, some people like to go through the entire song and choose the takes they’ll be using before moving on to the cleanup stage. Others like to clean up immediately after selecting a take—this way, they can choose something else if none of the cleanup techniques work on the take they originally had in mind.
As with anything, practice as much as you can and you’ll be a vocal comping pro in no time!
Need to clean up some pops or noise in your takes? Try iZotope’s RX for industry-leading tools for the most common vocal recording problems:
July 25, 2025