.svg)
.svg)


Illustration: Jordan Moss
Have you ever wanted to learn how to make beats?
If so, there’s no better time to get started than now. The recent proliferation of free and low-cost DAWs, sounds, and educational resources has drastically lowered the barriers to entry for music production, making creating original and high-quality beats both more affordable and approachable than ever before. In this in-depth guide, we’ll walk through exactly how to make beats for a song, covering everything from the tools you’ll need to the creative process of sequencing your own rhythms.
What you’ll learn:
- The tools you need to start making beats
- How to set up your DAW for making beats
- The 6 steps for making beats with MIDI
- How to turn your beat into a full song
- Alternate methods for making a beat
Let’s dive in!
The tools you need to start learning how to make beats
Excited to embark on your beat making journey? Let’s take our very first steps by going over the key tools you’ll need.
1. A DAW (Digital Audio Workstation)
These days, there are a wide array of approaches you can take to start creating beats for a song. Mobile apps are more powerful than ever, and there are even some sites that let you make get started with beat making with nothing but an internet connection.
That said, the most common (and often most robust) method for making music digitally continues to be via the use of a digital audio workstation, or DAW for short. The DAW is the central software where you’ll be sequencing and arranging all of your sounds. You can think of it as your creative canvas (and soon-to-be best friend).
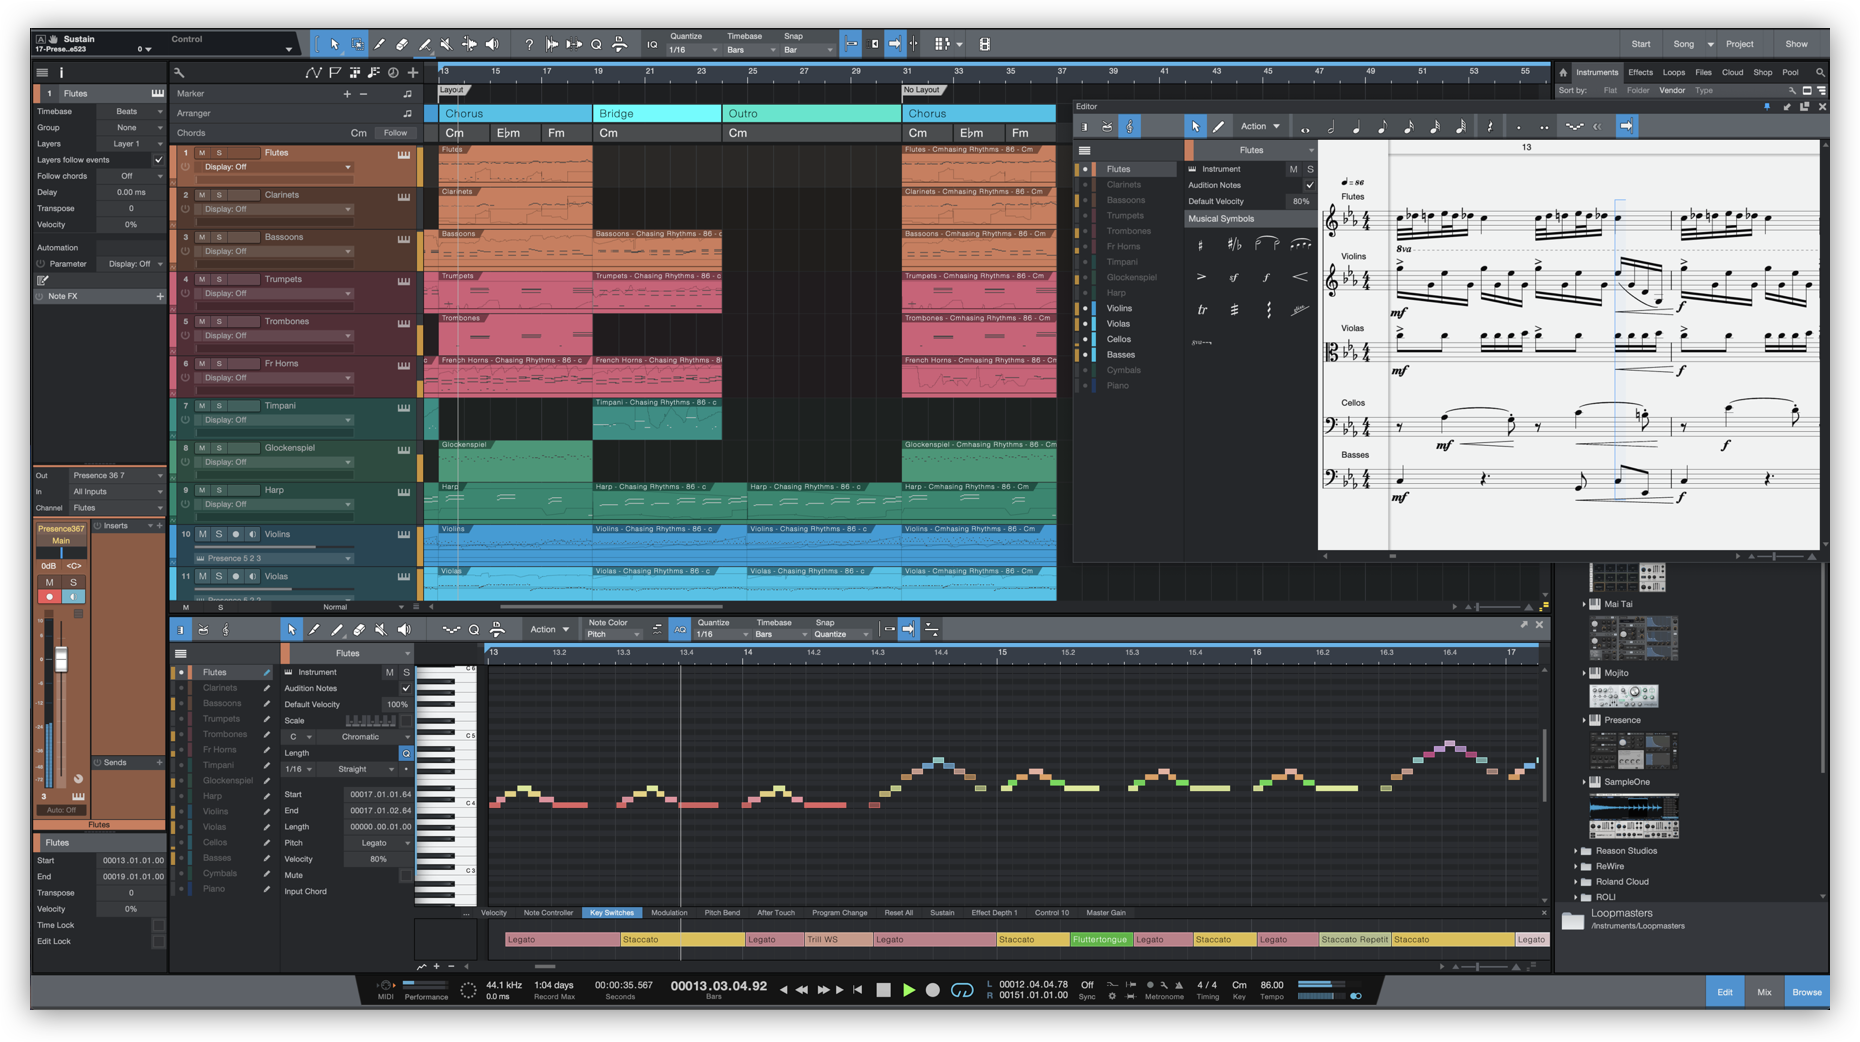
What a DAW typically looks like—this one is Studio One (now Fender Studio Pro).
How to choose a DAW that works for you
There are a ton of DAWs out there, and each of them offers you the potential to make incredible music. So, there’s really no wrong answer when it comes to which one you pick. Some key considerations that might ultimately become your deciding factors include price, compatibility, and visual preference. We’ll list a few particularly popular options with high-level notes below:
- GarageBand ($0): a completely free DAW from Apple that boasts both desktop and mobile applications (Mac / iOS only)
- Logic Pro X ($200): Apple’s time-tested DAW that’s in many ways a more powerful GarageBand (Mac only)
- Ableton Live ($0 – $749): a DAW that places an emphasis on live performance in addition to music production (Mac / Windows)
- Fender Studio Pro (formerly Studio One) ($199 or $19.99/mo): a beloved DAW that offers both the essentials as well as forward-thinking features like Chord Track and Impact XT (Mac / Windows)
- Bitwig Studio ($99 – $399): a DAW that supports unique modular and non-linear workflows in addition to standard creative approaches
- FL Studio ($99 – $499): a DAW that emphasizes sequencer workflows and lifetime free updates (Mac / Windows)
- Soundtrap (free – $17.99/mo): Soundtrap offers real-time collaboration, an array of virtual instruments, and more—they’re a freemium service, so while paid tiers will provide access to more tools and sounds, you can make music using the platform for absolutely free
Some of the DAWs have ranges in price because they offer lite versions that provide a restricted feature set. That said, they all have free trial periods, so it could be worth playing around with a few to figure out which one feels like the best fit for you. Cubase and Bitwig Studio in particular are available on Rent-to-Own, which means that you can pay smaller monthly installments even after your trial period ends instead of purchasing them outright.
DAW-specific considerations for making beats
In latter sections of this article, we’ll be diving into incredibly versatile approaches to beat making that apply to all DAWs and workflows. That said, if creating beats is what you truly want to focus on, it’s also worth taking note of some DAW-specific features that are specifically designed for this process.
For example, both GarageBand and Logic Pro X offer a Drummer Track feature, which lets you add ‘virtual drummers’ to your projects who each specialize in different genres. These drummers will start playing along with your song automatically, and you can customize their grooves by using an XY pad to determine the overall feel, while clicking on kit parts to determine how much of a particular sound (the kick, snare, claps, etc.) is present.
The Drummer Track in action in Logic Pro X
This feature may not be as useful for veterans who have a specific vision for a beat in their head and know exactly how to put it together from scratch. However, it’s amazing for beginners who want to be provided with starting points that then leave room for customization. Logic Pro X in particular also has a dedicated Drum Machine Designer for those who want to dive deeper into sound design and selection.
Meanwhile, Fender Studio Pro also has some unique and cutting-edge beat making tools in its Pattern Editor and Impact XT. The former captures step sequencing (we’ll dive into what this looks like later) within a clean and flexible UI. Meanwhile, Impact XT is a grid-based drum module that allows you to drag, drop, and edit sounds from both within Fender Studio Pro and from outside sources really easily.
If these pique your interest, you can get a taste of them in our overview video below:
But let’s not get too ahead of ourselves—the bottom line is that there are both DAW-agnostic and DAW-specific methods for making beats. We’re going to focus on the former for the rest of this article, because it’s knowledge that you can take and apply with any toolset for the rest of your music making journey. But, DAW-specific features like the ones above are also worth taking a look at when you’re browsing for a workstation.
For more on choosing a DAW, check out our in-depth guide below:
Now that we have an idea of what a DAW is and some of the popular options out there, let’s explore another crucial tool for beat production: our sounds.
2. Sounds
The sounds—comprised of instruments and audio samples—are the audio elements that’ll make up your beat. If the DAW is your canvas, you can think of your sounds as your paints.
An example of a one-shot, or a type of audio sample that’s just a single strike. Arranging multiple instances of these in a rhythmic fashion will allow us to create our own beats.
Each popular DAW will likely come with its own suite of audio samples and software instruments that you can use to make beats for a song. The sounds you heard in the Drummer Track demo above are a perfect example of this, as they’re available to you as soon as you download GarageBand or Logic Pro X. That said, if you’re looking to go beyond what your DAW offers, you can also make use of a royalty-free sounds catalog like Splice Sounds.
3. Plugins
Last but not least are plugins. These are smaller pieces of software that are used within your DAW to meet a wide array of musical needs. Maybe they provide a special instrument for you to use, or maybe they add an effect like a reverb. Your DAW will also come with a suite of built-in plugins. But, similar to sounds, there are also a ton of free and paid third-party plugins that you can explore.
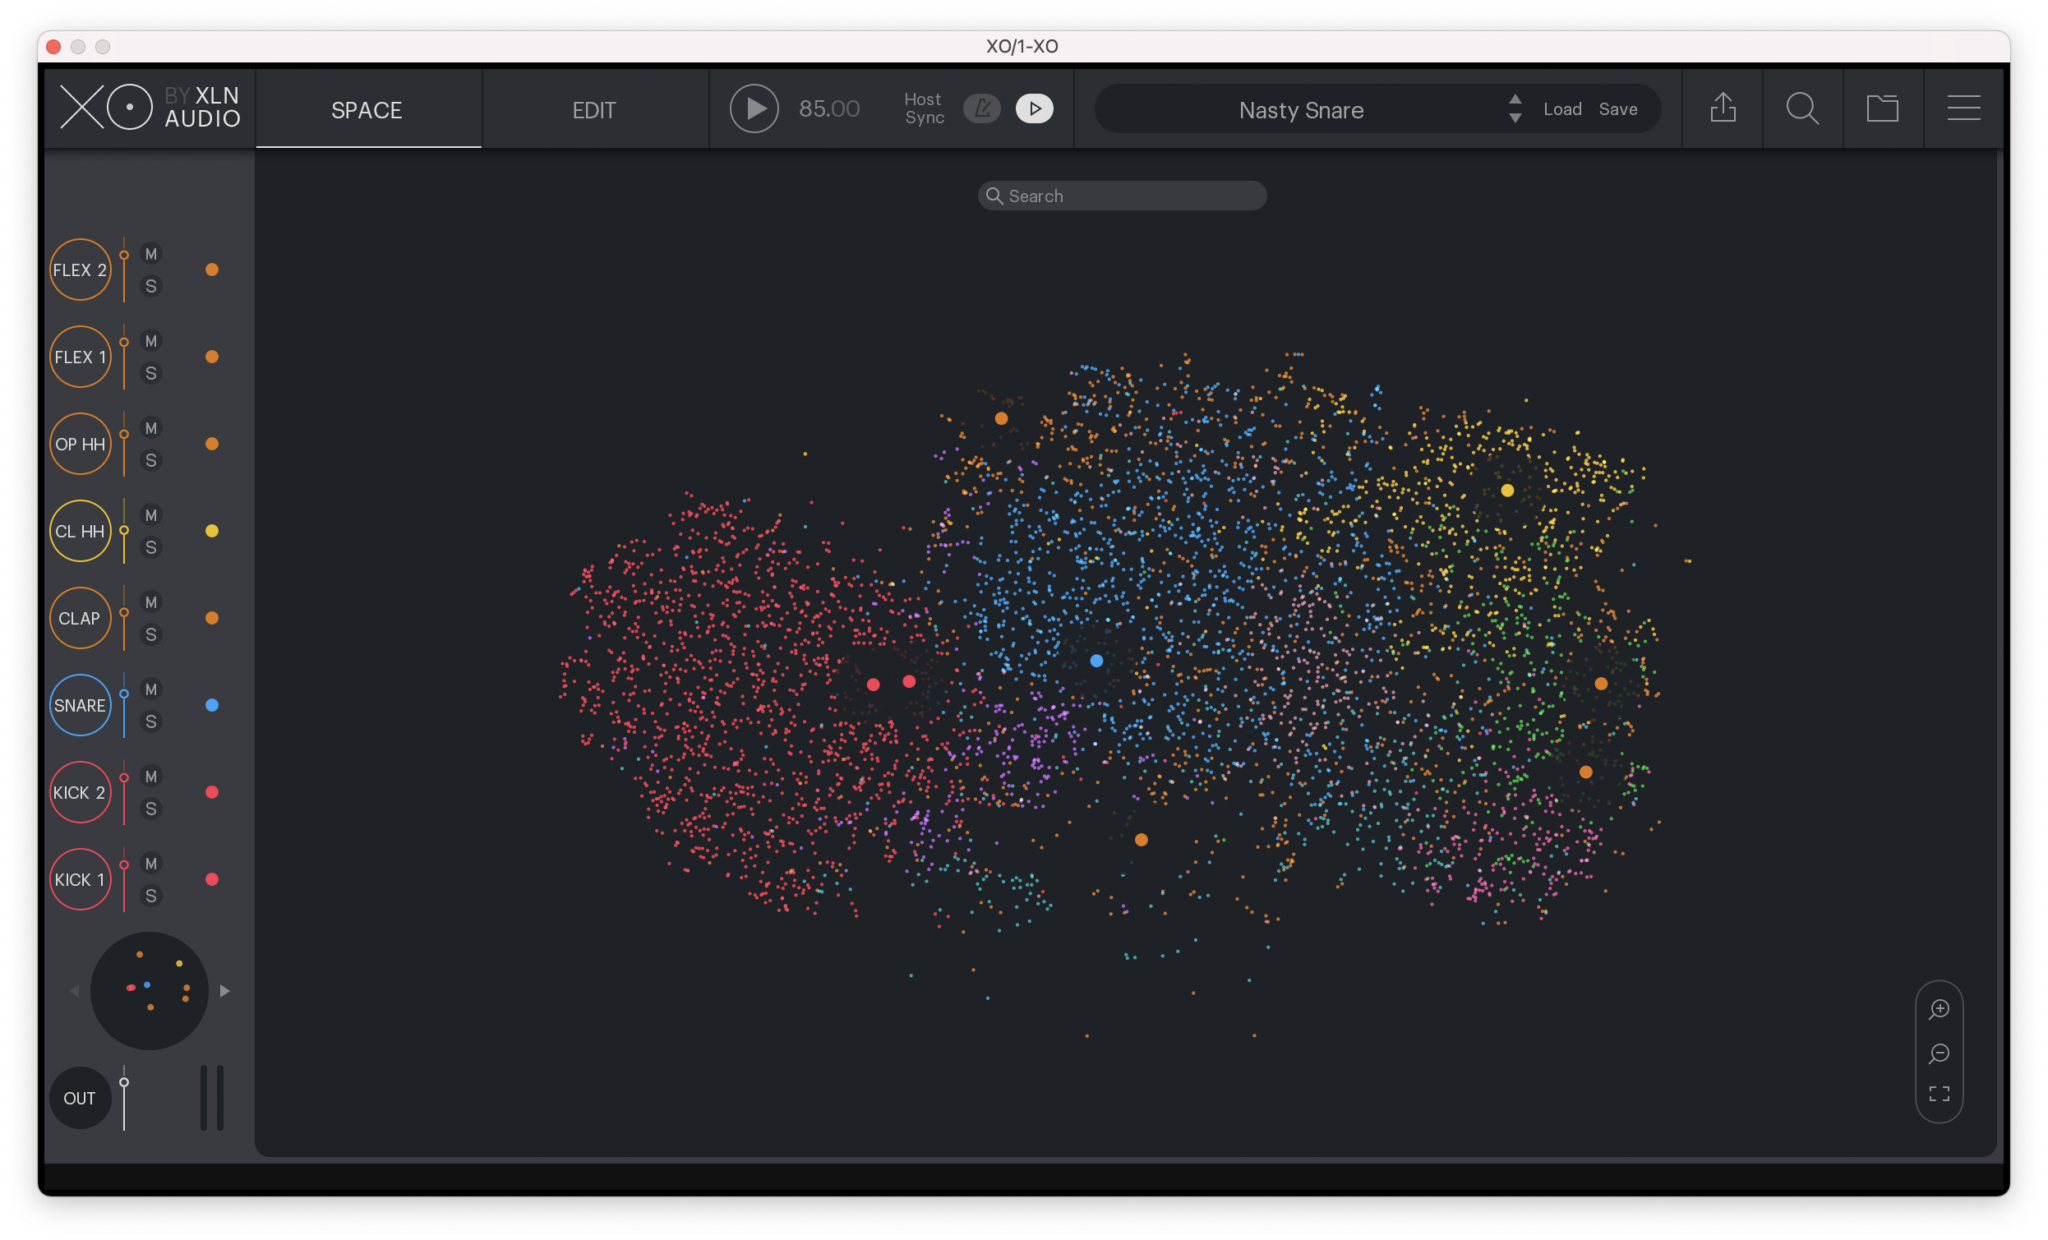
We might use a plugin like XLN Audio’s XO to discover new drum one-shots for our beats.
While there are always supplemental tools and knick-knacks, a DAW, some sounds, and plugins are all you truly need to get started with making beats (and as we mentioned, a handful of the latter two will be available right within your workstation of choice). As we dive into the actual beat production process, you’ll see exactly how each of these come into play.
How to set up your DAW for making beats
Now that we have a basic understanding of our tools, let’s dive into how you can use them to make your own beats. One of the many cool aspects of music production is that there are countless paths that you can take to achieve one creative outcome (like making beats). That said, they all start with the same step: opening your DAW and creating a new project.
From there, you’ll want to add a new software instrument plugin, choosing an option that already contains all of the built-in sounds we need. This will look a little different depending on which DAW you chose. Take a look below if you need help:
- GarageBand: Go to Track → New Track → Software Instrument, and then hit Drum Kit or Electronic Drum Kit in the Library view depending on if you’re looking for a more organic or synthesized sound. From there, pick any kit that sounds cool to you.
- Logic Pro X: Go to Track → New Software Instrument Track, and then hit Drum Kit or Electronic Drum Kit in the Library view depending on if you’re looking for a more organic or synthesized sound. From there, pick any kit that sounds cool to you.
- Ableton Live: Go to the browser on the left-hand side of the screen, and hit Instruments (under Categories). From there, drag Drum Rack onto the empty area on the right to load the instrument (or “device”) on the bottom of the UI. Lastly, load a preset instrument by clicking the Hot Swap button on the top right of the drum rack. From there, choose from any of the presets that sound cool to you under the Drums category.
- Fender Studio Pro: Hit the plus icon on the top left of the screen, and then name the track anything you’d like (ex. “Drums”). From there, select Instrument for Type, 1 for Count, and New Instrument and Presence for Output. Now, go to Browse → Instruments → Drum Kits, and drag any kit you like onto the track.
- Bitwig Studio: Hit the plus icon on the left, and then go to Presets → Bitwig → Drum Machine. From there, choose any preset that sounds cool to you.
- FL Studio: Open up a Channel Rack (hit F6 if you don’t see it when you open the DAW), which will automatically load up some drums. You can make patterns by clicking notes into the grid on the right side of the rack (this is unique to FL Studio), or click on the empty Playlist area next to Track 1 at any time to add those notes as MIDI (we’ll dive into what this means below). You can change your sounds or add new ones by going to the Browser and going to Packs → Drums (ModeAudio), and then dragging any sounds you like onto the Channel Rack.
How to make beats in 6 steps
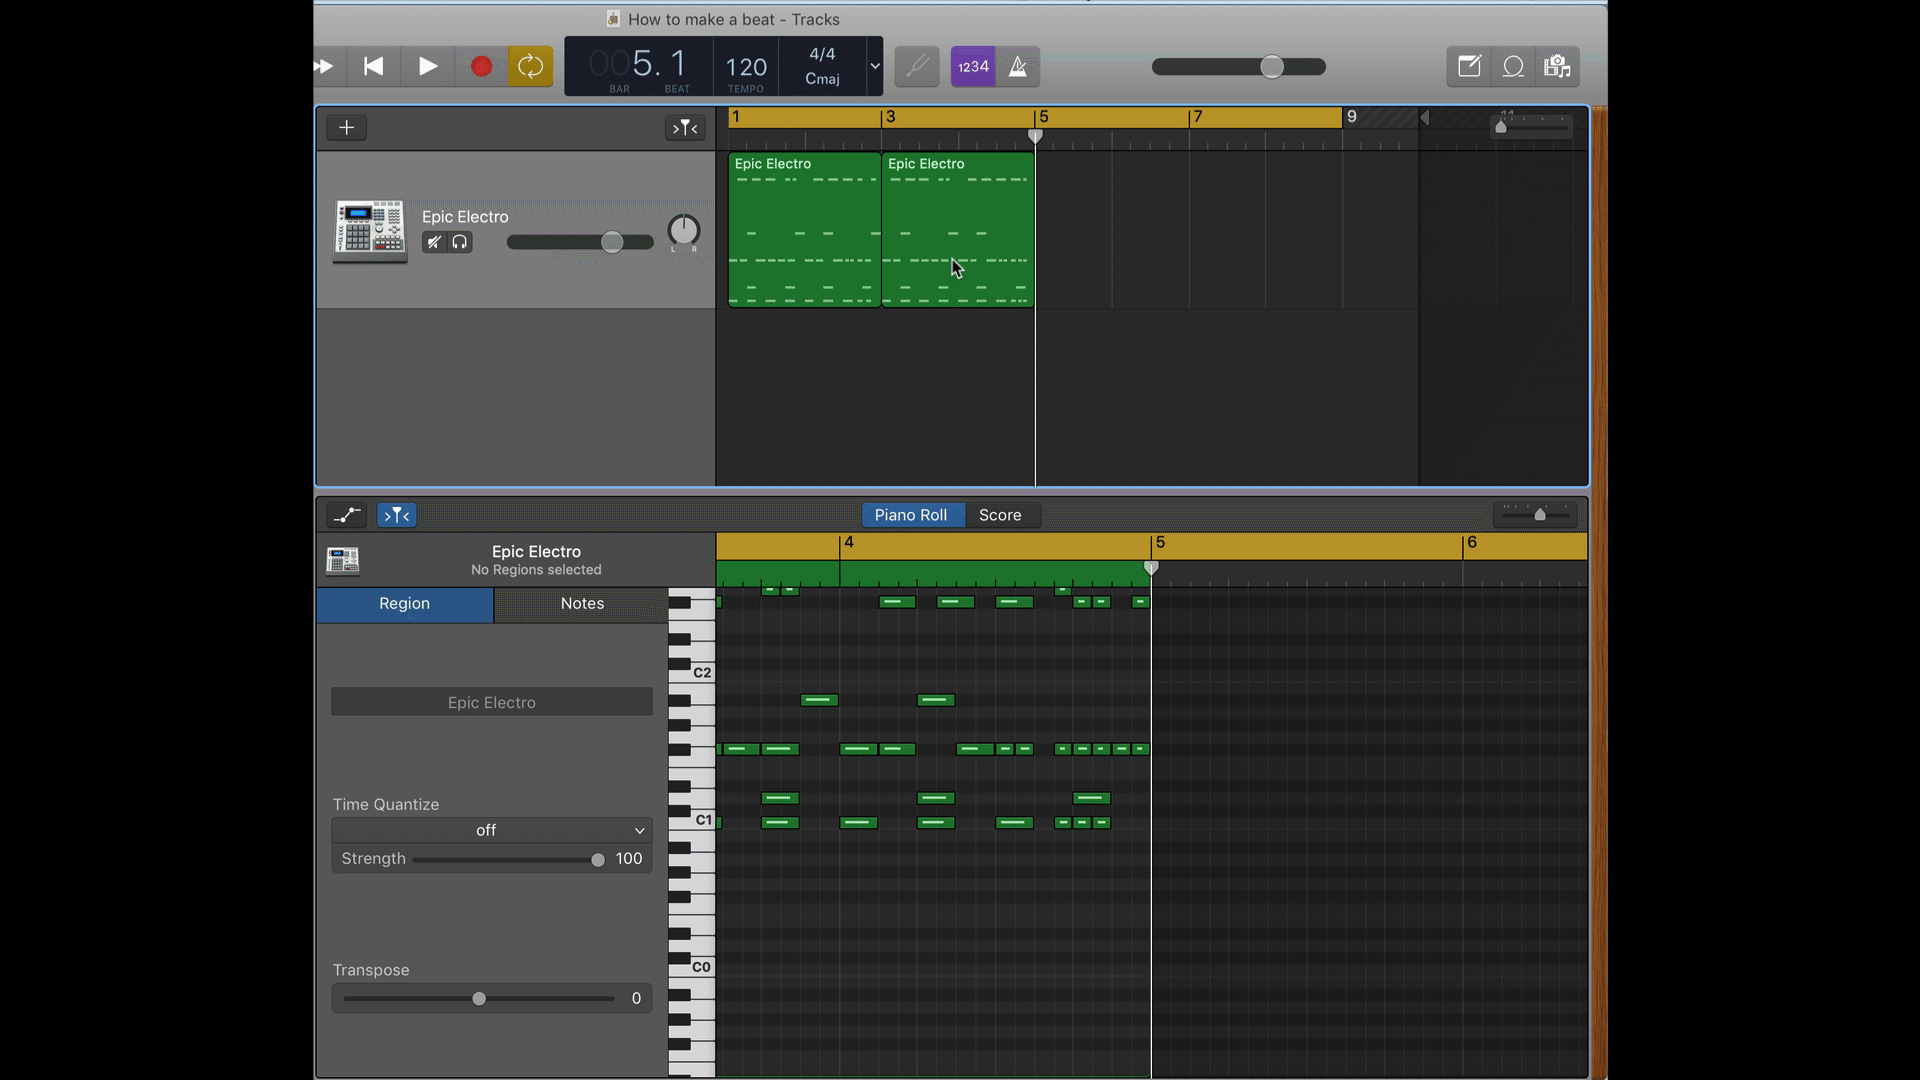
Once you’ve loaded a software instrument in the DAW of your choice, open up the MIDI track in your DAW. This may be also referred to as the piano roll or MIDI editor if you’re having trouble finding it. This should look like a grid, labeled with numbers that represent your musical measures.

The MIDI track / piano roll in GarageBand
MIDI (Musical Instrument Digital Interface) is a digital protocol that allows us to relay instructions to our software instrument. In this tutorial, we’ll be using MIDI notes to arrange our beat’s various ingredients, starting with the kick.
1. Create a kick pattern
Now, let’s start adding some sounds in, starting with a kick. Use your DAW’s pencil tool to add new notes. The kick will most likely be mapped to C1 by default. If it’s not, you can drag the note up and down on your grid until you find it:
In GarageBand and many other DAWs, you can hold the command key while using your cursor to easily toggle to and from the pencil tool.
Now, let’s add more kick drums to evolve what we have from one singular sound into a real rhythm. We’re going to create a four-on-the-floor pattern for demonstration purposes, which is when the kick falls on every downbeat. Whatever you choose to do, you can take a listen to what you’ve created by moving your playhead thumb to your first measure (where it says ‘1’ at the top of the grid) and hitting the space bar.
Now we’re on to something!
In many styles of music, the kick serves as the foundation of the entire beat. So, laying down a strong kick groove is in some ways half of the battle.
A quick side note on music theory
As we get into the composition process, we’ve started dropping some terminology here and there (like ‘measure’ and ‘downbeat’). If you have any experience with traditional music education, these terms may already be familiar to you.
If not, don’t worry—our in-depth introduction on the music theory of rhythm defines these terms and more:
You don’t need to be a theory expert to start making your own beats. However, when approached with a curious mind, music theory can be an invaluable toolset that can empower us to better express ourselves and understand music. As you continue developing your music production chops, we also encourage you to consider looking into foundational music theory topics and tutorials in parallel.
Now back to our beat!
2. Create a snare pattern
Next, let’s give our beat some punch with the help of a snare. As with everything else, there are no hard rules for where a snare drum should fall. That said, the second and fourth beats of each measure is usually a safe starting point.
And in just a few minutes, we’ve created the core essence of countless pop and EDM hits.
3. Create a hi-hat pattern
Now, let’s go ahead and add some hi-hats. These tight transient sounds will help add some detail and movement to our beat. There are two primary types of hi-hats: closed and open. Closed hi-hats will have a short decay, while open hi-hats will linger a bit longer. We’ll add some of both in our demo:
You’ll notice that we duplicated larger regions that we wanted to reuse by dragging them while holding the option key. We also replaced an open hat with a quick hi-hat fill at the end to create some additional energy.
4. Add some life with velocity
Currently, every sound in our beat is playing at the exact same volume. We can change this up by highlighting notes and increasing or decreasing their velocity.
In GarageBand, the length of the white line within each note will give you a visual sense of its velocity. In many other DAWs, the color of the note may change instead.
Above, we created some accents by de-emphasizing the offbeats and some other areas. While often subtle, having variations in velocity will add a bit of movement and life to a beat. After all, a real drummer would never strike every piece of the kit at the exact same volume.
While we don’t do it above, you can also humanize your beat further by nudging notes slightly left and right. This will make it so that every note doesn’t have robotically perfect timing.
5. Add extra sounds and have some fun with your beat
Now that we have a solid foundation to build off of, let’s experiment and just have some fun! You can add extra notes, additional sounds, and more to taste until you have something that you’re excited about.
Claps, cowbells, toms, cymbals—the world is our oyster.
6. Determine your beat’s tempo
Last but not least, let’s talk about how to adjust the tempo, or speed, of your beat. In a DAW, we can set our tempo by defining a BPM (short for “beats per minute”). Most projects are set to 120 BPM by default.
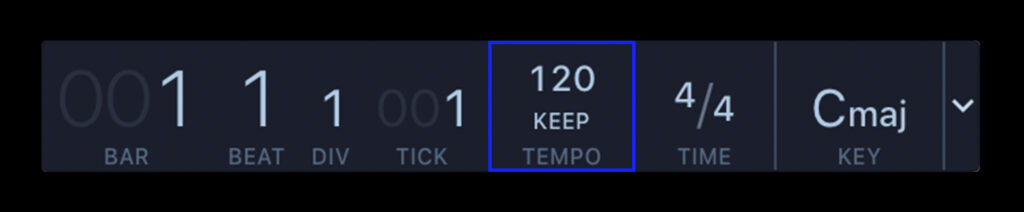
Most DAWs have a toolbar at the top or bottom of their GUI where you can enter your own BPM.
You’ll find that changing your BPM will have a profound effect on the sound of your beat. For example, here’s the same beat we made above at 80 BPM:
And here it is again at 160 BPM:
Once you’ve determined your tempo, give yourself a pat on the back! Your first original beat is officially complete.
How to turn your beat into a full song
Right now, your beat is perhaps just a few seconds long. You can easily extend it into something that feels more like a full track by looping or copy-and-pasting the region several times in your DAW’s track view. If you do the latter, you can also make some small changes in the MIDI for each region. This will help make your extended beat feel less repetitive.
Lastly, if you want to create a full arrangement, consider adding some chords, a melody, and / or a bassline.
Above, we used Splice Sounds to find a royalty-free chord progression and melody that match the BPM of our track. From here, we could edit the sounds to truly make them our own. Or, we could continue adding even more new ideas to fill out the song even further. Sampling is a great creative tool for both beginners who want to quickly get something going, as well as veteran beat makers who want to explore unique sounds that they can then process, chop, and flip to taste.
That said, MIDI can also be used to design your own melodies, chord progressions, and more from scratch. If you’re interested in learning more on this, consider checking out our full guide on how to produce a track:
Bonus: Alternate methods for making a beat
The beauty of music production is that there’s never just one ‘correct’ path to achieving a creative goal. Today, we learned how to use MIDI to create our own beats, because it’s one of the most versatile and DAW-agnostic ways of doing so. However, as you move forward with your music production journey, just be aware that there are a myriad of other ways to create beats (or do anything, really).
For example, what if we stuck solely to the track view? Here, we could’ve brought sampling earlier into the process, and created our beat by exclusively sequencing audio clips:
Our same beat, re-created with one-shots from Murda Beatz’ sample pack.
Or, we could have used a sequencer like the one in Splice’s Beatmaker. This is another highly popular workflow for beat making in particular:
We could even try combining an array of these methods. For example, in the video below we use samples and MIDI alongside the DAW-specific Impact XT to create a beat:
How to make beats for a song: Conclusion
Producing music is a lifelong journey. Today, we took a huge step forward by learning how to make beats from start to finish.
But, that’s not to say that we covered every aspect of beat making. If anything, what we explored is truly just the tip of the iceberg. If new questions arose as you were following along, or if you’re looking for a place to share and receive feedback on your beats as you grow, consider joining the Splice Discord for a community of music producers who are constantly exchanging knowledge and inspiration.
We can’t wait to hear what you’ll create!
Explore Splice INSTRUMENT, our virtual instrument plugin that puts an ever-growing catalog of free and premium sounds at your fingertips:
May 8, 2024