Illustration: Daniel Zender
When you close your eyes and listen to your MIDI drums, do you envision a drummer playing the groove, or your DAW punching out audio samples?
If you find yourself seeing the latter, you’ve come to the right place – in this article, we’ll explore strategies that will help you humanize your MIDI drum sequences. Not all grooves need to sound like they were performed by a human, but there are numerous musical contexts where you would want your software instruments to sound as realistic as possible. Note that in this tutorial, we’re not equating ‘humanization’ with ‘swing’ – rather, we’re going to walk through three subtle techniques that can go a long way with both straight and swung grooves.
As a starting point, we’ll be using this simple unhumanized groove (performed by one of Logic Pro X’s built-in drum kits):

Our unhumanized drum groove
As you can see, the velocity values of all the MIDI notes are unwaveringly uniform, everything is perfectly lined up to the grid, and the hi-hats look as though they’ve just been copied-and-pasted indefinitely. Does the groove sound unbearably horrible? Not at all – but it could certainly sound more convincing! Let’s start by taking a look at our velocity values.
1. How to humanize velocity
An unvaried velocity value can be one of the main culprits behind a performance sounding like it was performed by a robot. Does that mean we should go to the opposite extreme and create variation through total randomization? Not quite; as humans, we tend to emphasize certain beats over others when we’re getting in the groove. Specifically, we’re inclined to hit downbeats a little harder and offbeats a little softer. Or course, this might not always be the case if we’re looking to accent the offbeat (or other rhythmic moments) for musical effect. But in this particular groove where we want things to sound fairly on-the-beat, let’s try emphasizing downbeats with slightly higher velocity values while de-emphasizing offbeats with lower velocity values.

Our drum groove with some velocity variations
Although there’s still more work to be done, the groove definitely has more movement and sounds a little more human as a result. As you can see from the MIDI screenshot, the hi-hats were given the largest fluctuations in velocity. The hi-hat on the first downbeat of each measure is generally receiving the greatest emphasis, followed by the hi-hat on the third beat, followed by the hats on the second and fourth beats. The hi-hats on the offbeats are overall receiving less emphasis than those on the downbeats; they’re not the main event, but rather exist to subdivide and fill the gap to the next downbeat.
Pro Tip: It might be tempting to duplicate one measure of velocity edits across the entire groove, but try to resist that temptation – a listener will likely subconsciously pick up on the fact that the same variations are occurring over and over again.
The kick and snare have also received some velocity variation, though not nearly as much as the hi-hat. We want these two elements to feel dynamically consistent in most rock / pop grooves – the velocity editing is primarily to prevent the hits from sounding like they’re identical samples, rather than to create significant changes in loudness. That said, the MIDI notes comprising the snare fill have greater variations in velocity in order to imitate the differences in force between the virtual drummer’s alternating right and left hands.

Our fill is definitely improving, but we’ll be revisiting it to refine it further
2. How to humanize note position
With velocity out of the way, the next step is to add some human error to the machine-perfect timing of each MIDI note. While we were more intentional with velocity, we’re going to employ the Humanize function in Logic Pro X to randomize the position of all of the MIDI events (rather than offsetting the timing of each note manually, which would be a painstaking process to say the least).
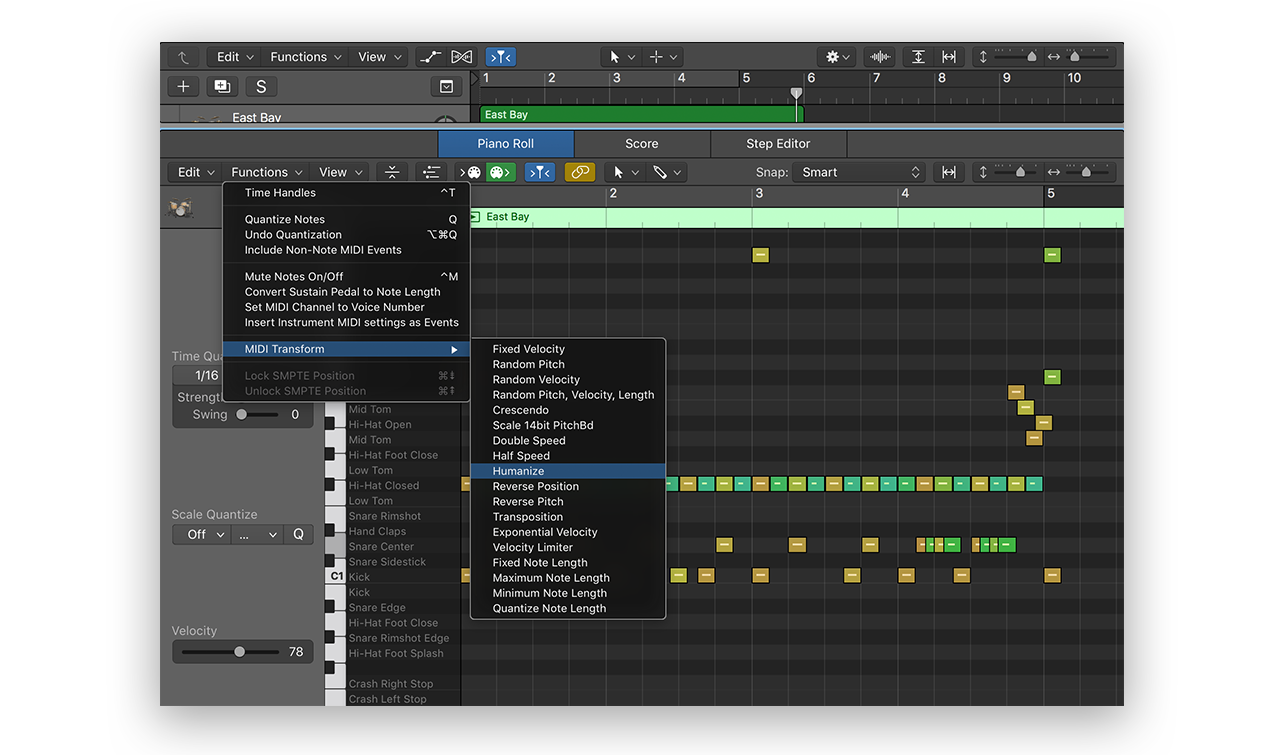
In Logic’s Piano Roll, go to Functions → MIDI Transform → Humanize
We’re not going to randomize the position of the MIDI notes drastically – even just ±10 ticks can add a subtle life to your groove without making it sound like the drummer is making perceptible mistakes in their timing.
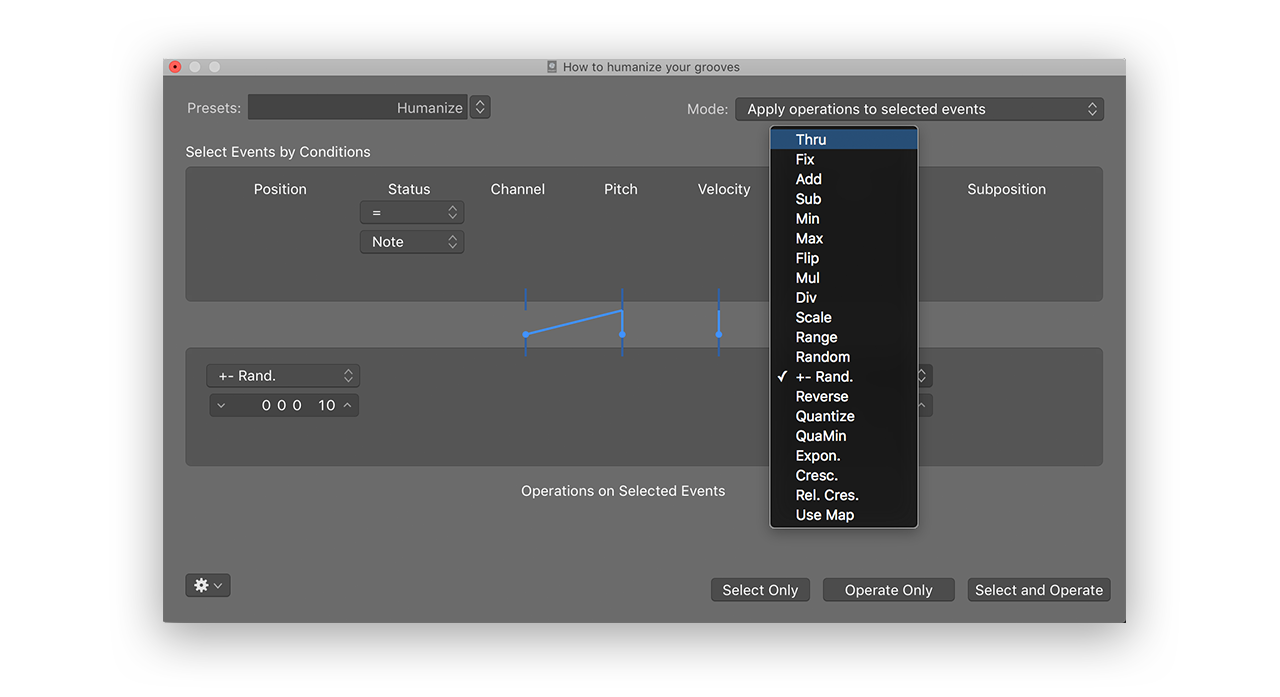
Make sure the velocity and length operations are set to “Thru” before you hit “Select and Operate” so that they aren’t randomized as well
If you don’t use Logic, don’t worry; most DAWs offer their own version of this Humanize function.
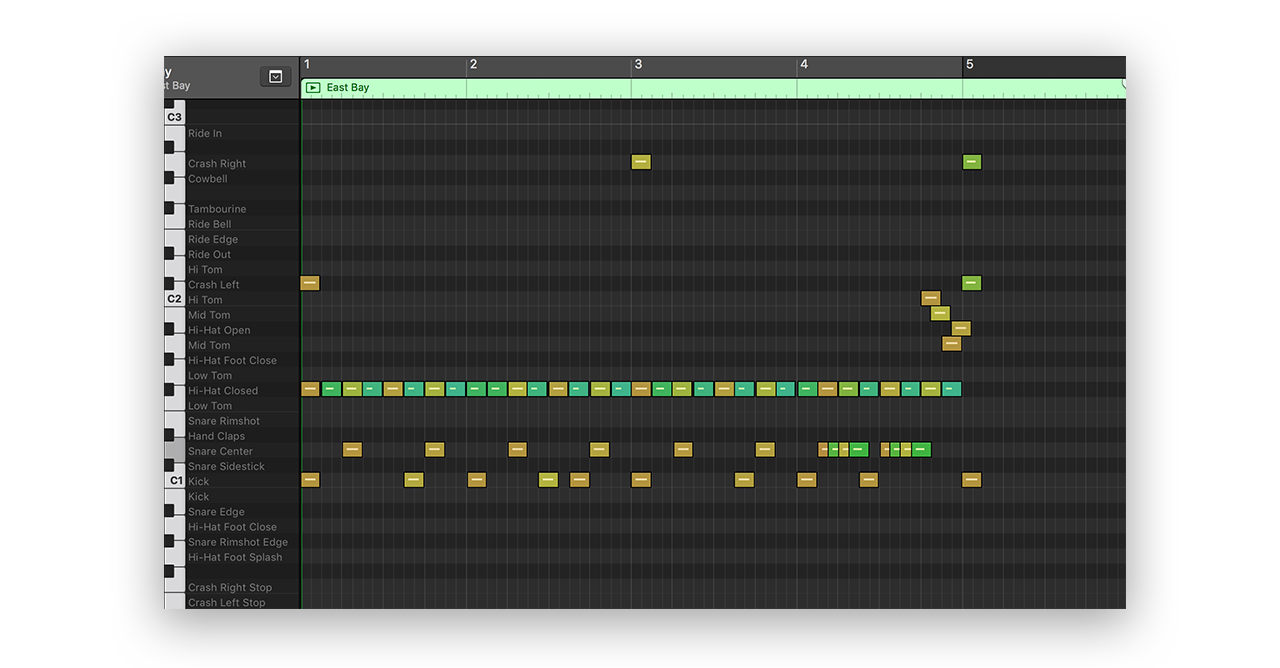
The result is subtle, but if you look closely you can see that notes are no longer perfectly aligned
Pro Tip: After humanizing note position, it’s not a bad idea to go in and re-quantize just the kicks and crash cymbals that are occurring together (or to exclude them from the randomization operation in the first place). These tend to be emphasizing important musical moments, and having them perfectly aligned creates a more satisfying punch (this is a personal preference, not a hard rule).
3. How to humanize the performance
The last thing we’re going to do is less obvious but incredibly important – we’re going to add and remove MIDI notes in our groove to make the performance sound more believable. This requires us to think like a drummer, and to make sure that the parts we’re writing are parts that can and would be played on a kit.
In terms of what can be played, the main restriction to keep in mind is that a drummer only has two hands. This means that kick drum and hi-hat pedal aside, we generally shouldn’t be hearing more than two kit pieces sounding at the exact same time. In addition, a cross-handed drummer will typically use their right hand for both on-beat hi-hats and cymbals – therefore, it’ll sound more natural if we remove the closed hi-hat hits that are occurring at the same time as the crash cymbals. We also want to consider musical elements that a drummer might add when performing a given groove, even if they’re not changing the rhythm’s core character; these might include ghost notes, open hi-hats, rolls, etc.
Let’s take a listen to what the same drum groove sounds like when some of these performative elements are applied:

The hi-hats are muted because they’ve been moved to a separate track – more on that later
Occasional open hi-hats add a lot of energy to the track, particularly in combination with the snare fill. We’ve also fixed performance-related issues with the hi-hat that made the groove sound less realistic; closed hats that overlapped with the crash cymbal have been removed, and the foot pedal is being used instead during the fill, since both of the drummer’s hands would be occupied. Ghost notes on the snare add a subtle grooviness to the track, and different snare samples such as rimshots and edge hits (which are commonly preloaded into even built-in drum kits) are sprinkled into the fill to prevent it from sounding like a succession of duplicate samples.

Our improved snare fill featuring rolls, rimshots, edge hits, and more
Speaking of preventing things from sounding like duplicate samples, one trick that we’ve implemented is creating a separate track for the hi-hats and adding a stereo tremolo with a low depth (30%) and slower rate (1/2). This makes each hi-hat sound come from a slightly different position in the stereo image, which can perceptually help prevent the listener from picking up on the sample’s repetitiveness.

Our hi-hats isolated on a separate track
This works because unlike the kick and the snare, the hi-hat is often panned to begin with, and the effect isn’t noticeable because our stereo tremolo is relatively subtle. The trick is useful because the hi-hat is the sound that we hear the most frequently, and in this groove we just want the hats to be felt rather than heard.

The slightest stereo tremolo can do wonders with blending the hi hats with the rest of the kit
The big picture
If you have these three techniques in mind, you should be well prepared to go forth and humanize your own drums. When we think of humanizing MIDI, our first instinct may be to make adjustments to velocity and note position – and these are important steps without a doubt, as discussed in this article. However, a key takeaway to keep in mind is our last step, writing drum parts that inherently lend themselves well to a human performance. Whether it’s the drums or a guitar, when trying to create convincing lines for any instrument using software, we have to consider what’s idiomatic, or playable, by that instrument (unless we’re not aiming for realism to begin with; one of the awesome benefits of digital music production is that realism is an option, not a restriction).
As music producers and composers, we’re tasked to understand how all sorts of instruments are played. This shouldn’t be seen as a chore though; rather, it’s an enjoyable and rewarding endeavor that allows us to appreciate the music created using various instruments in a deeper and richer way.
Explore royalty-free sounds from leading artists, producers, and sound designers:
December 3, 2020

.svg)
.svg)

