.svg)
.svg)


Splice has partnered with iZotope to offer the mastering plugin Ozone 9 Elements (a $129 value) for free to all Splice users until June 5th, 2020.
At Splice, we understand that these are challenging times for many music creators, and are committed to getting through this together by providing resources and educational material to improve your music production skills. To get Ozone 9 Elements, all you need to do is log into your Splice account (you can create an account for free here) and simply download the plugin.
In our previous article in the Mastering basics with iZotope’s Ozone 9 Elements series, we discussed how to use the Imager in Ozone 9 Elements to broaden your mix and give it some depth.
For a refresher, here are the mixes before and after our adjustments to the Imager:
The mix before the Imager was applied
The mix after the Imager was applied
In this article, we’re going to get our track up to commercial loudness with limiting, the final stage of the mastering process.
First things first: how loud is loud?
You’ve probably heard of the Loudness Wars and how they came to an end with the introduction of loudness normalization on streaming platforms. By using LUFS to measure loudness rather than RMS, loudness normalization helps level the playing field so every song gets played at the same average loudness as the other tracks in the catalogue. Note that each streaming platform has a different target LUFS level:
- Spotify: -14 LUFS
- YouTube: -13 LUFS
- Tidal: -14 LUFS
- Apple Music: -16 LUFS
Mastering basics: Limiting
A limiter is essentially a compressor with an incredibly high ratio (10:1 or more), and its main purpose is to make a track loud without causing clipping. The limiter in Ozone 9 Elements is referred to as the Maximizer. Below, we dive into the different parameters within the Maximizer and use them to top off our mix.
Threshold and ceiling
The threshold tells Ozone’s Maximizer when to start limiting. The lower the threshold, the more limiting is applied to the mix, and the louder the mix will sound as a result.
On the other hand, the ceiling tells the Maximizer what the highest possible level should be in dBFS. Audio distorts and clips at 0 dB, so it’s good practice to set the ceiling below that; -0.2 dB at the highest, or between -1.0 dB and -2.0 dB if you want to be on the safe side in terms of distortion or clipping.
Ozone 9 Elements has a nifty Learn Threshold feature. If you’re mastering for any of the streaming platforms mentioned above, simply input your target LUFS and click on Learn Threshold to have Ozone 9 Elements automatically adjust the slider so that your track is within that target.
For this track, it looked like the recommended threshold was -3.5 dB for a target LUFS of -12.0 db. Before committing to the prescribed level, I made sure that gain reduction at the loudest points of the track was no more than 4.0 dB. You’ll notice that once gain reduction hits more than 4.0 dB, you’ll start to hear ‘pumping’ artifacts, which aren’t ideal.
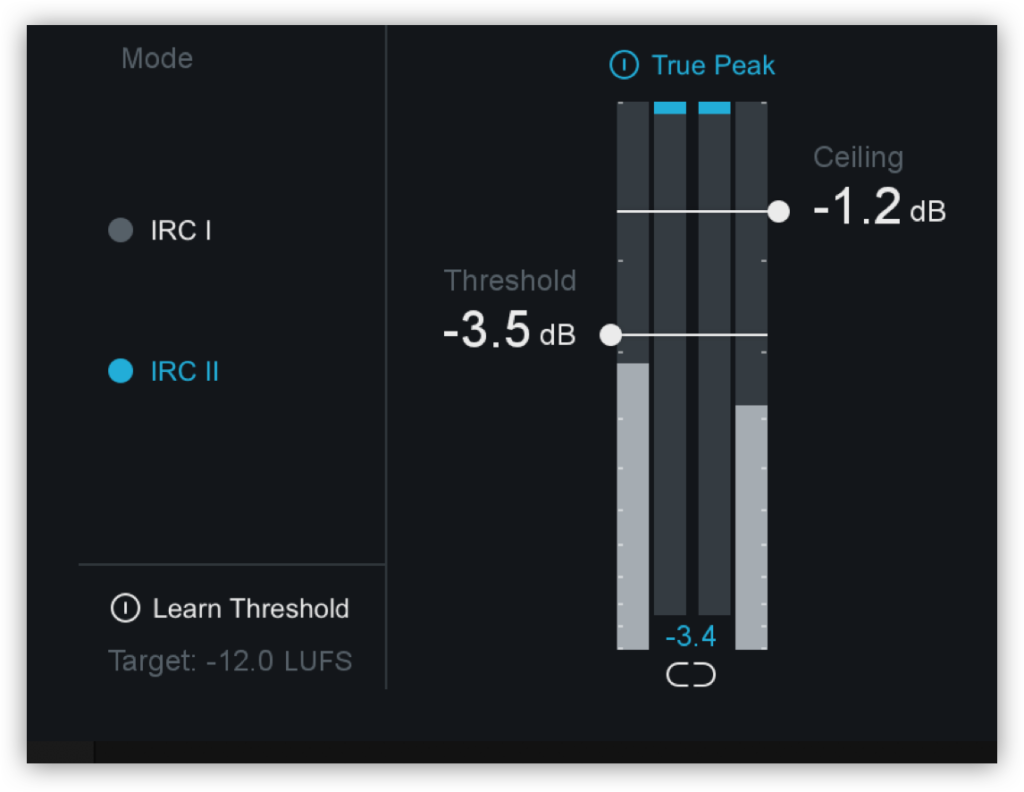
Our settings for the threshold and ceiling
Character
Adjust the character slider according to the energy of your song. If you have a fast-tempo song, try setting the character closer towards ‘fast’ so that the limiter works on managing those transients quickly.
Stereo independence
The stereo independence section of the Maximizer consists of two sliders. The transient slider adjusts how the limiter responds to transient material across the two channels. Try bringing this parameter up if you have a track that has a lot of transient details (ex. heavy hits).
On the other hand, the sustain slider adjusts how the limiter responds to sustained materials (like pads, guitars, drones, etc.) across the two channels.
Transient emphasis
This feature is useful for preserving sharper sounds like drums, while still optimizing for loudness. Given that there’s a lot of strong drum fills, guitar strokes, and other transient material, I decided to emphasize the transients slightly so that they don’t get too squashed by the limiter.
Given everything we discussed above, here are the final settings we landed on:
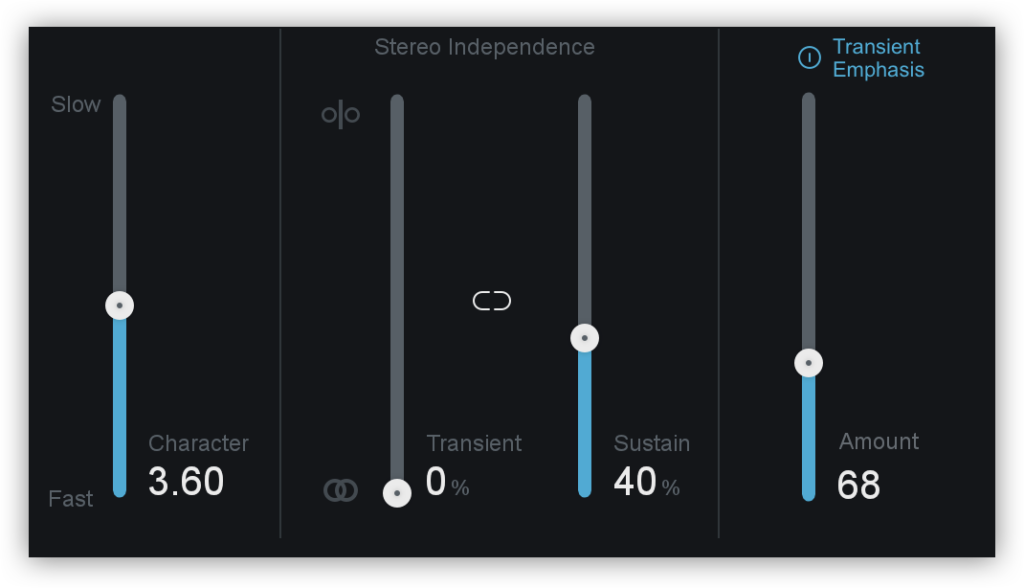
Our settings for the character, transient, sustain, and transient emphasis sliders
Let’s take a listen to what our final master sounds like:
The mix before the Maximizer
The mix after the Maximizer
We hope you enjoyed this three-part series on mastering using Ozone 9 Elements. Take some time to download the plugin and play around with it, and remember that if you feel lost, the plugin has a Mastering Assistant that listens to your mix and suggests a setting for you.
If you have any questions on how to use Ozone 9 Elements’ Maximizer when mastering, let us know in the comments below.
Download Ozone 9 Elements for free:
May 12, 2020


