.svg)
.svg)


Splice has partnered with iZotope to offer the mastering plugin Ozone 9 Elements (a $129 value) for free to all Splice users until June 5th, 2020.
At Splice, we understand that these are challenging times for many music creators, and are committed to getting through this together by providing resources and educational material to improve your music production skills. To get Ozone 9 Elements, all you need to do is log into your Splice account (you can create an account for free here) and simply download the plugin.
iZotope’s Ozone 9 Elements is a beginner-friendly mastering plugin that anyone can master (pun intended), consisting of three modules: EQ, Imager, and Maximizer. iZotope is known for making various high-quality mixing and mastering plugins, many of which are available on Rent-to-Own.
In this upcoming series of Mastering basics with iZotope’s Ozone 9 Elements articles, we’ll go through each module of the plugin, building our own master along the way. Feel free to download the plugin and follow along.
That said, before we dive into mastering a track, let’s answer some essential questions about mastering and why we master in the first place.
What is mastering?
Mastering is the process of finalizing a song by applying subtle technical touches that allow it to compete commercially with other songs in the market. It’s usually the final ‘polishing’ step before releasing your song to the world.
When should I master?
In most cases, you’ll master when you’re ready to distribute your songs to streaming platforms. However, it’s not uncommon to apply a quick master to your demo track before sending it to other producers or friends for feedback.
Why master?
One of the primary goals of mastering is to make sure that your track is up to commercial loudness. Have you ever noticed how your mix in your DAW is almost always softer than a track on Spotify? Mastering solves that. That said, mastering is also about applying the icing on the cake – achieving good tonal balance and making the mix sound better, regardless of level.
Now that we have a basic understanding of mastering, let’s dive into how Ozone 9 Elements can help take your mastering to the next level. One excellent feature in Ozone 9 Elements that’s great for beginners is Mastering Assistant. This feature listens to your mix and intelligently suggests a starting point for each module. If you’re lost or unsure at any point, give Mastering Assistant a try and go from there.
Mastering basics: EQ
Here’s the mix we will be working with for this series:
Before we begin, make sure that Ozone 9 Elements is installed and you’ve placed the plugin on your master track. While the steps below use the above mix as an example, the concepts we’ll be exploring apply to mastering any track.
One of the first steps in the mastering process is achieving a good tonal balance using EQ. Tonal balance is obviously subjective, but here are some simple principles we can apply to make sure we’re moving in the right direction.
1. Make sure the bass is balanced
In the song above, you’ll notice that the mix is pretty bass-heavy. The bass notes hit pretty hard with a lot of sub undertones that tend to muddy up the mix at some parts. This can easily be solved by using a high pass filter to remove some of the super-low frequencies.
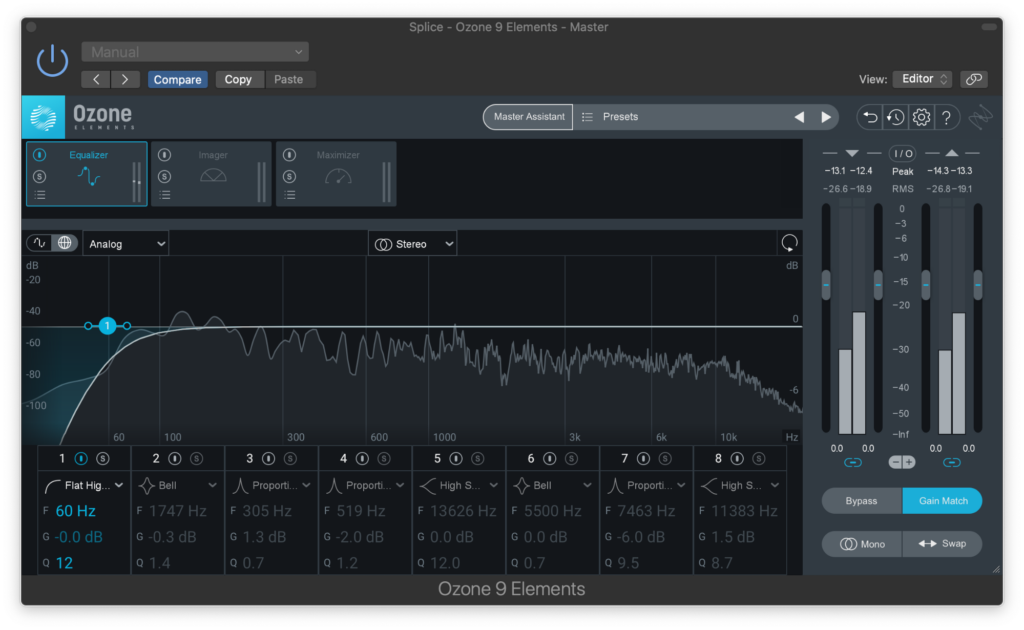
In the image above, I applied a high-pass filter at around 60 Hz to pull back some of the heavy sub frequencies. This is a very easy trick that can do a lot without much EQ wizardry. Take a listen below and hear how the bass is less pronounced, increasing the clarity of the overall mix:
How the bass sounds before the EQ is applied
How the bass sounds after the EQ is applied
2. Make sure the mix isn’t too harsh
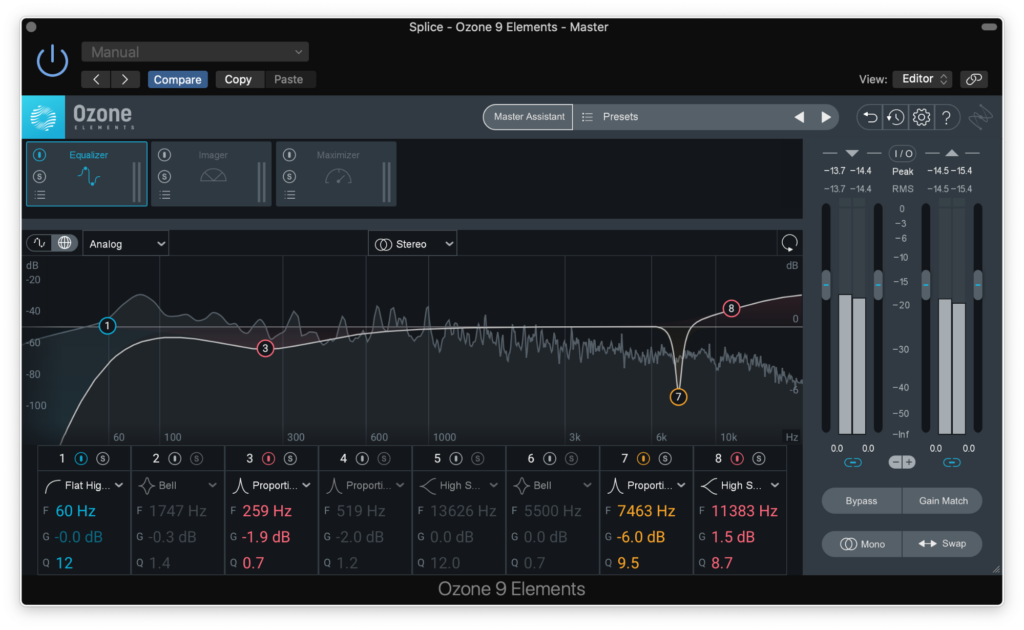
When a mix is harsh, it usually means that there’s some mid to high frequencies that are annoying to the ear. In this mix, I noticed that the vocals are sibilant in certain parts, so I decided to do a 6 db EQ cut at around 7.4 kHz.

Hear the difference:
How the vocals sound before the EQ is applied
How the vocals sound before the EQ is applied
3. Make sure the mix isn’t muddy
Muddiness is a term that describes the lack of clarity in a mix. This can be solved in a few ways with EQ. The most common way is to cut the ‘muddy range’ of the frequency spectrum, which is generally around 250 – 500 Hz. Another way is to add some top end, or ‘air’ (10 kHz and above).
In this mix, I’ll apply a little bit of both by cutting the muddy range and adding some air.
Hear the difference:
How the mix sounds before muddiness is attenuated
How the mix sounds after muddiness is attenuated
Paying close attention to the vocals and the guitars, notice how the mix is now more open-sounding.
Wrapping up
Here’s the mix before and after all of our EQ changes:
The mix before our EQ changes
The mix after our EQ changes
Mastering is all about going back and forth listening to the original mix against the processing you’ve done on your master, and making sure that you’re implementing adjustments that enhance the overall sound. Whenever you’re mastering next, apply these EQ principles, and you should be on track to a tonally-balanced master.
If you have any questions on how to use EQ when mastering, let us know in the comments below. In the next post, we’ll be covering stereo imaging with Ozone 9 Elements.
Download Ozone 9 Elements for free:
May 8, 2020