Have you ever wondered how some synth lead sounds instantly draw you in, fitting perfectly into the mix while standing apart from the rest of the track?
In this article, we’ll discuss how to make a synth lead stand out by recreating an existing sound and breaking down why it works so well.
The sound we’ll recreate is the synth lead from “Shooting Stars” by Bag Raiders. This was big when I was a young person going out to shows, but it recently experienced a second life through becoming a meme. To me, this slippery synth lead is one of the most classic lead sounds out there.
Fun fact: according to Wikipedia, this sound was originally created on a pocket synth called a Stylophone (the Bag Raiders later described the lead in an interview as “the most annoying sound we could possibly make”). As it turns out, it’s actually an incredibly fun instrument, so I used it as the base sound source for our synth patch recreation.
Selecting a sound source for our synth lead
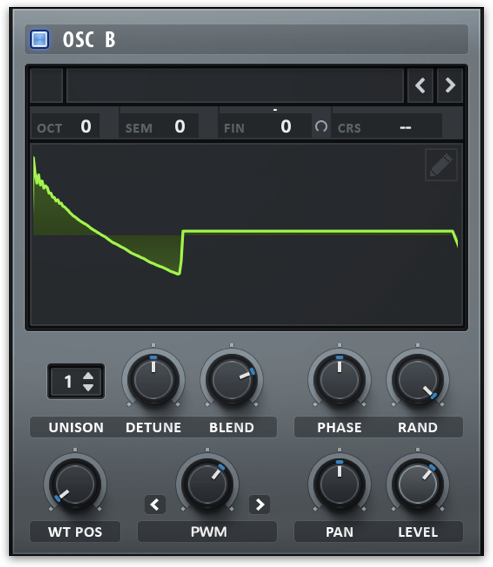
Let’s begin by finding the best possible sound source to use in our sound design process. Since we already know that we want to use the Stylophone for this specific lead, I recorded a long held note on it to import into Serum as a wavetable (if you’re crafting your own sound from scratch, you can import any sample of your choice, or explore the built-in options that come with your synth).
Our Stylophone sample
The lead sound we’re going for is kind of thin and ‘nasal’—in order to achieve this effect, let’s narrow the pulse width. You may have noticed the acronym PWM on certain hardware synths or synth plugins; this acronym stands for “pulse width modulation.” Without going too deep into the math behind it, PWM basically allows you to adjust the amount of time that a wave spends in the top of its cycle. In other words, adjusting the width of the pulse squashes up the wave and results in a ‘narrower’ sound.
In Serum, we can narrow the pulse width by adjusting the PWM Warp parameter in our oscillator engine. This is a great technique for helping synth lead sounds fit into a mix—it allows the sound to complement the vocal instead of masking the similar frequencies too much.

Layering voices
Next, let’s give our patch more body and power by adding another voice using the same imported wavetable. We can also play around with transposing the oscillators by +/- 8 va and adding a sub oscillator.
The terms monophonic (hereafter referred to as mono) and polyphonic (poly) refer to the number of different voices a synth can play simultaneously. In mono, only one note can be played at a time, whereas poly means that multiple notes can be played. For this sound (and most lead sounds) we’ll use mono, so that we can take advantage of the Glide parameter to nail the grace note in the song’s melodic motif. For pads, chords, or anything that uses harmony, you’ll need to use poly to employ more than one voice.

Now, let’s dive deeper into the Glide parameter, since it’s very important to this particular sound. In this context, “glide” means to slide from one note into another, and we can adjust how fast this happens by changing the Glide Time. A small amount of this parameter combined with the grace note in the melodic motif really hooks the ear; in general, adding a grace note is a great compositional technique that you can use in a wide range of situations to make your synth lead sound more interesting.
Let’s add some Unison and Detune as well. Unison will stack another voice on top of the existing sound to act as a layer, while detuning will slightly adjust the pitch of each layered voice. This helps our sound feel ‘wider’ because it’s covering a larger range of frequencies. Just a tiny bit of this effect is appropriate for this sound—if we make the patch sound too wide, it’ll begin to lose focus.
Modulation
Modulation is the process by which synthesized sounds are manipulated and shaped. Envelopes and LFOs acting on parameters over time give a sound interest, intrigue, and signature sonic characteristics.
New sound designers may wonder when to use an envelope for modulation and when to use an LFO. Both tools accomplish essentially the same thing: changing a parameter over time. The difference is that an LFO repeats for as long as the note is held, while an envelope is triggered only once. In other words, an envelope changes the destination parameter according to the attack, decay, sustain, and release times specified by the user, while an LFO changes the destination parameter according to a looping wave.
This particular sound we’re designing has some vibrato. We’ll use the LFO to accomplish this effect, because we don’t want it to happen just once; rather, we want vibrato throughout the entire sound. We’ll apply the LFO to the Fine parameter (which refers to fine tuning) so that the pitch wobbles, but only slightly. For a quick vibrato, I find that a Rate of ~7 Hz works well. Adding a Delay of ~200 ms will make our vibrato weave into the sound a bit more gradually as well.
For amplitude, we’ll use an envelope, because we don’t want the changes to repeat throughout the course of the held note. By default, Serum uses EG 1 for amplitude, so we’ll stick with that. All we’re doing with the envelope is adding a slight attack to remove clicks, but not so much that we lose the grace note.


This is a simple patch, so we don’t need too much more modulation. That said, in your patches, try adding more and more modulation on different parameters; this is the key to making complex presets!
Effects
Lastly, we’ll use effects to put the finishing touches on the sound. I like to do this step at the end, because while effects can significantly influence the sound of the patch, they’re not often the defining quality. I find it’s best to look at effects like the cherry on top of our patch sundae. Also keeping in mind that they may be applied in the mixing process, and not necessarily just within the patch, we’ll try to use the effects available to us to get the sound dialed in as close as possible to the original. This might include chorus, EQ, compression, reverb, distortion, bitcrush, or more.
Our goal with this patch’s effects chain is to make our sound cut through the mix. It should be bright and attention-grabbing to hook the ear. We’ll make this happen by using compression and distortion to saturate our patch with more high-frequency content.
Distortion
“A little distortion, a lot of the time” is a good rule of thumb to begin with. We don’t need that much here—just enough to give our patch a little more bite. When adding distortion to your patches, try out different distortion algorithms to see what sounds best. In this patch, I think Serum’s downsample algorithm gives a nice effect.
Downsampling is a bitcrush effect, which is another form of distortion. Bitcrushers typically feature two main methods for introducing distortion: sample rate reduction and bit depth reduction.

As the sample rate parameter is lowered to extreme values, we introduce an effect known as aliasing to the signal. Without getting too deep into DSP theory, we usually work at sample rates of at least twice the upper limit of human hearing in order to accurately reproduce the signal and avoid aliasing. When we reduce the sample rate with a bitcrusher, we intentionally introduce aliasing so we can use it as a creative effect.
Digital audio is also sampled using numbers of a certain precision: the higher the bit depth, the higher the precision. More bit depth means more resolution, so most modern DAWs work at a 64-bit resolution. This is great for making music at the highest quality possible—but again, by intentionally reducing the resolution using a bitcrusher, we can introduce noise into our signal for aesthetic purposes.
Although intentionally reducing our patch’s sample rate and bit depth may sound counter-intuitive, here this will give our patch bite and intensity.
Compression
Our last bit of effects will be dynamics processing, using Serum’s Compressor module. Compression is useful in many situations because it tames renegade peaks, thereby reducing dynamic range. This, in turn, means the body of the signal will be louder, so the entire signal will sound more full. This can be excellent on synth leads, especially for helping cut through the mix!

Much like distortion, when applying compression, think “a little compression, a lot of the time.” Our settings don’t need to be too aggressive here since the compressor is the last processor in our chain. Attack and release can be relatively short, and our threshold setting can vary according to the sound’s amplitude peaks. A ratio setting of around 3 – 4 will give us a lot of gain reduction for this particular lead, without squashing the sound too much.
Once we add make-up gain as necessary, we have a completed synth lead patch that stands out in the mix and catches the listener’s attention:
Our final patch playing the iconic melody of “Shooting Stars”
Go forth and create your own synth lead sounds
The old parable says: “If you give a man a fish, he will eat for a day. But if you teach a man to fish, he will eat for a lifetime.” Similarly, I believe that if you give a producer a preset, they will make a track. But, if you teach a producer how to make presets, they can make a career out of it. If you’d like to use this Serum patch for yourself, feel free to download it here. But if you’d like to dive even deeper into music production, sound design, mixing, and tons of other topics, consider checking out our courses on Splice Skills, where instructors like me will give you detailed insights right inside the DAW that’ll help you take your music production skills to the next level.
Thanks for reading, and happy producing!
Design your own synth leads and more with a free trial of Serum, and then Rent-to-Own the plugin for $9.99/mo until you own it outright:
October 4, 2021


