.svg)
.svg)


iZotope’s Nectar 3 addresses all of your vocal processing needs, from tuning and sculpting to harmonies and effects, in one elegant suite of modules.
Since its initial release in 2010, Nectar has established a place for itself across both home recording setups and world-class studios, adored for its ability to produce professional results in seconds. Nectar 3 boldly advances the already powerful plugin by incorporating iZotope’s game-changing machine learning, inter-plugin communication, and signal processing technologies. This feature guide will overview some of these enhancements and more to help you get the most out of this dynamic plugin.
Voice to verse—anywhere. With the addition of Splice Mic, you can instantly test and record ideas, explore genres, and unlock new creative possibilities, all from the Splice mobile app.
Overview
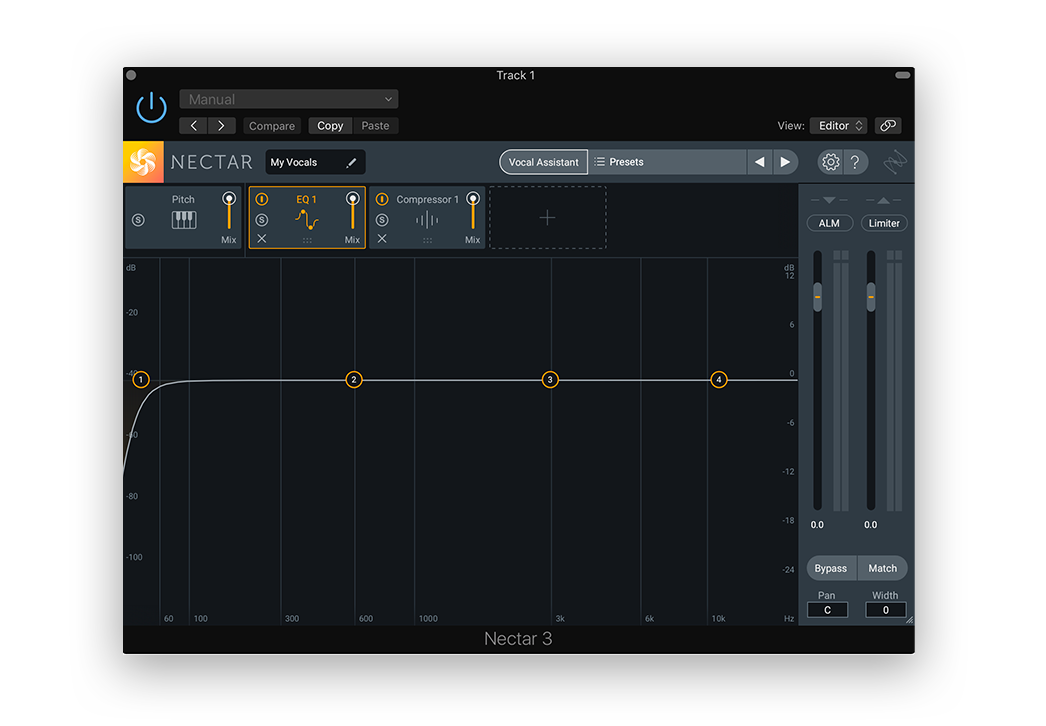
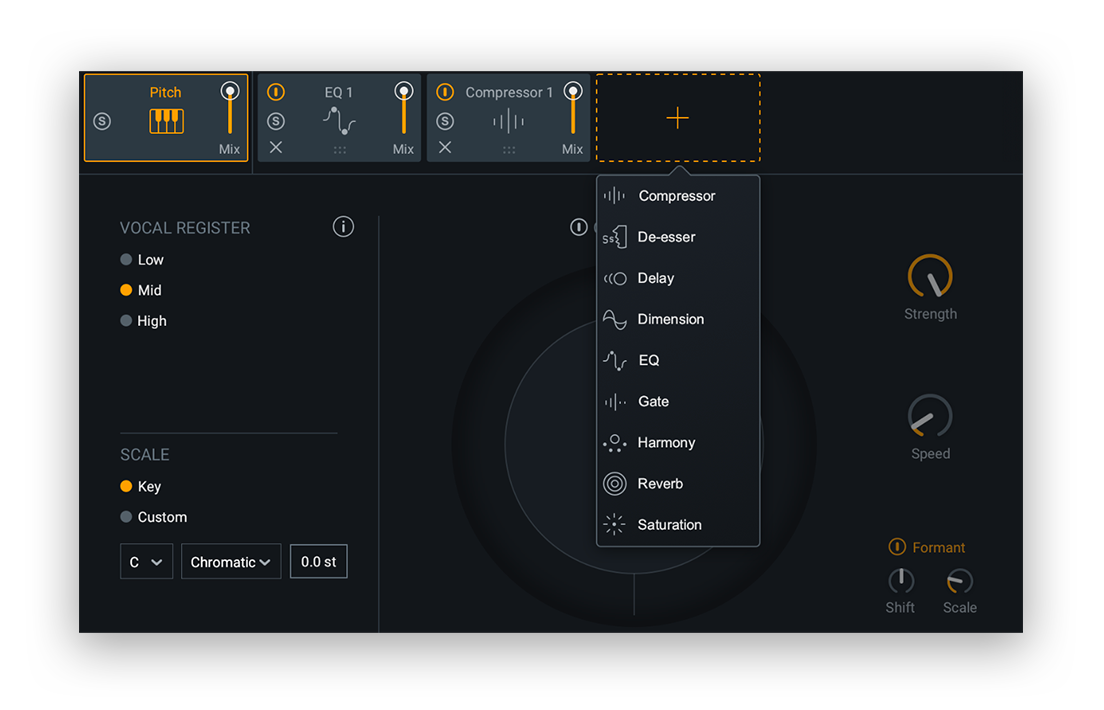
When you first open an instance of Nectar 3, you’ll be greeted by this default setting consisting of three modules – Pitch, EQ 1, and Compressor 1. This preset offers a very basic starting point, with a high pass at 40 Hz and subtle compression. Each module is situated in a horizontal processing chain across the top of the GUI, and their order can be freely rearranged. Aside from these three, an array of other modules can be added to your chain that are all well-suited for processing vocals: Delay, De-essing, Dimension, Gate, Harmony, Reverb, and Saturation are some additional options available for further sculpting your sound. Click on any module to open up its unique GUI in the main window.
 With all of these different modules at your disposal, you might be unsure where to start. Nectar 3 offers a collection of polished presets, spanning the utilitarian (Background Noise Removal, Increase Vocal Clarity) to the outlandish (Robo Army, Elephants But On Mars). Another option is to use Vocal Assistant to intelligently produce an optimized starting point for your specific vocal track.
Vocal Assistant
 Vocal Assistant is your go-to extra pair of trusted ears. When you open up the feature, it offers you two help options: Assist and Unmask. Let’s explore each in greater detail.
Assist
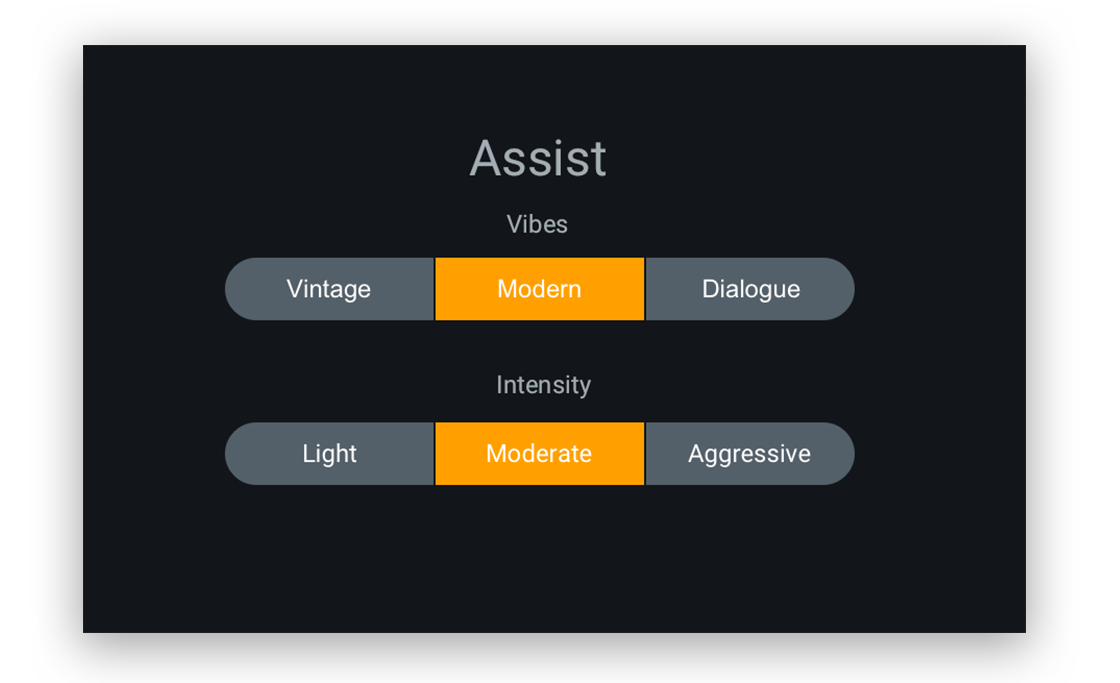
Using machine learning technology, Vocal Assistant detects and automatically adjusts level inconsistencies, timbre variations, resonant peaks, and harsh frequencies. Upon detection, Vocal Assistant addresses these issues by setting EQ nodes, removing pesky sibilants, dialing in suggested compression settings, etc. You can choose to have the aesthetic of the overall sound align with one of three different Vibes (Vintage, Modern, or Dialogue) and one of three different Intensities (Light, Moderate, or Aggressive). The Assist feature is great for quickly arriving to an optimal starting point, so that you can focus on topping off your sound with your personal touch.
Unmask
Masking is one of the most common issues encountered in a mix. The term refers to when the perception of a sound is affected by the presence of another sound in a shared frequency range, usually causing reduced clarity and a sense of ‘mudiness.’ Vocals are often masked by other tracks in a mix. This is mainly because they tend to occupy the mids, which is competitive sonic real estate shared by common instruments such as guitars, pianos, synths, strings, etc.
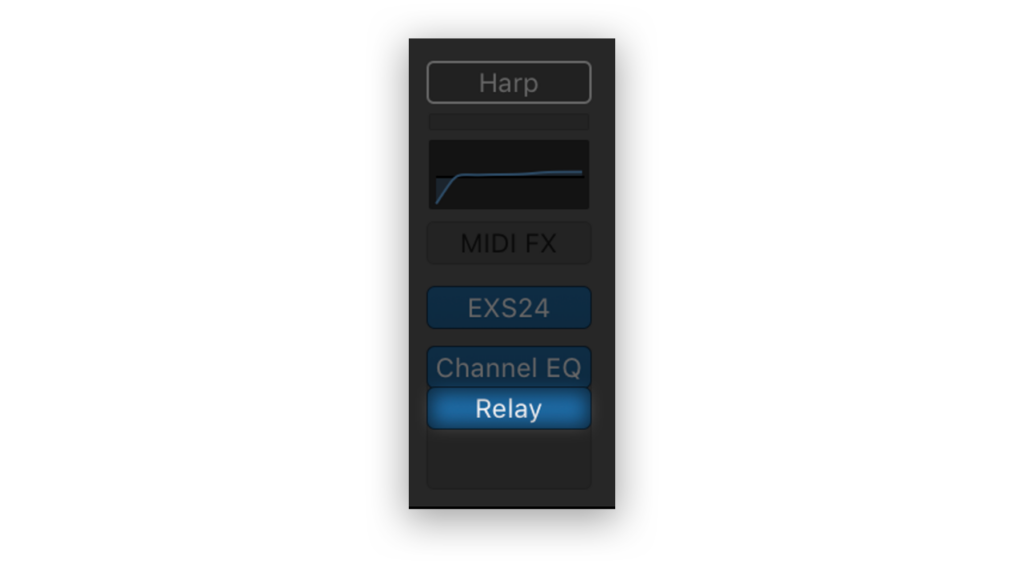
Nectar 3 brings the ability to counter the masking of any vocal with Unmask. Before we get started, it’s important to note that the feature needs to identify sources aside from your vocal track to compare for unmasking – Nectar 3 is able to detect other elements in the mix if their processing chain includes an instance of Nectar 3 or the Relay plugin. The Relay plugin is preferable if unmasking your vocals is the sole objective, since it’s much less CPU-intensive than running tons of instances of Nectar 3.
Once you’ve attached the Relay plugin or Nectar 3 to any tracks you want to unmask, go back to your vocal track and hit the Unmask option in Vocal Assistant. You’ll now be able to view all the other sources that you selected, right from within Nectar 3.
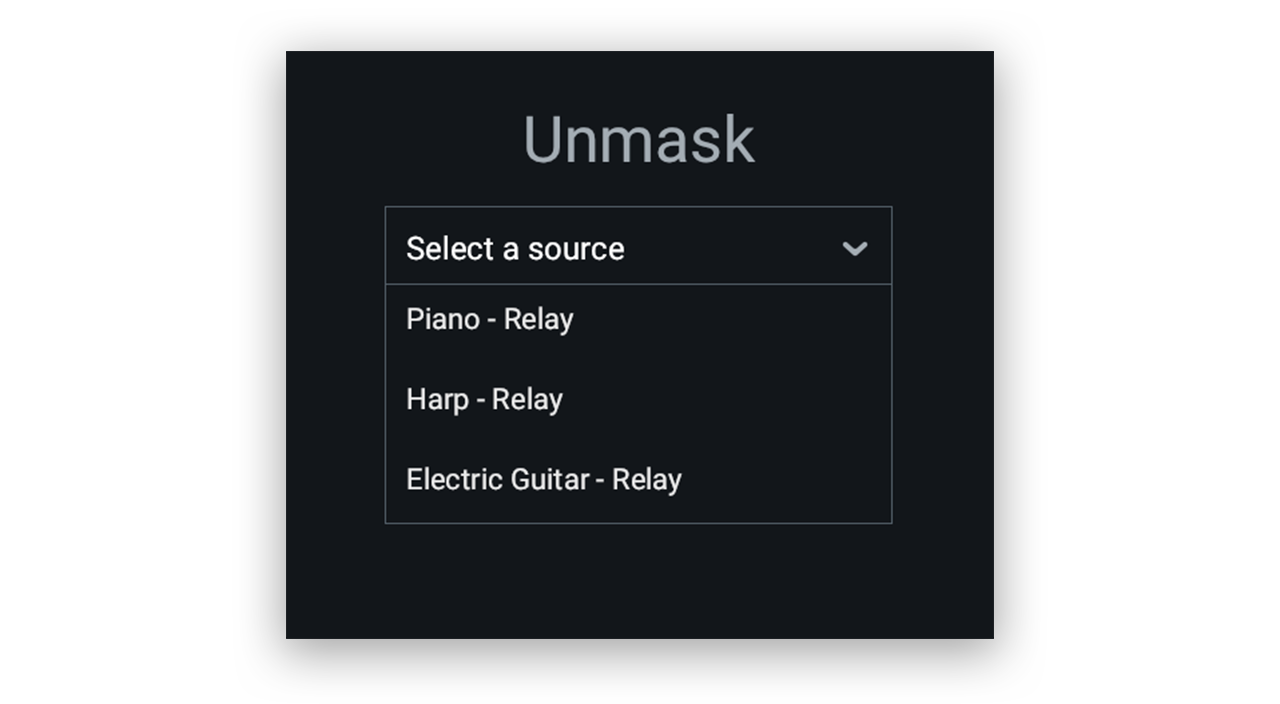
Select one of the tracks to have Unmask work its magic – if masking is detected, a static EQ will be applied to the offending source to carve out spectral space for the vocal. Relay plugins that are unmasking Nectar 3 will update their display accordingly.
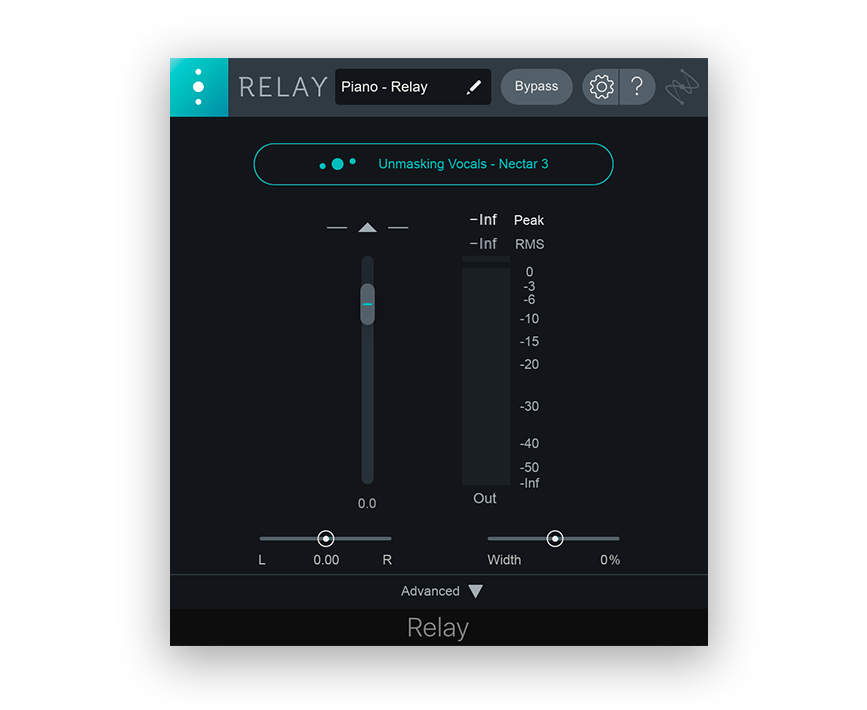
If there’s not much masking going on, the final Unmask step will display “No significant masking detected,” and no EQ will be applied to the selected source. The Relay plugin is iZotope’s latest implementation of inter-plugin communication, their innovative concept of achieving a more dynamic workflow by allowing plugins to interface with one another.
Pro Tip: On the note of inter-plugin communication, are you using iZotope’s other plugins in your workflow? Nectar 3 gives you a complete view of your entire production by sending essential vocal information to Neutron 2, directly connecting your vocals with the rest of your mix. Appearing in the Visual Mixer, Masking Meter, Tonal Balance Control, and Insight 2’s Intelligibility Meter, Nectar 3 sits alongside instances of VocalSynth 2, Insight 2, Ozone 8, and Relay to streamline the mixing process.
Dynamic EQs
 Something worth shouting out is Nectar 3’s addition of two brand-new dynamic frequency modes, which intelligently adjust their parameters to best match your vocals from moment to moment. Dynamic Frequency mode updates the frequency of a filter in response to harmonic frequency content changing over time, while Dynamic Gain mode automatically adjusts the level of a filter in response to the input. Simply click on a node (or add one of your own) and expand the Dynamic menu to turn these features on and off.
Pro Tip #1: Track the first harmonic of a vocal by enabling Dynamic Frequency Mode on a high pass filter. This will dynamically cut out undesirable low end rumble while preserving the vocal’s character.
Pro Tip #2: Turn Dynamic Frequency Mode on for a Bell filter to track and attenuate harsh vocal resonances.
Harmony
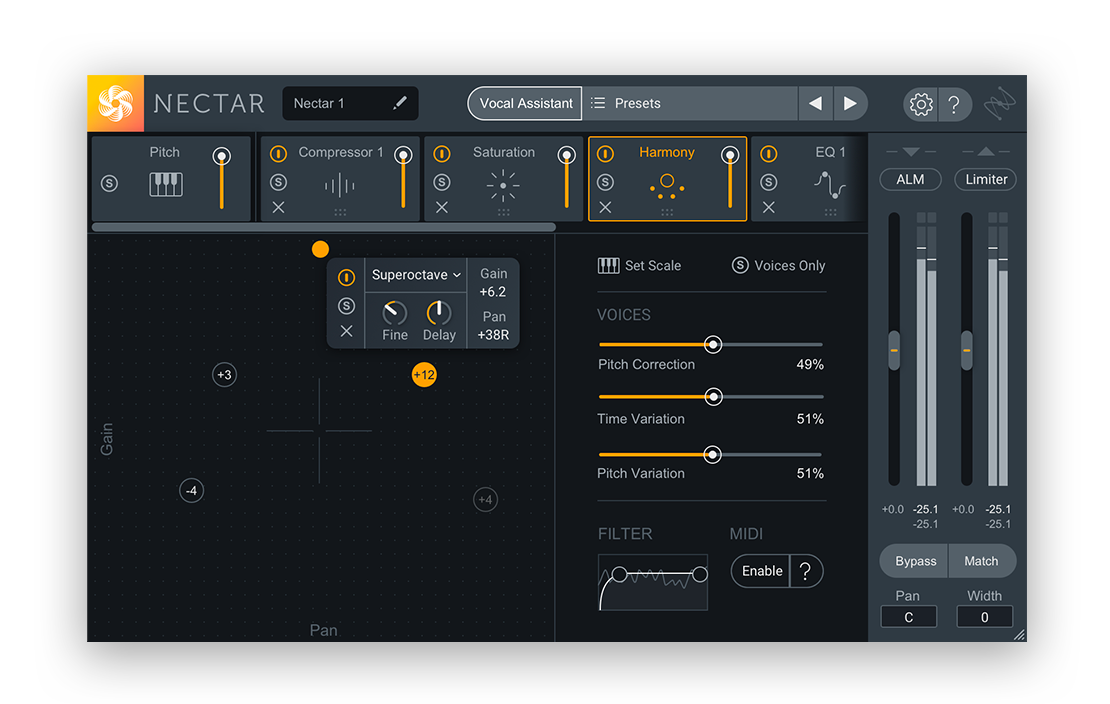 While features such as Vocal Assistant and Dynamic EQs are great for making corrective improvements, the Harmony module offers great opportunities for adding a creative touch to your vocals. The grid-like area of the module, referred to as the Voice XY Pad Controller, offers a sleek and intuitive way to generate vocal harmonies.
Simply click anywhere on the grid to add a new voice, and designate your desired interval via the drop-down menu. You can set a custom key for the harmony to follow by hitting the Set Scale button, which will redirect you to the Pitch module. The vertical positioning of a node on the pad controller determines the harmony’s volume, while its horizontal position determines its location in the stereo image – this allows for an intuitive and swift workflow for creating vocal harmonies. While larger intervals will inevitably result in artifacts, they will often be surprisingly unnoticeable when the voices are tucked nicely behind the lead vocal.
Pro Tip: Want more precise control over the harmonies? Trigger voices using a MIDI controller by activating the MIDI mode feature, located on the bottom right of the GUI.
This concludes our introductory tour of Nectar 3. It goes without saying that there are plenty of other modules to explore, but hopefully this guide gives you a glimpse into some of the new and best features this latest installment of Nectar brings to the table.
Explore industry-leading plugins, bundles, DAWs, and more:
November 1, 2018