.svg)
.svg)


Illustration: Ariel Davis
iZotope’s Neutron 2 Advanced is a powerhouse tool for mixing any type of content.
In this tutorial, we’ll explore Neutron 2 Advanced’s best features and how they can be used to remix vocals in particular.
Neutron 3 Advanced, the latest version of iZotope’s mixing suite, offers even more powerful features — check out the guide here.
Voice to verse—anywhere. With the addition of Splice Mic, you can instantly test and record ideas, explore genres, and unlock new creative possibilities, all from the Splice mobile app.
Find a good starting point
Neutron 2 Advanced has several features that help kickstart your mixing and sound design. First, there’s an abundance of presets included with Neutron 2 that can give you different starting points which are a huge time saver. Neutron 2’s Track Assistant is also an amazing tool to ignite your mixing process – it intelligently analyzes the incoming audio and appropriately adjusts necessary parameters to create a balanced mix.
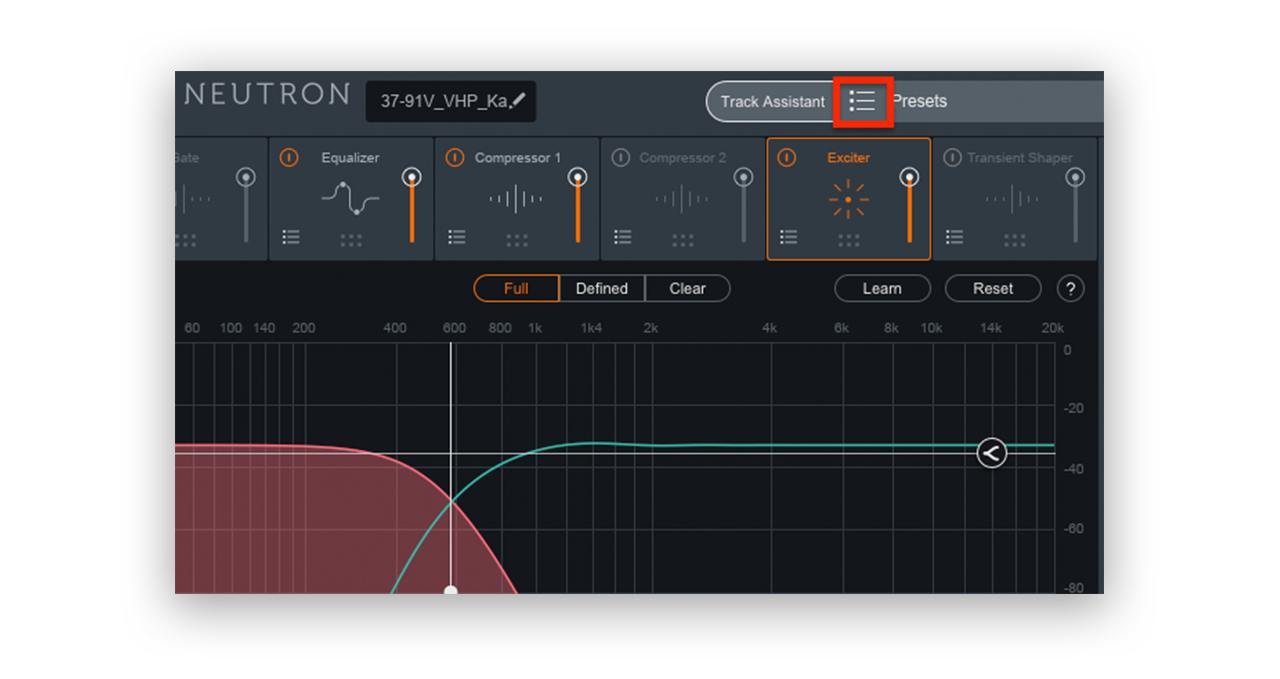
Presets
You can open the Presets menu by clicking on the icon near towards the top right of the interface:
I recommend starting your vocal remixing by auditioning the different presets as the vocals are playing. You can use the arrow keys to switch between presets and hear the changes in real time. Remember, you don’t always have to select a female-type preset for female vocals – experimenting with different preset types can create unique textures that might be perfect for your remix.
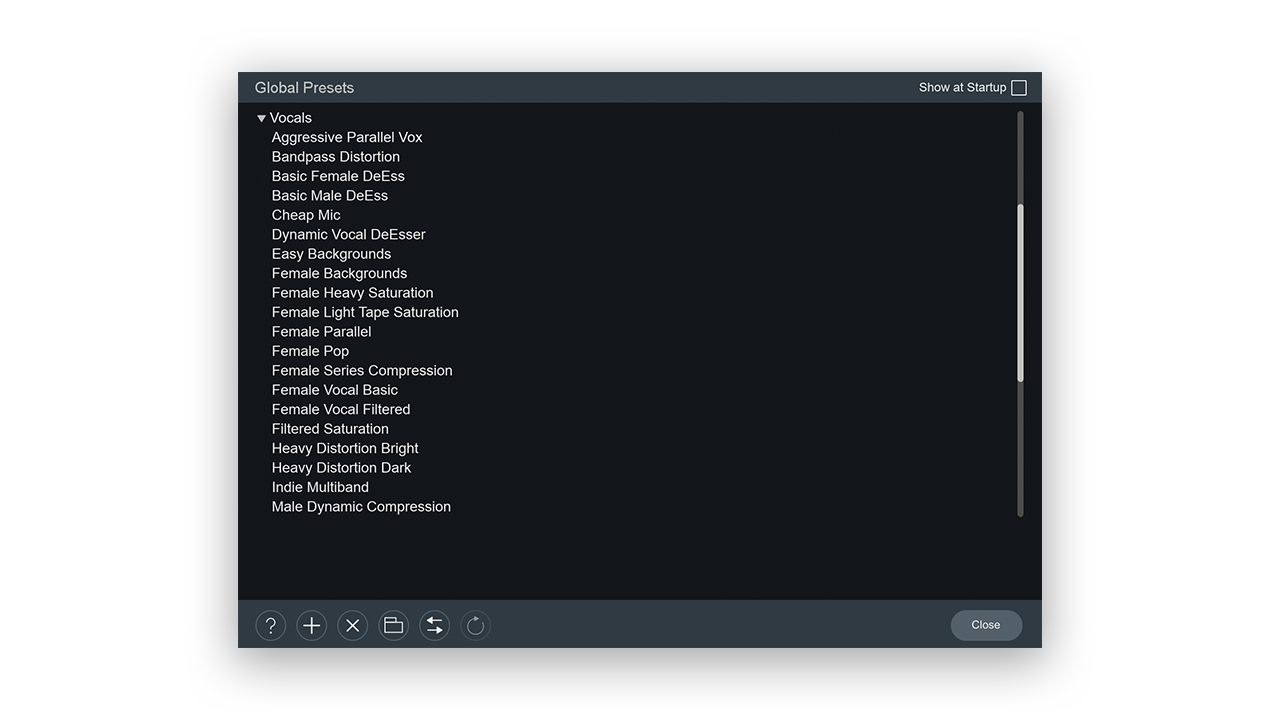
The presets are all fairly self-explanatory, but if you want more info you can single click the preset to see additional details about the preset displayed at the bottom. You can also set the preset as your default preset.

The Track Assistant
The Track Assistant is a powerful innovation in machine learning and intelligent audio processing that automatically finds a good starting point for your mix. Upon enabling the Track Assistant, you will be prompted to identify a few starting parameters. You can select “Voice” for the Instrument type, though experimenting with the parameter can also produce some creative results.
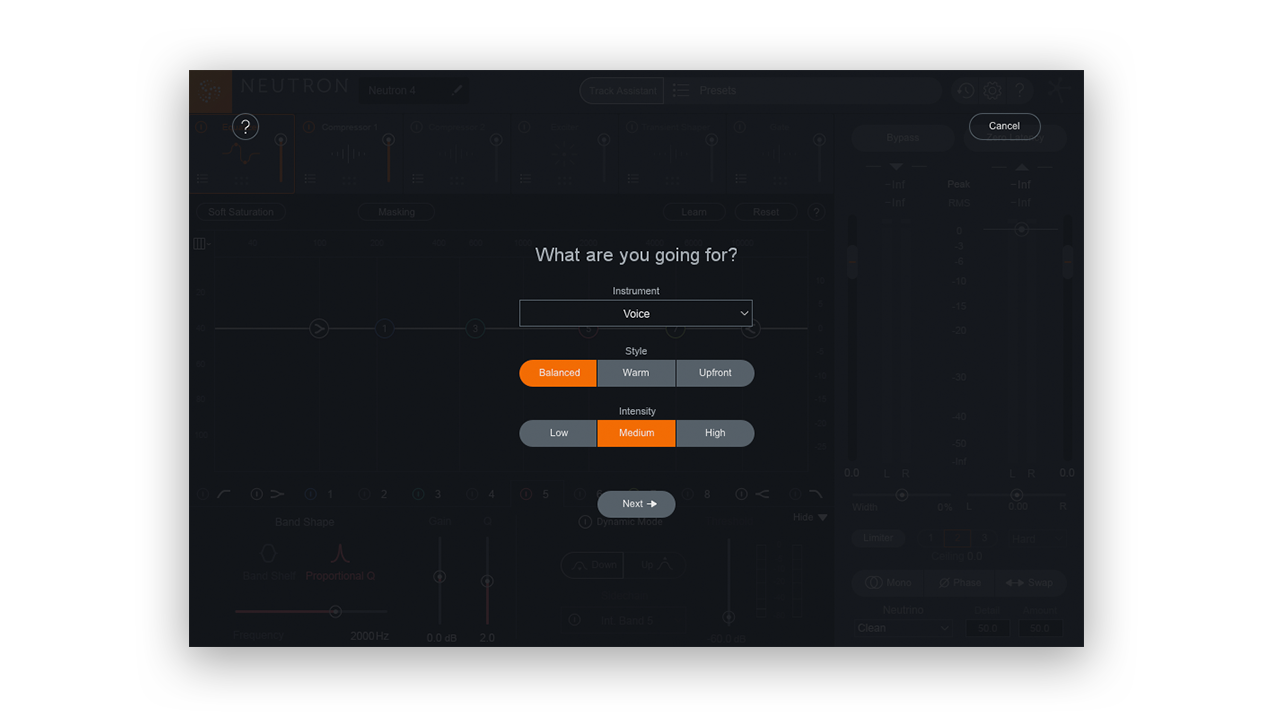
The three Style parameters will dictate the sonic character – “Balanced” provides an even broadband clarity, “Warm” boosts mids and lows, and “Upfront” emphasizes mids and highs. Lastly, the three Intensity parameters will determine the amount of overall processing applied. These choices affect the amount of processing, number of bands, and compression ratios, among other parameters.
When remixing vocals I like to use the Upfront style and Medium intensity. By using the Upfront style, Neutron 2 Advanced will ensure the vocals sit higher in the mix. I recommend you experiment with these parameters yourself to find starting points that work best for you.
Tools for sound designing your vocals
Once you’ve found a preset or used the Track Assistant to find a good starting point for your vocals, you can start fine-tuning the sound design with Neutron 2 Advanced‘s individual modules.
The Transient Shaper
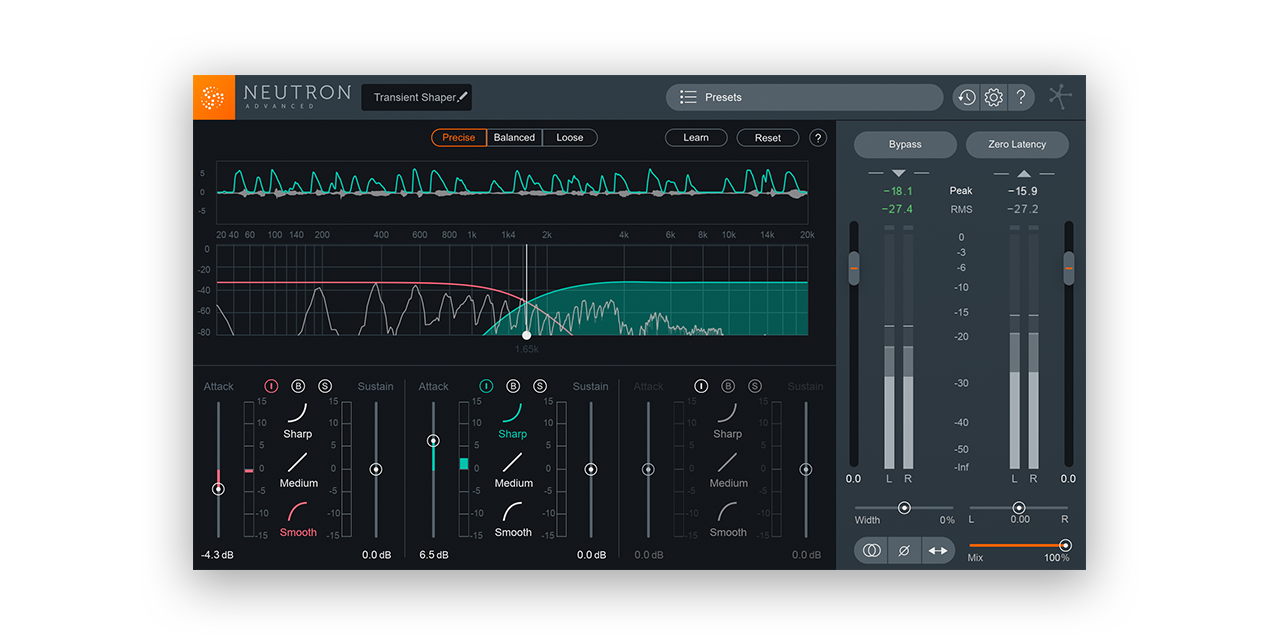
Neutron 2’s transient shaper can be divided into three frequency bands, which is very helpful when processing vocals. If your vocals lack clarity or seem muddy in general, try increasing the attack on the higher band (1 kHz and above) and decreasing attack on the lower band (1 kHz and below). This will emphasize the higher frequency pronunciation and can clear up a muddy vocal. Likewise, if you have a harsh vocal with a lot of sibilance, you can invert the previous settings to balance the vocals.
The Exciter
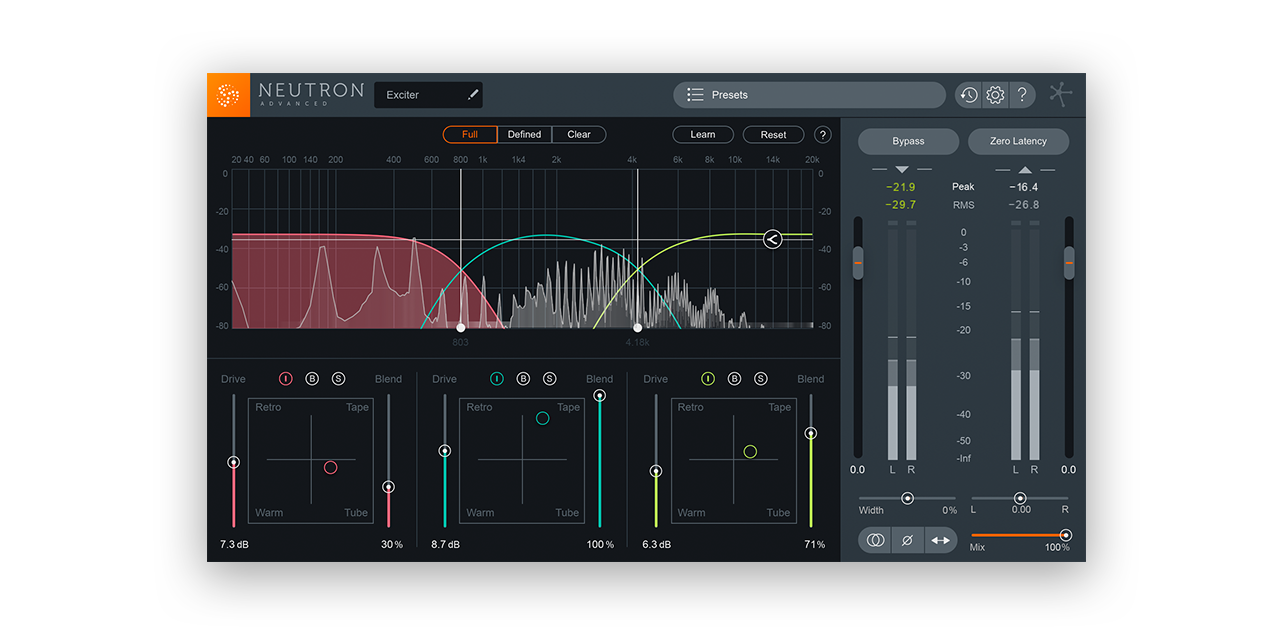
The Exciter can also be divided into three frequency bands, which allows you to apply different amounts of harmonic distortion to certain areas of your vocals’ frequency spectrum. The main parameter is the X/Y pad that blends the different harmonic profiles.
Placing the vocals in your mix
Once you’ve got your vocals sounding good on their own, it’s time to combine your vocals with the rest of the mix. Neutron 2 Advanced has several tools to help you balance your vocals in your mix.
Mix Tap

Mix Tap is iZotope’s lightweight utility plugin that can be loaded on tracks that don’t need an entire instance of Neutron or Ozone. Mix Tap features basic volume, panning, width and time delay controls. Try putting Mix Tap on your background vocal layers and turning on Time Delay. By delaying either the left or right side by four to twelve milliseconds you will create what’s known as the Haas Effect. This will make the background vocals appear wider than the main vocals and create more separation in the mix.
The real prowess of Mix Tap is its ability to be seen by Visual Mixer, Tonal Balance Control, and other instances of Neutron 2 and Ozone 8 Advanced. This means you can load Mix Tap on virtually all of your tracks so that they all appear inside the Visual Mixer.
The Visual Mixer

iZotope’s Visual Mixer allows you to see all Neutron 2 and Mix Tap instances in your project. This inter-plugin communication truly sets Neutron 2 Advanced apart from other mixing plugins.
By dragging the track bubbles upwards and downwards, the Visual Mixer will increase and decrease the volume of the track. Dragging left and right pans the track respectively. There is also a width control, which can be accessed using the small handles on either side of the track bubbles.
Try using the Visual Mixer to place your background vocals underneath your main vocal track. You can also make your vocals sound “bigger” by widening background and layered vocals (you generally want to avoid doing this on the lead vocals).
Masking Meter
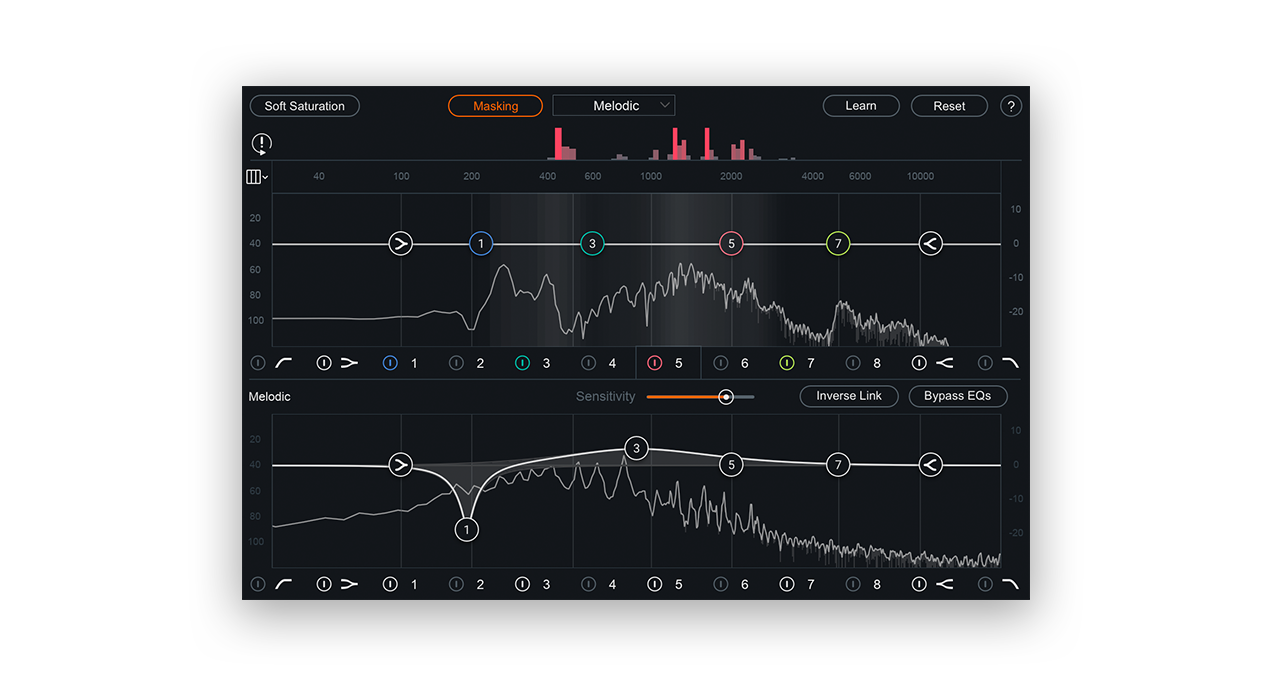
Neutron 2 Advanced’s Masking Meter feature allows us to compare the frequency content between two instances of Neutron 2. Open Neutron 2 Advanced on your main vocal track, then click on “Masking.” In the drop-down menu, try selecting a track that may interfere with the vocals (for example, guitars or keys). Neutron 2 Advanced will highlight parts of the frequency spectrum that may be clashing between the two instances. This will allow us to visualize which parts of the spectrum we may want to cut on the clashing track to allow more space for our vocals.
Are there any techniques that we missed? Do you have a favorite trick that you’d like to share? Let us know in the comments!
Use Splice Mobile to instantly test and record ideas, explore genres, and unlock new creative possibilities—all from your phone:
March 5, 2018