.svg)
.svg)


iZotope’s Neutron is an all-in-one mixing suite that takes the guesswork out of mixing.
With innovative mixing tools and top-notch versions of all the standard tools you might need to approach a mix (EQs, exciters, gates, compressors, and much more), Neutron is a powerful addition to any mixing workflow.
Neutron 4 takes this up a notch by adding brand-new tools and updating some of the fan-favorite features from the Neutron line. In this article, we’ll run through a few of these key features and how they can help bring impact, presence, and clarity to your next mix.
The new Mix Assistant View
A quick note on the iZotope’s Assistant features
Long-time iZotope users are likely familiar with the ‘Assistant’ features found across their roster of plugins, particularly in flagship suites like Neutron, Ozone, and Nectar. These plugins act as channel strips, featuring individual modules (EQs, compressors, etc.) to process your audio.
For those who aren’t familiar with iZotope’s assistants, many iZotope plugins feature an AI-powered workflow in which the plugin listens to incoming audio and sets a custom effect chain according to targets that you outline and the analysis of thousands of professional tracks.
These assistant workflows aren’t intended to “mix your track for you,” but instead shave hours off of a mixing or mastering session by offering a great starting point in minutes, ensuring that you’re on the path to a professional-sounding track.
The assistant workflows show up as Mix Assistant in Neutron, Master Assistant in Ozone, and Vocal Assistant in Nectar. In their recent string of updates, iZotope has turned this workflow into a dedicated Assistant View, allowing for intuitive and quick adjustments.
How this shows up in Neutron
Neutron features an Assistant View like this, which hinges off of the concept of identifying a “target” for Mix Assistant to hit.
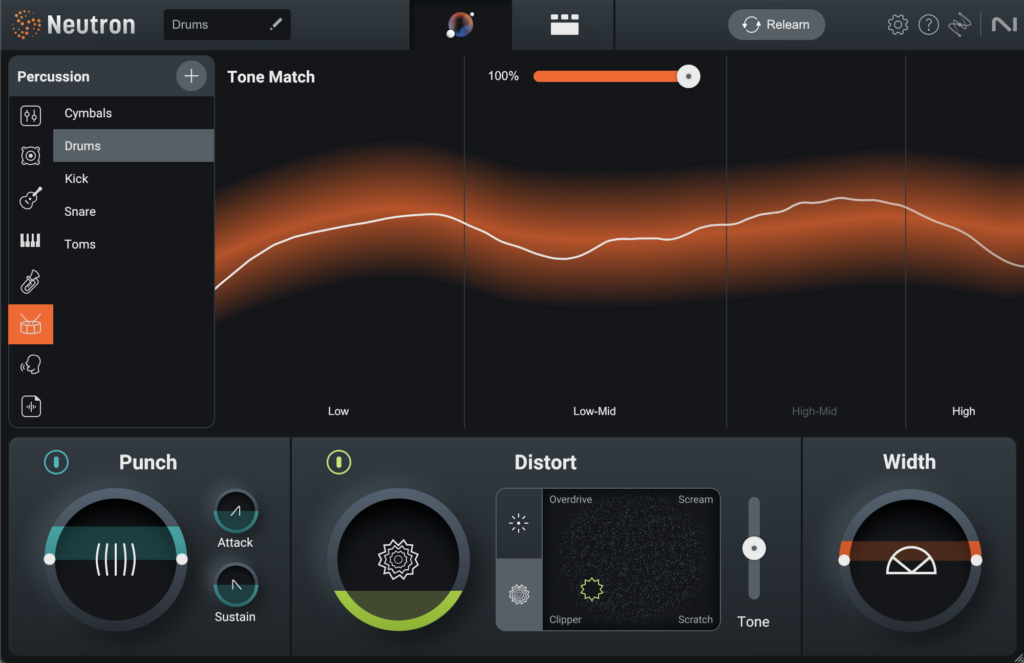
First, you’ll want to click the Relearn button and play some audio so Neutron can analyze your audio. Mix Assistant will then display a tonal balance target curve in the center of the Assistant View that represents the frequency and dynamic information that Neutron recommends for your track (the target is the hazy orange line, while your audio is the defined white line).
Sometimes, this might be all you need, but if you had something else in mind, you can take advantage of a few other controls here to communicate your intent to the assistant.
On the left-hand side of Neutron’s Mix Assistant View, you’ll find a Target Library, featuring AI-analyzed profiles of how a variety of instruments, vocals, and drums “should” sound. You can use these targets to “teach” Mix Assistant the spectral profile that you’re looking for.
Looking for a highly specific sound? You can also load your own audio into Neutron’s Target Library to guide Mix Assistant’s processing (using the plus button). Love the sound of a drum loop you found? Create a custom target and put Neutron on your drum bus to push your drums in that direction.
Neutron’s Assistant View also features four “intent-based controls”—the Tone Match slider at the top and the Punch, Distort, and Width sections. These sections act as macros to control the parameters in Neutron’s underlying effects chain:
- The Tone Match slider pushes your audio towards or pulls it away from your selected target. As you increase the slider, you should see the white line representing your audio lock into the target spectrum. This macro is directly linked to two parameters in Neutron’s powerful Sculptor module, which we’ll cover later in this article.
- Punch affects Neutron’s Compressor, adjusting the punchiness of your sound (we’ll also cover this new feature in the Compressor a bit later).
- Distort is a slimmed-down version of the Exciter module, letting you blend between different distortion and saturation profiles (we’ll talk about the Trash Mode that was introduced in Neutron 4 later, too).
- Width widens or narrows the stereo image of your audio.
A review of Balance Assistant
Long-time Neutron users are probably also familiar with a prior feature of Neutron’s Mix Assistant, which was called Balance Assistant. You can still access this feature, but only through Visual Mixer, a graphical mixing plugin that comes with Neutron 4.
With Balance Assistant, you can automatically generate a rough “level mix” for your entire project. The relative level of your tracks is arguably the most important aspect of any mix, so this feature alone can shave tons of time off your project.
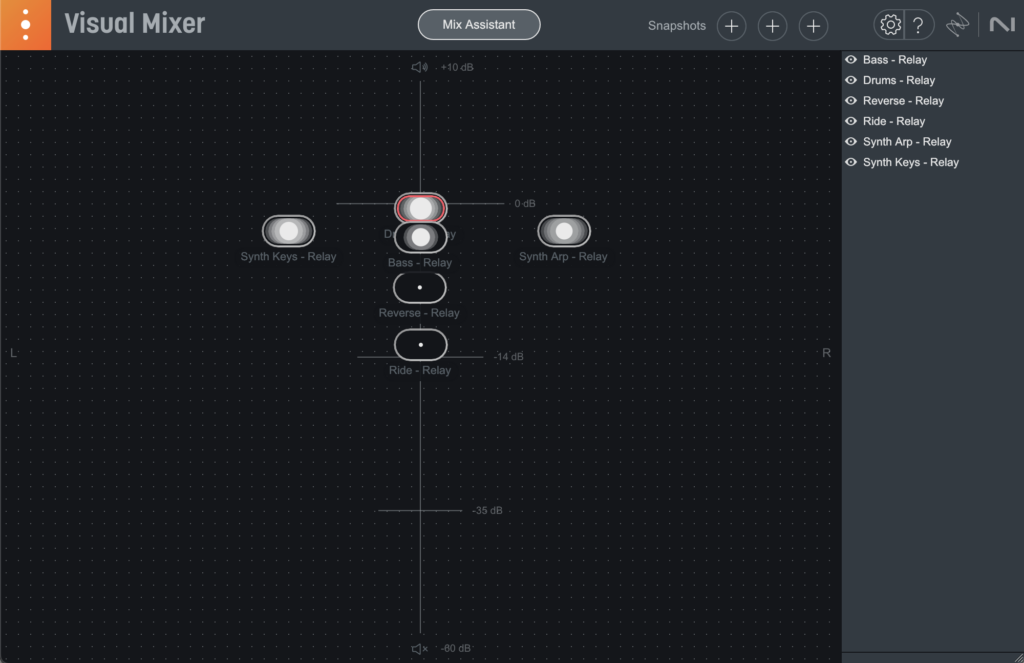
This is Visual Mixer, a plugin that recognizes every channel in your project with an iZotope plugin on it. With Visual Mixer on your master channel, you’ll see every one of these channels as an individual node in a 2D space (the X-axis controls the pan setting in each of those iZotope plugins, while the Y-axis controls the output level of each of those plugins).
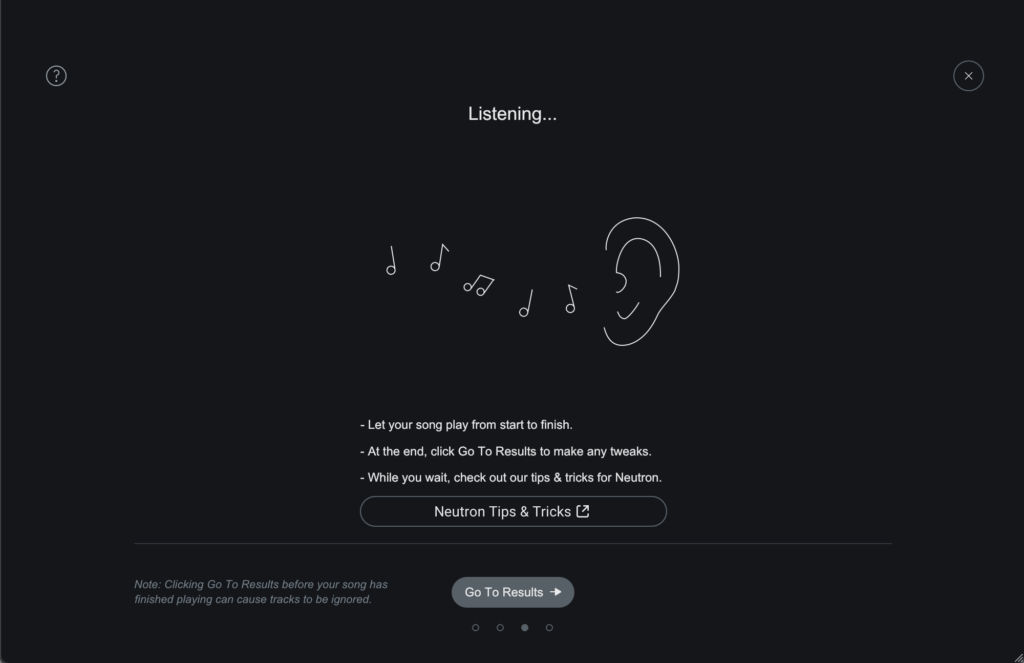
In Visual Mixer, simply click the Mix Assistant button and follow the on-screen instructions to get your rough level mix (the best and lightest-weight way to do this is to load the free Relay plugin onto every channel and set all of your channel faders to unity gain).
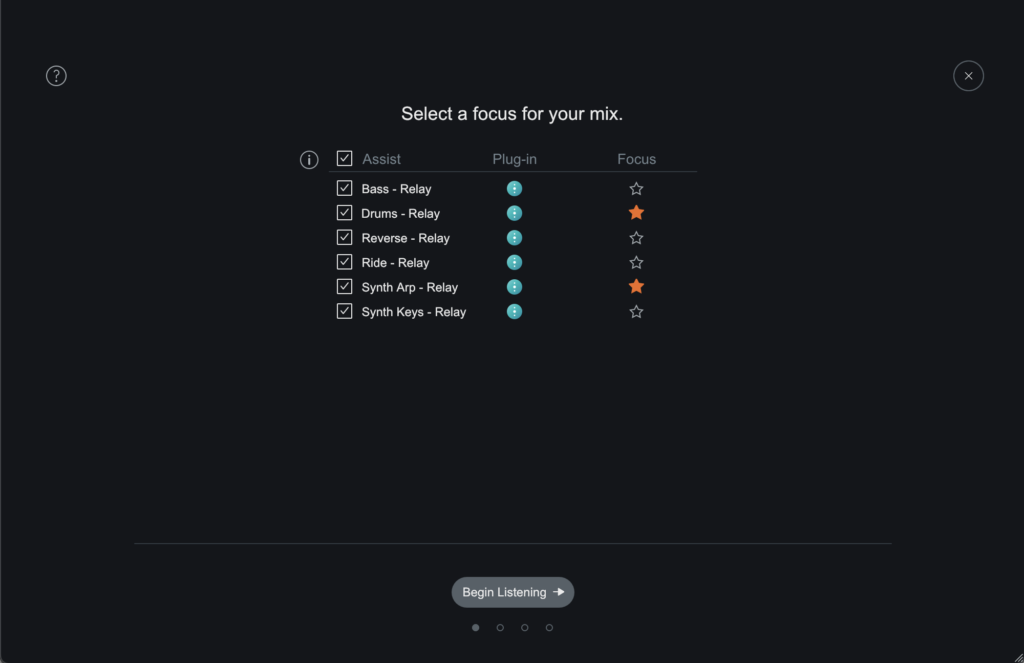
After identifying the focus elements of your mix (main leads, bass, kick drum, etc.), just click Begin Listening and start your track from the beginning, and Visual Mixer will adjust the level faders on each instance of Relay to match your intended balance.
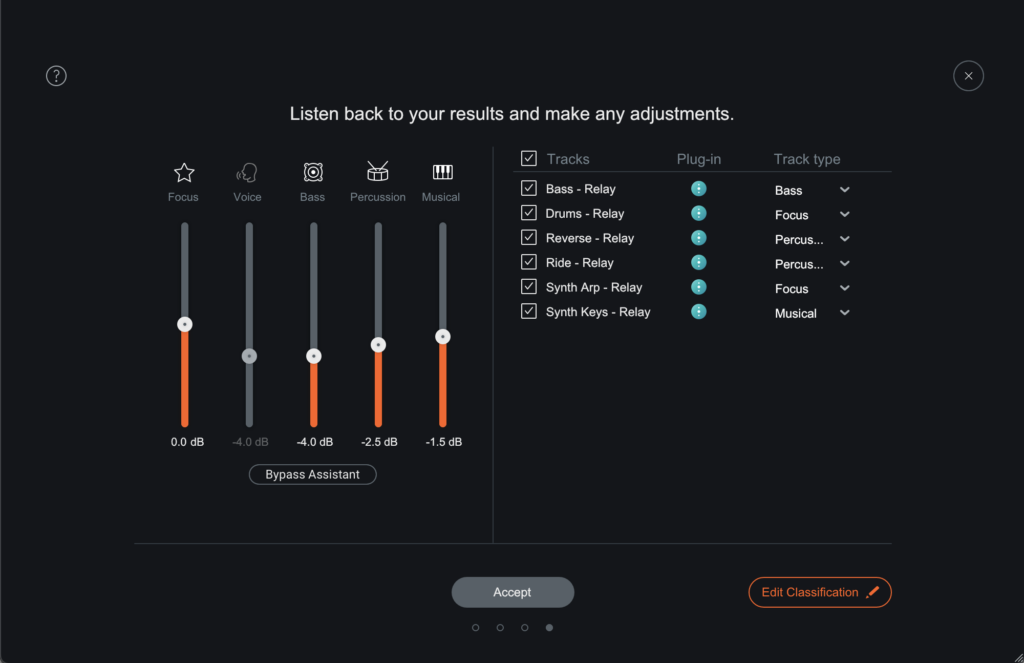
After this processing is done, you can adjust the group sliders—or even the individual nodes in the Visual Mixer environment—to fine-tune your mix. Did Mix Assistant mis-categorize one of your channels? Just click the Edit Classification button to adjust.
Unique mixing tools in Neutron
In addition to the Mix Assistant updates, Neutron 4 features a couple unique processors that can streamline and improve any mix. To access the individual modules in Neutron, just click the Detailed View button at the top of the plugin, and you’ll be able to add, adjust, and remove individual mixing modules.
Umask
Sometimes, two elements in your mix will occupy the same frequency range, limiting the clarity of both elements. This is especially problematic when the most prominent frequencies in each element overlap with each other.
Typically, one of these elements should be more prominent, and the best way to do this is to reduce its most important frequencies in the element that’s “masking” it.
New to Neutron 4, the Unmask module makes this simple, stemming from iZotope’s masking technology (also used in the Masking Meter feature in Neutron’s EQ).
The Unmask module works by first detecting masking between the two sources, and then using a sidechain signal to trigger frequency-specific gain reduction in the “masking” element. This all happens under-the-hood, so all you have to do is set the amount of gain reduction you want.
First, add the Unmask module in an instance of Neutron on the “masking” channel—the element that you want to attenuate. Neutron 4 also comes with component plugins, letting you load only the Unmasking module onto the channel as its own plugin.
Once you’ve loaded up Unmask on the element that’s crowding your mix, set the sidechain source in Neutron (in the top-right of the plugin) to the element that you want to create space for. A perfect example would be making space for a lead synth element against a keyboard or pad part.
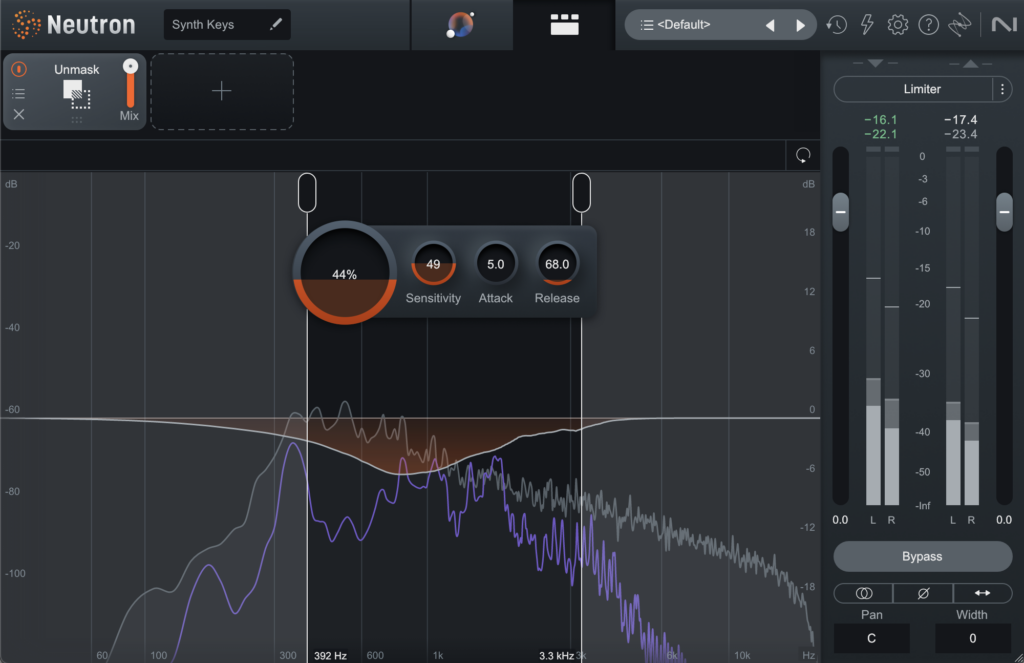
Once you’ve selected the sidechain source, the meter in the Unmask module will show where the frequency content of this channel (the gray line) overlaps with frequency content in your sidechain signal (the purple line). This tells Neutron where gain reduction should occur.
Now, whenever the lead synth is present, dynamic gain reduction will occur in the keyboard / pad part to reduce the overlapping frequencies, according to the following controls you set in Unmask:
- Amount: The amount of gain reduction applied to masking frequencies.
- Sensitivity: The level of masking at which gain reduction beings (at low sensitivity, only areas of excessive masking will be affected).
- Attack: How quickly unmasking is applied once the sidechain signal is active.
- Release: How quickly unmasking stops once the sidechain signal falls below the threshold.
- Filters: This establishes the region of the frequency spectrum where the Unmask module is applied.
You’ll see the amount of gain reduction being applied with the orange Difference Meter. This module makes it easy to create space in your mix for key elements without tons of routing, automation, and frankly, headache.
Sculptor
The Sculptor module provides a per-band army of compressors and EQs that operate as one to shape your tracks. When you use Sculptor, you’ll be prompted to select a target to begin shaping your audio.

If it’s on your master track, one of the all-purpose targets such as Add Fullness or Add Punch may be a good option. If you’re using Sculptor on an individual track, there are a variety of instrument-specific targets (Acoustic Guitar, Dialogue, etc.) that you can pick from.
Once you select a target, Sculptor will listen to your track and generate an intelligent setting for you to work off of. Circular sliders can be used to adjust the Dry / Wet mix, Tone, and Speed of Sculptor’s processing. If you’ve run Mix Assistant, you can also adjust the Assistant Pre-EQ slider to introduce static EQ adjustments before Sculptor performs its dynamic adjustments.
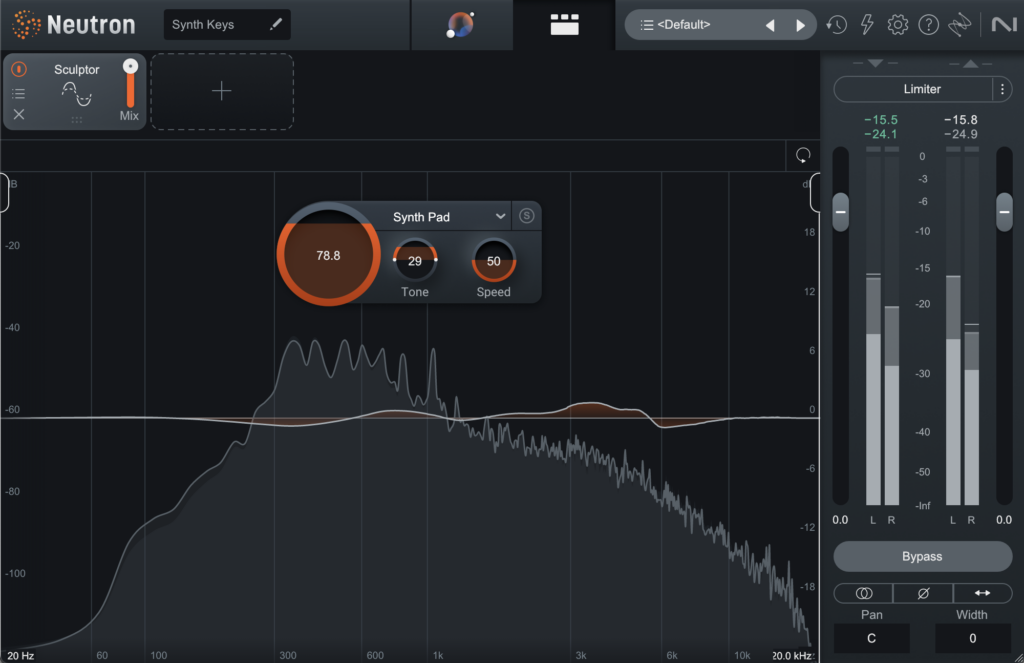
So, in just a couple of clicks, you’re able to dynamically push your audio towards the spectral balance of your target. And remember that we said Sculptor is controlled by a Mix Assistant macro control? The Tone Match slider in the Assistant View is directly linked to the Amount and Assistant Pre-EQ controls.
New features in existing modules
In addition to these newer tools, Neutron 4 also introduces some brand-new features to the modules from prior versions.
Exciter (Trash Mode)
Some of the tech behind iZotope’s fan-favorite distortion plugin Trash 2 is now in Neutron. In addition to the Exciter module’s four classic saturation / distortion profiles (Retro, Tape, Warm, and Tube), there are now four additional “Trash Mode” profiles (Overdrive, Scream, Clipper, and Scratch).
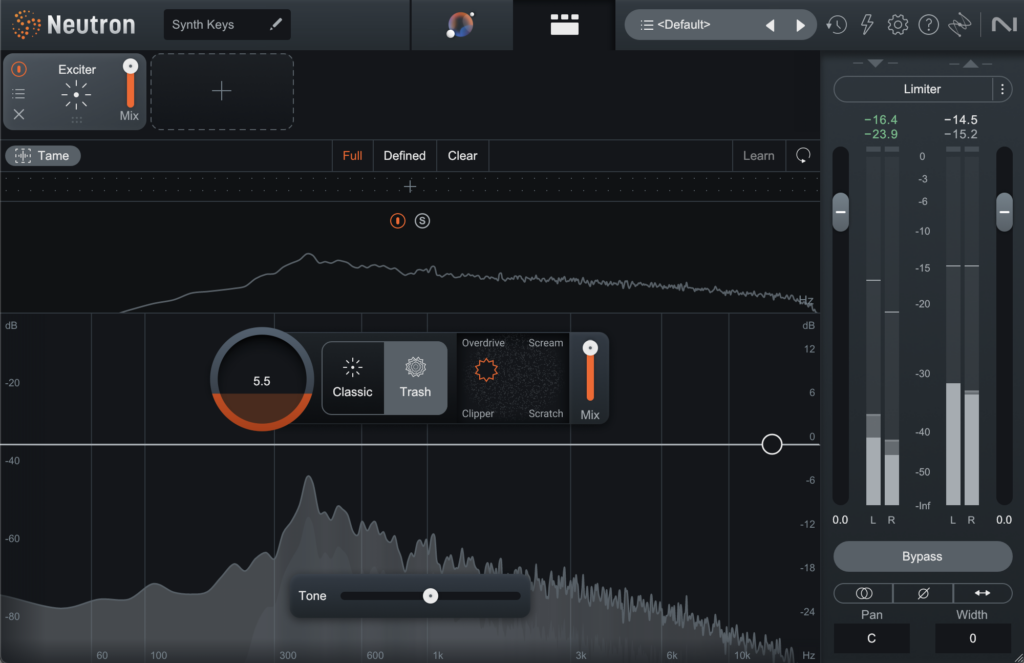
This lets you take the Exciter module past subtle saturation and into the total destruction of aggressive distortion. Looking to preserve dynamics while using this new Trash Mode? Just engage the Tame button in the top-left of the Exciter module to do exactly that.
Compressor (Punch Mode)
Neutron’s Compressor module now features a new way to increase or reduce the “punch” of any audio, from drums and bass to individual instruments. You can access these controls either from the Punch intent control on the Assistant View, or by diving into the Compressor module itself in the Detailed View.
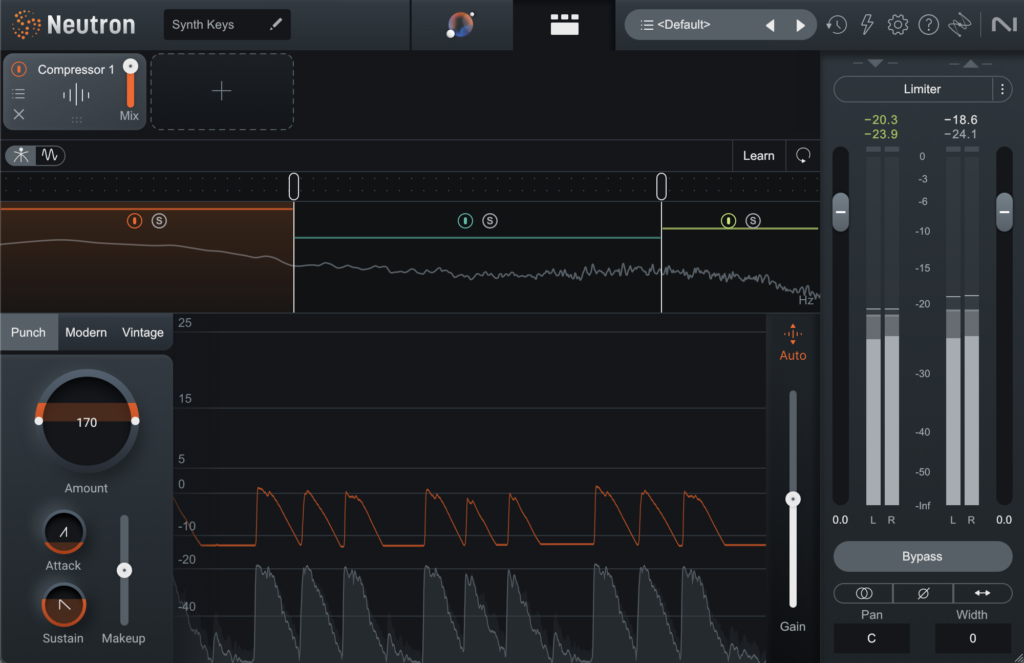
The Amount control increases or decreases the dynamic range of the incoming signal (effectively expansion and compression, respectively). The Attack and Release controls can then be set to define the shape of this processing.
For even greater control, you can split the Compressor module in the Detailed View to process separate frequency ranges differently. This is perfect when you want different amounts of punchiness in different frequencies, like when you’re processing a drum bus.
Compressor (Sidechain Metering)
The Compressor module features an Oscilloscope view, which lets you see the waveform of audio running through Neutron in white.
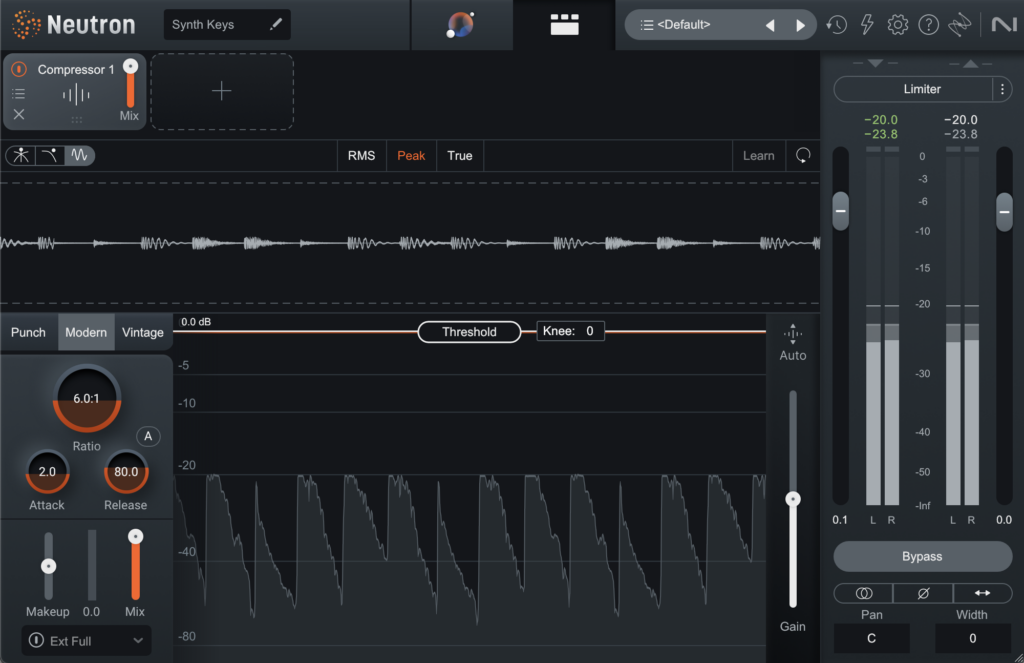
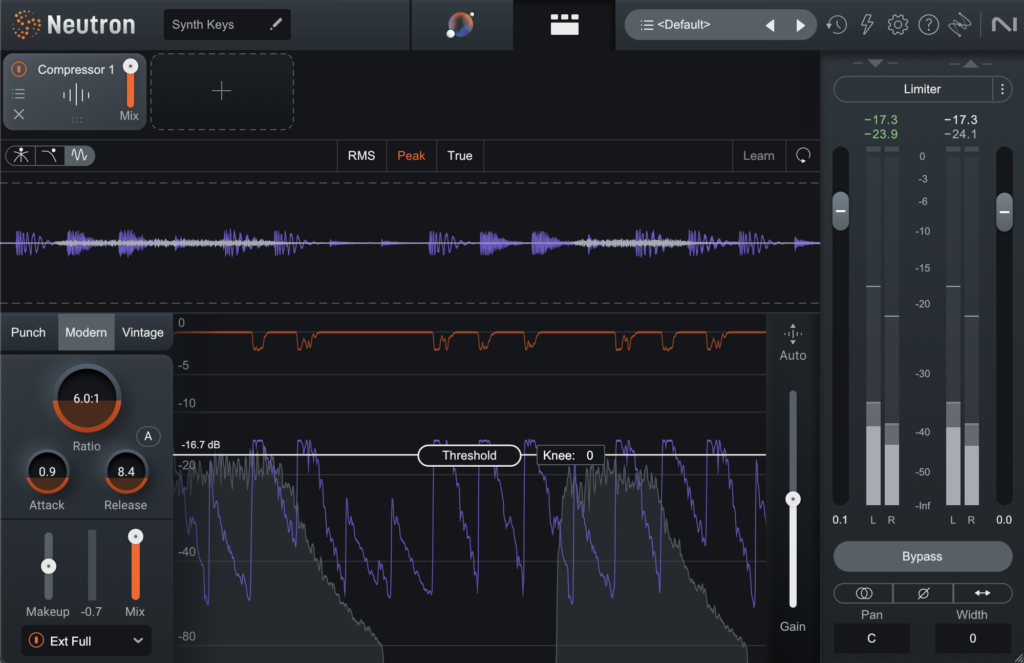
This is great for seeing the impact your compression decisions have on your sound, and it also makes it super easy to dial-in your sidechain compression.
With Sidechain mode activated, you’ll see the waveform of your sidechain signal in purple. This is a great visual helper for carving out the exact space that you need for this signal to cut through the mix.
Get mixing and try Neutron for free
These are just some of the many ways that iZotope’s Neutron can fit into any mixing workflow. And with its improved GUI and faster performance, Neutron 4 is the most equipped, powerful, and fun version of Neutron yet.
Want to test these tools for yourself? You can try Neutron 4 through Splice for absolutely free for three days, and then pay only $19.99/mo for 20 months until it’s yours for good. Happy mixing!
Try Neutron 4 free for three days, and then rent-to-own it for $19.99/mo until you own it outright:
December 4, 2023