.svg)
.svg)


We are excited to be able to have Ableton Certified Trainer, Alec Ness (producing as “su na“) to walk us through his production methods and philosophies on how to produce a Future Beats track. Su Na recently released Surface EP with coverage from The Fader and Thissongissick and much more. You can find out more about Su Na and listen to his music on his SoundCloud and Facebook page.
Before reading, please check out Part 1: Pre Production and Part 2: Production & Composition of this blog series.
Part 3: Mixing
1. Before the Mixdown
- Composition is the biggest part of our mix thus It’s important to make sure we have balanced instrumentation or we won’t have a balanced mix. Compare your work to another finished song and listen to any holes in your composition. Do you have enough melodic content to make the song memorable? Is the track missing mid-low frequencies due to a pure sine-wave bass?
- Sometimes it’s beneficial to bounce stems from your session and start a fresh project for the mix. This gives you fresh perspective and more available CPU to process plugins.
2. Spectral Balance
- One of the most crucial parts of a good mix is balance across the entire frequency spectrum. You can use free tools like Voxengo Span to check this.

- Looking for imbalance in your frequency spectrum can help account for monitors that can’t reproduce all frequencies in your music.
- Since we’re using synthesized sounds we may struggle with “one dimensional” sounds that have a large spike in their fundamental frequency and don’t have many natural harmonics. Read about the solution below in “Sound Shaping”.
- For example, bass is huge problem in electronic music. If you have a pure sine wave bass it will be virtually inaudible on smaller speakers. It’s beneficial to have a bass sound with harmonics that extend into the higher frequencies so that it translates to all listening systems.

3. Sound Shaping – Filtering and Saturation
- So how do we create those harmonics if our sounds are very digital or dull? Tools like saturation help by using subtle distortion to add harmonics
- Filtering is another way to make our sounds more interesting and give them character. Additionally, it’s a key element to cleaning up our mix.
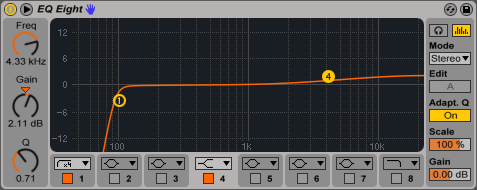
- Filtering also helps cut away unnecessary frequencies opening up the mix. This is an essential part of Equalizing. Equalization for me is typically subtle, 90% of my EQ’s are high pass or low pass filters to cut out unnecessary frequencies and leave more headroom for important sounds. This can be accomplished with either an EQ plugin or a filter plugin.
- EQ can also be useful to add subtle frequency boosts as seen in the image above.

4. Stereo Mixing
- Another key element to a good mix is stereo balance. We can use a tools like iZotope’s Ozone to monitor the width of our mix. See a narrow mono mix and wide stereo mix below.
- Stereo width is total difference between the two speakers. So we have two prominent mix elements panned hard left and right that will create a substantial difference and make our mix sound very wide.
- The key is to pan things across the frequency spectrum to create a nice wide stereo image while using your judgement to make sure it still sounds balanced.
- It is also possible to make a singular sound wider by using effects like chorus, reverb, delay or mid/side EQ. There are also stereo processing plugins from companies like Waves and iZotope. It’s important to be careful with these however as they may introduce phase problems if your mix is played back in mono. Learn more about phase here.
- I prefer keeping things closer to mono and then panning them to create more total stereo difference. Ableton’s Reverb has a “stereo” adjustment which (if turned to 0) allows us to add depth to a sound while keeping it mono, then we can pan it to one side without many phase problems at all.
- Additionally on this track I’ve used some subtle mid/side equalizing to push certain frequencies into the stereo field using phasing. Find out more about mid/side processing here.


5. Dynamics
- A full overview of dynamics is beyond the scope of this article. However, we’ll cover the basic types of compression that can be used.
- Read more about compression here.
- Note that side chaining is a massive part “beats” music, it’s largely what gives it the signature heavy drum sound. Check out this Teebs song below for an example.
https://www.youtube.com/watch?v=8SyHJVB8-RU
6. Time Effects & Return Processing
- Lastly, in addition to using stereo, dynamics, saturation and filtering, there are a number of other creative effects we can use also. I’ve used 3 return tracks with reverb and delay to send multiple instruments to each type of space effect. This helps add more depth to our track as it increases the sustain of these instruments and helps put them in a sonic space.
For Part 4: Mastering, Click Here.
August 31, 2016


