.svg)
.svg)


XLN Audio has been distributing high-quality music creation software since 2005.
You may already know them for their fan-favorite multi-effects plugin RC-20, or their realistic instrument plugins like Addictive Keys or Addictive Drums. In this article, you’ll learn how to use their beat-making plugin XO, a tool that takes a unique approach to drum production that allows you to fine tune grooves and pick the perfect samples to fit the vibe of your track.
First, we’ll take a look at XO’s major controls, which are largely contained in the two main pages (Space and Edit). Then, using its bounty of samples and groove presets, we’ll quickly demonstrate a typical workflow and find a groove we like in the blink of an eye. Let’s get into it!
Note: XO displays some helpful tips along the bottom of the plugin window—be sure to check those out if you’re new.
An overview of XO
At its core, XO is a highly editable eight-channel drum sequencer with a unique take on sample selection. With XO, you can program grooves—or select from and tweak hundreds of preset grooves—using factory samples or your own curated library. And with XO’s filtering and sample organization, it’s simple to find just the sound you’re hearing in your head.
The Top Bar
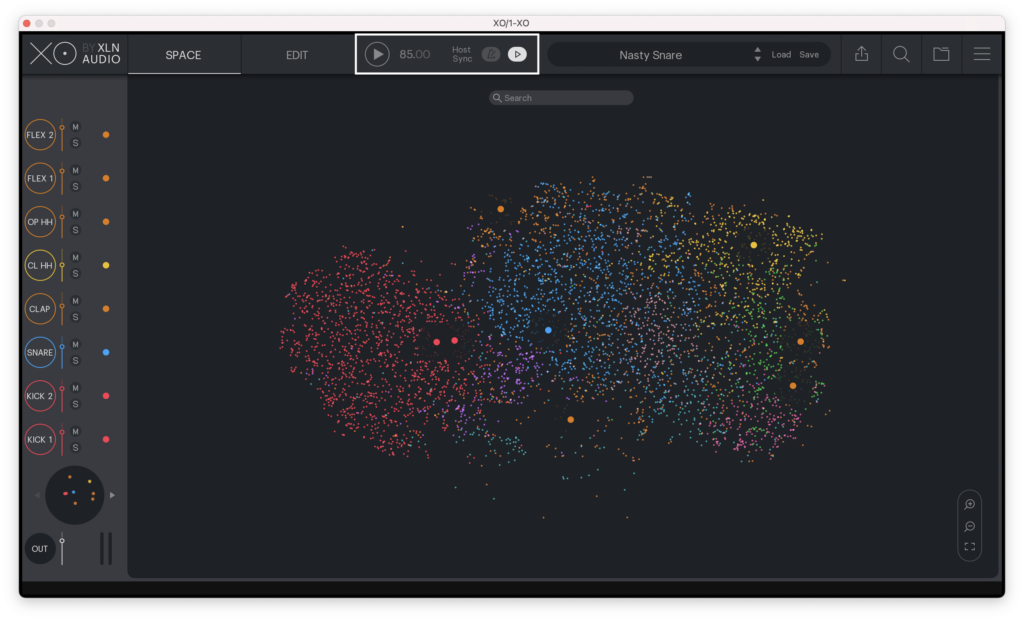
Before we dive into sequencing and tweaking samples, let’s just take a second to go over the controls at the top of XO’s UI.
First are the buttons for the Space and Edit pages, the main sections of the UI. We’ll dive specifically into each of these in just a moment.
Next you’ll find tempo controls, including the Tempo itself and options to lock XO’s tempo and playback to your DAW’s tempo and playback.
To the right of that, you’ll find the Preset Browser, which we’ll use to kickstart a groove later in this article.
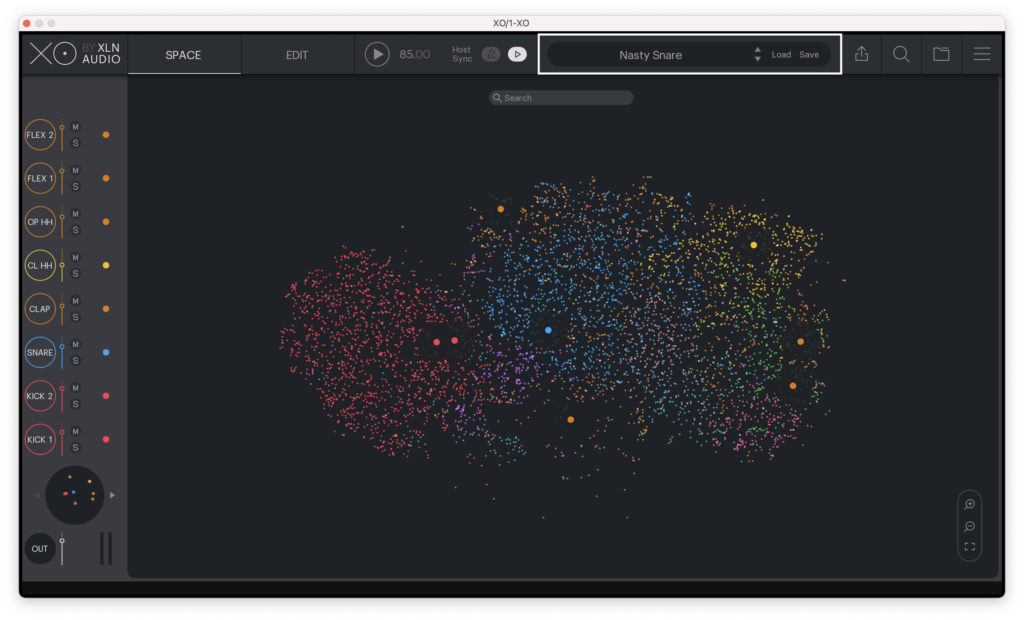
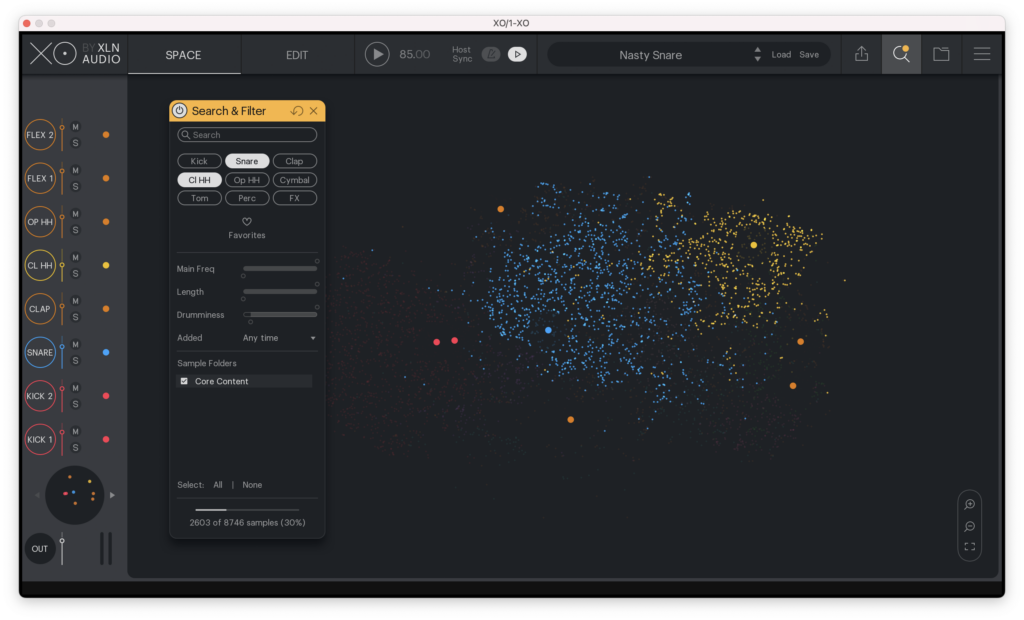
And to the right of the Preset Browser, you’ll find a few more panels, as follows from left to right: Export WAV & MIDI, Search & Filter, Sample Folders, and the Top Bar Menu.
We’ll cover these as they come up in the context of working in the Space and Edit pages.
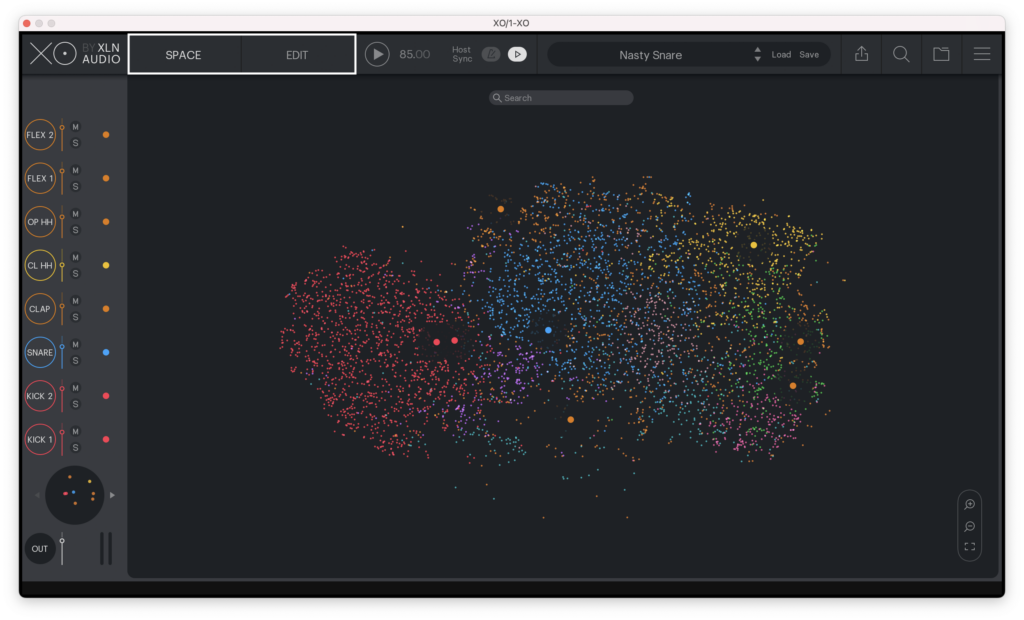
The Space page and the eight drum tracks
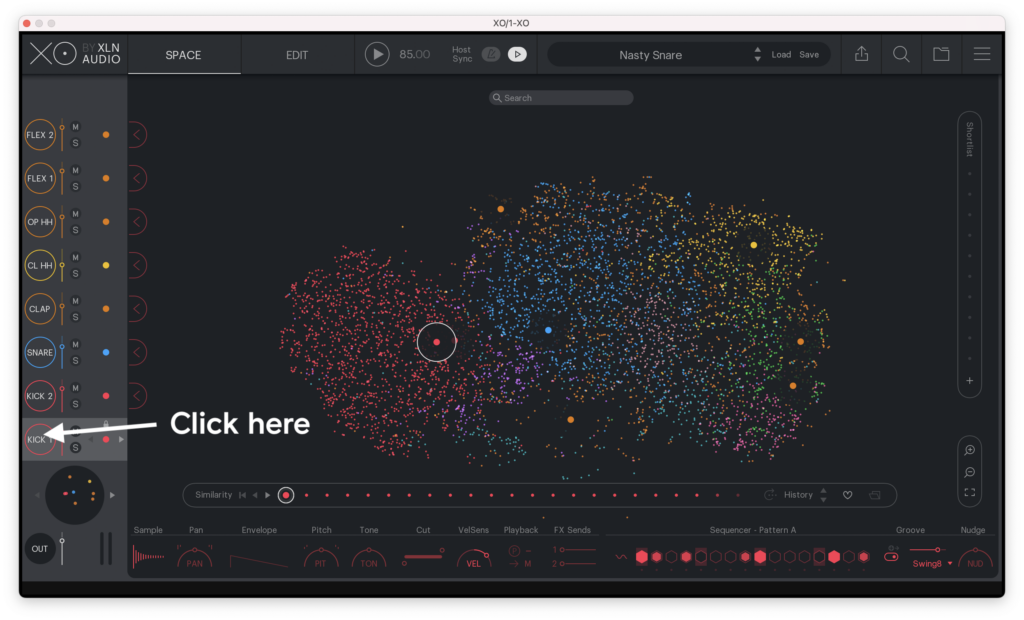
When you first load up XO, you’ll probably be met by an array of little colored dots, swimming in a void of black. This is the Space page, and each of these nodes represents a sample. You can consider this a constellation of your sample library, with each color denoting a specific kind of drum sound (red for kicks, blue for snares, etc.).
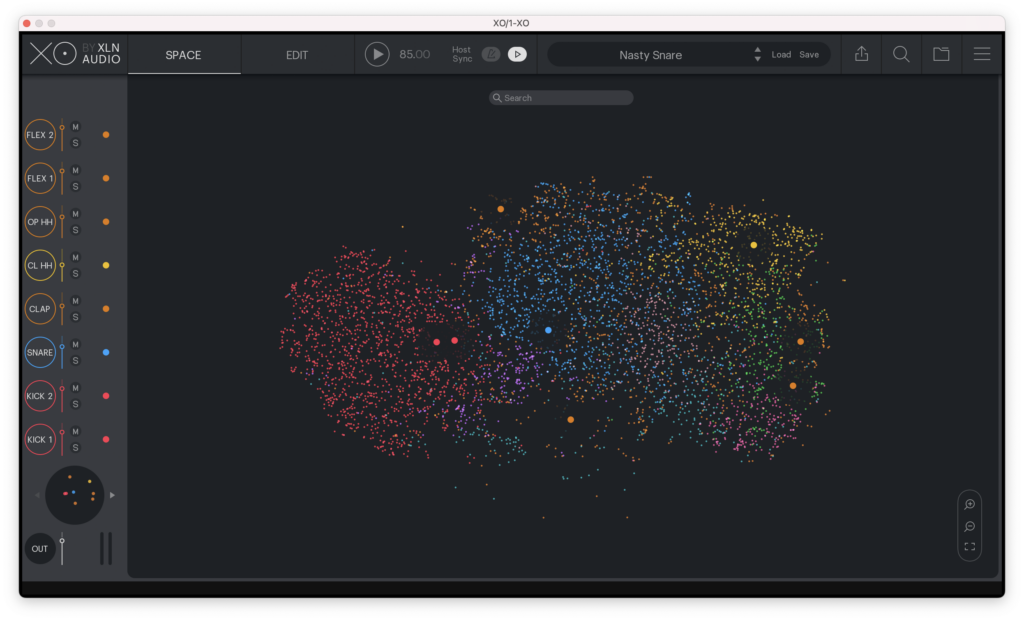
Samples are located near similar-sounding samples, so if at any point you’re not quite feeling one of the drum sounds in your beat, finding a similar sound is as easy as searching around that node in the Space page.
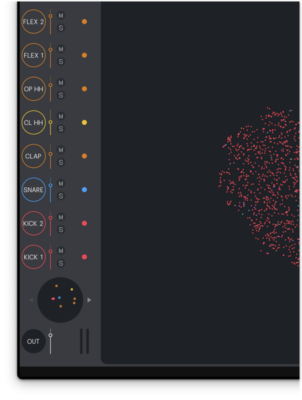
On the left side of the plugin, you’ll notice 8 lanes: Kick 1, Kick 2, Snare, Clap, CL HH, OP HH, Flex 1, and Flex 2. These are the eight channels in XO’s sequencer, each of which can contain any sample in XO. You’ll also notice that this area on the left side of the plugin is where you can adjust each channel’s output volume, mute, and solo controls. The master output control is also located here.
If you’re not feeling the kit that’s loaded up, there are a few ways to change out sounds in your kit for new samples.
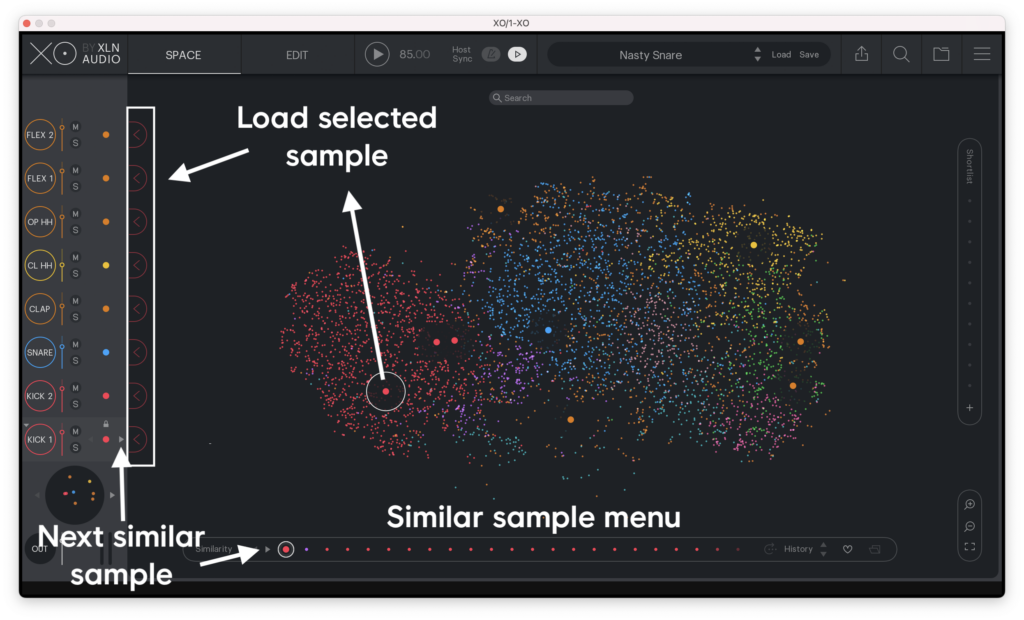
First, you can just click around the nodes in the Space page to audition samples. When you have any sample in the Space selected, you’ll notice some icons appear to the right of your channels. Click any of these icons to load the selected sample into that channel.
You’ll notice a Similarity menu appear at the bottom of the UI when you have a sample selected in the Space. You can use this to quickly find similar sounds to the one you’ve selected in the Space. There are also Next / Previous Similar Sample arrows located on the channels that let you find similar sounds to the samples you currently have loaded into those eight tracks.
Alternatively, you could use XO’s hot-swapping feature to audition new samples while the beat is playing. Click the little colored dot next to the mute and solo buttons to engage the hot-swap mode. Now, you can use any of the previously mentioned methods to switch this sample out on-the-fly. This is actually done non-destructively, so feel free to experiment knowing that you can lock in your selection when you’re happy.

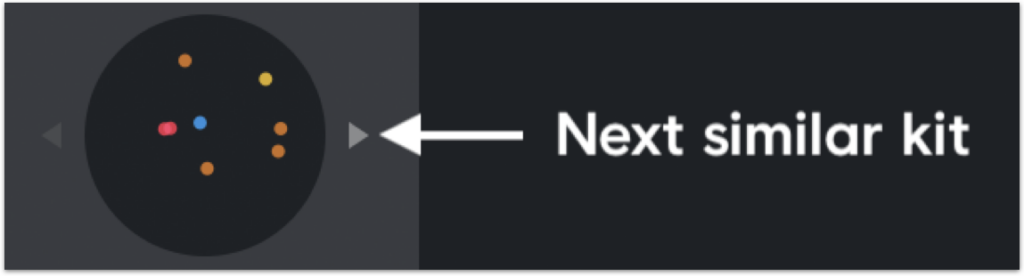
Lastly, if you want to completely switch things up, you can change the full kit out for similar samples using the Kit Similarity arrows shown below. This will change out all eight samples and give your kit a whole new feel while keeping the same groove.
If the Space page is feeling a bit overwhelming with all these nodes, never fear! Remember that Search & Filter panel we were discussing earlier? Click the magnifying glass icon in the Top Bar to open that panel, where you can filter the active nodes in the Space page by type of drum sound, frequency, sample length, ‘drumminess’ (more percussive / transient sounds), and even how recently a sample was added to XO’s library. Or, if you know the name of a sample you’re looking for, you can always just search for it in the search bar.
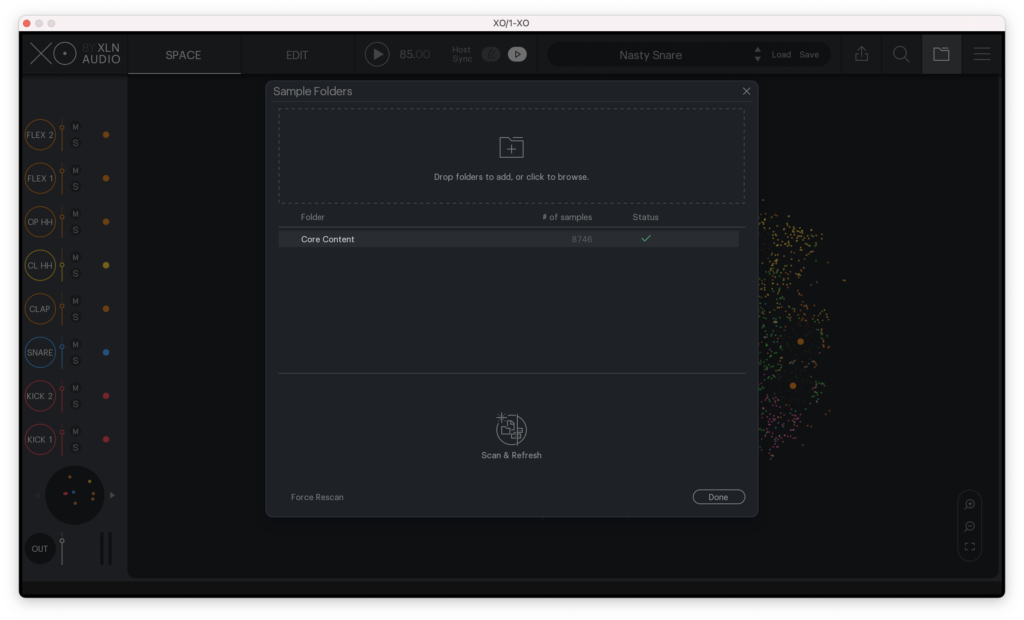
Need more samples to work with? You can add new samples to XO’s database using the Sample Folders panel from earlier. Click the folder icon in the Top Bar to open the panel, and simply drop folders or browse your computer for the location of the samples you’d like to add. Then, click Scan & Refresh to add these samples to the Space page.
On each track, if you click the circle with the channel name, you’ll hear the sample played, but you’ll also see a whole bunch of new controls show up at the bottom of the UI. These controls can be used to tweak the actual drum sample, effects, and the groove that sample is playing, and even select similar samples for this particular track.
Before we get ahead of ourselves, let’s quickly pop over to the Edit page to contextualize these new controls.
The Edit page
You’ll notice that the Edit page contains all the controls we were just looking at in the Space page, but now we can see all these controls for all eight tracks.
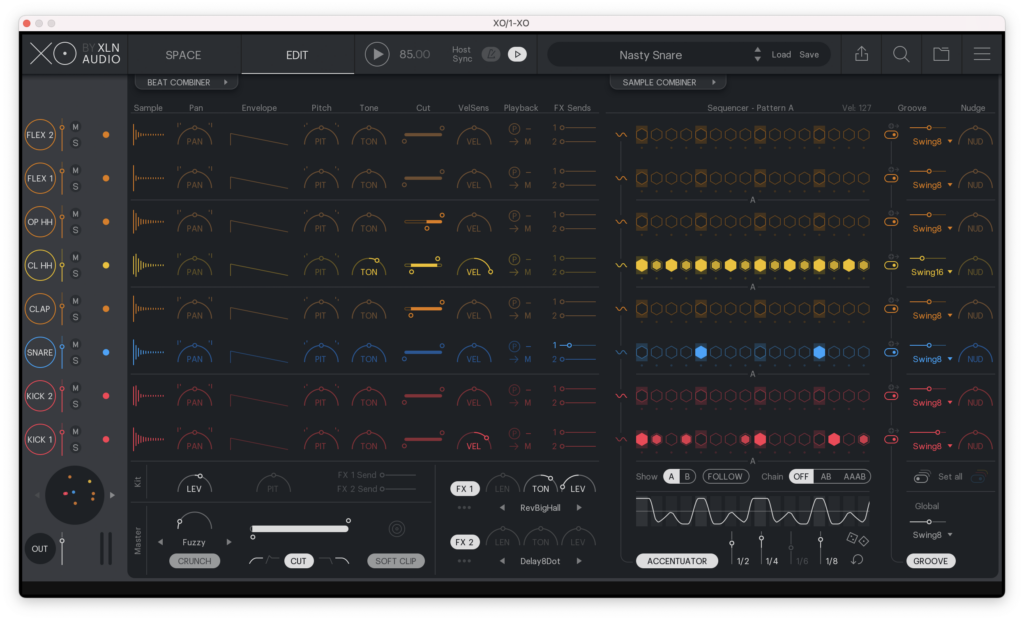
You’ll also notice some additional controls at the bottom in white, which we’ll get to—but let’s start by going through each of the controls in a single track to show you how powerful this Edit page can be.
Sound Controls
Starting on the left, we have a whole host of controls that can change the sound of the sample itself on this channel. These controls behave the same on all eight channels, and affect the sound as follows.

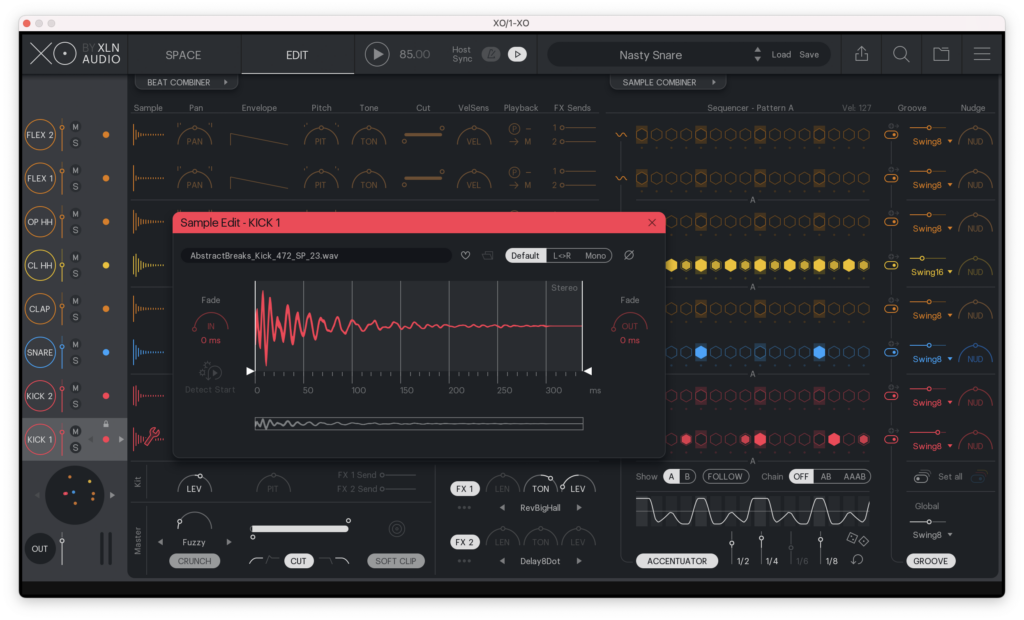
First is the Sample column. Clicking on any of the waveforms in this column will open a lightweight sample editor for this channel, where you can define the start and endpoints of the sample and apply fades to the beginning or end.
Next is a Pan column, which performs simple panning on this channel.
After that is an Envelope control. Here, you can separately adjust the Transient (the attack), Hold (the sustain), and Decay of the sample. This is great for shaping a sound or adding some punch.
To the right of that is a Pitch control, which pitches the sample on this channel. You can make these adjustments in 0.1 semitone increments, up to an octave in either direction.
Next are the Tone and Cut parameters, both of which apply some EQ. Tone is a simple tilt EQ (i.e. move this control to the right to increase high frequencies while decreasing low frequencies; move this control to the left for the opposite), and Cut performs some soft high-pass and low-pass filtering.
To the right is a column titled VelSens, which is short for velocity sensitivity. By setting this parameter to the left, or between 0% – 100%, you can limit the velocity variation that this channel will play. In other words, reduce this parameter to make velocities more uniform. Moving this control to the right, or between 100% – 200%, and lowering the velocity of notes will also skip the initial transient for a softer sound.
After that we have a Playback column, which contains four different controls:
- Poly Mode: When active, hits will overlap as they decay. When inactive, any hit will mute / choke the previous hit.
- Mute Groups: You can add each channel to one of four mute groups. Tracks in the same mute group will mute / choke each other, which is especially useful for realistic effects like a closed hi-hat muting the open hi-hat.
- Reverse: Engage this control to reverse the sample on this channel.
- Output Bus: Here, you can choose to send each channel to one of eight output buses, the master output, or both.
Lastly, we have the FX Sends controls, where we can send each channel to the two send effects, which can each be set to either reverbs or delays.
You’ll notice that each of these lanes is colored to match the type of sample you’ve loaded into that channel. Below these Sound Controls, you’ll see a white section that contains some Full Kit Sound Controls.
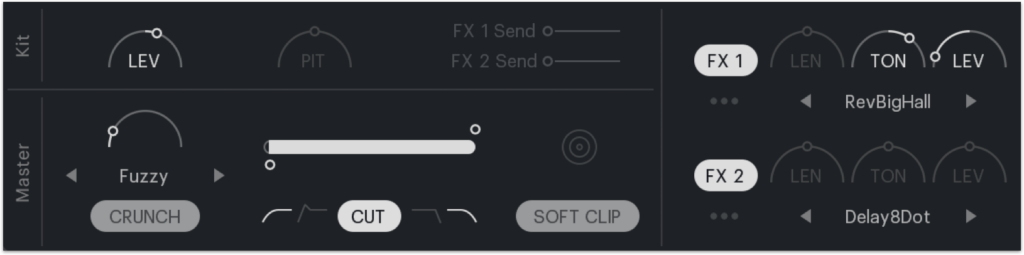
In the Kit section, you can set the output level of the full kit before it enters the Master section, pitch the whole kit at once, and send the full kit to the send effects.
In the Master section, you can add some subtle crunch to the full kit, with eight different algorithms and an Amount knob. Like the channel-by-channel Cut controls, you can apply high-pass and low-pass filtering to the master channel, and you can even elect to use steeper filter shapes. And lastly, to keep your output below 0.0 dB—and to add a bit of extra fizz—you can apply some Soft Clip to the master output.
Next to the Kit and Master sections, you’ll find the two send effects. As mentioned before, these can each be set to one of 15 reverb or delay algorithms. Regardless of which you choose, you can then use the Length, Tone, and Level controls to shape the sound to taste.
Sequencer
XO is able to play grooves using its 16-step sequencer, making it quick and simple to drum up (pun intended) a beat for your track.
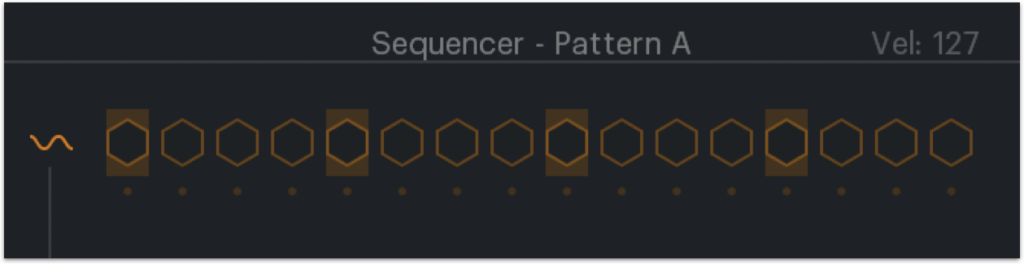
You can click to activate certain beats, which will play the sample on this track at this point in the groove. Drag up and down after clicking to adjust the velocity of individual beats, giving certain beats more emphasis and introducing some variance.
Below each of these steps, you can click to turn any note into a drum roll. Drag up and down to adjust this roll from two hits to three hits to four hits.
Below the sequencer lanes for all eight channels, you’ll find some general Sequencer Controls.
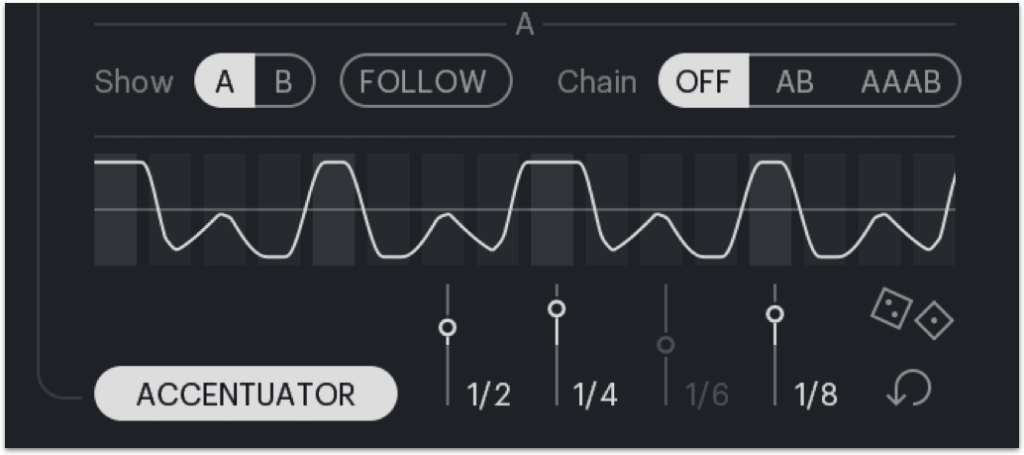
First, it’s worth noting that you actually have two 16-step patterns to work with: A and B. You can select which is showing using the Show options, or you can engage the Follow mode to have XO show the pattern that’s currently playing. Additionally, using the Chain options, you can set XO to play the patterns in an AB order, or in an AABB order.
Below these controls, you’ll find XO’s powerful Accentuator. This allows you to accentuate certain beats in the groove, which can really make a groove come to life, especially when paired with velocity and Groove controls.
A sidenote on the Preset Browser
Before moving on to the next section of the Edit page, it’s worth noting that you don’t have to manually activate sequencer nodes to set up a groove. XO comes with hundreds of preset grooves, plus you can purchase additional XOpaks with samples and grooves here. Click the Preset Browser in the Top Bar to get started.
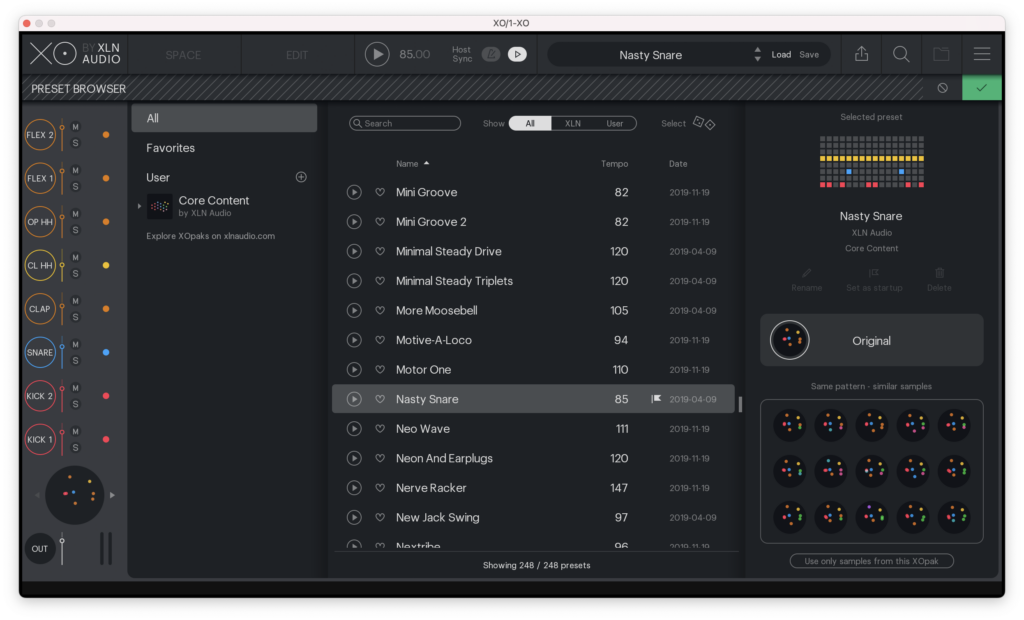
Here, you can select any preset groove to immediately load samples, patterns, and more into XO. On the right side of this view, you can select from 15 other similar kits, all of which will play the same drum pattern.
Groove Controls
Hopping back to the Edit page, let’s check out its final section, the Groove Controls.
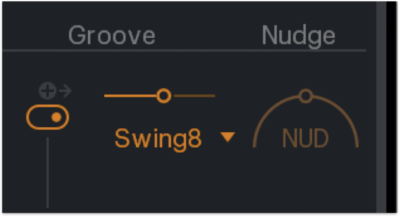
First, between the Sequencer Controls and Groove Controls, you’ll find a switch on each channel that allows you to give a channel its own Individual groove, or set it to follow the Global groove. There’s also a Set All switch above the Global groove section that lets you do this for all eight channels simultaneously. Going the Global route is often quicker, but using individual grooves can sound more humanlike and organic.
Next, each channel has its own Groove Type option, which can be set to anything from simple 8th- or 16th-note swing to more unique options like Hickup or Annoy. Each channel also has a Groove Amount parameter.
Lastly, you’ll find a Nudge control that lets you slightly adjust the timing of a channel’s drum hits to be earlier or later. This can be a helpful final step to get that “pocket” for a sound like a hi-hat.
Playground modes
All the above controls make sound- and groove-sculpting simple, but XO also offers a unique Playground mode that allows you to try out new rhythms and sounds, non-destructively and on-the-fly. Just click the Beat Combiner and Sample Combiner tabs near the top of the UI.
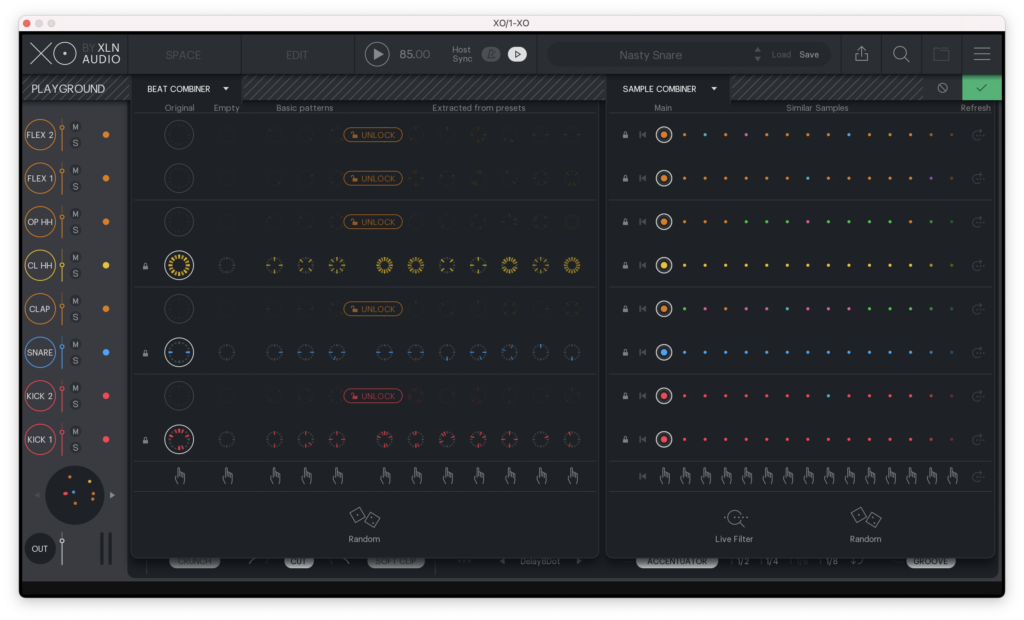
In the Beat Combiner, you can quickly audition different patterns for each channel. Just click on any pattern and this channel will play a new groove that you can choose to lock in or revert to the original pattern. To fully switch up the groove, you can even use the pointed hand icons, or hit Column Select to switch all patterns at once.
The Sample Combiner takes a similar approach, but with sample selection. Click any of the nodes to switch to a similar sample for this channel, or use the Column Select option to find new sounds for all channels at once. Note that this is the same menu that we saw on the Space page earlier. You can also use the Live Filter option to bring up the Search & Filter panel and filter while the beat is playing.
Go get in the groove with XO
As you can see, XLN Audio’s XO turns beat making and drum programming into a more musical and inspiring process, all while offering quick and powerful workflows to help you find your groove and keep you in a creative mindset. Hopefully this feature guide helps you get started, but if you have a question, feel free to leave it in the comments below.
Try XO for free, and then Rent-to-Own it for $4.99/mo until you own it outright:
December 11, 2021