.svg)
.svg)


This blog post is part of a series on Mastering with Ozone 8 Standard. If you missed a tutorial, click on the topics below to catch up:
Ozone 9 Advanced, the latest version of iZotope’s mastering suite, offers even more powerful features — check out the guide here.
1. Signal Flow

There are 8 different mastering processors ranging from EQ, to multiband dynamics, exciter, and maximizers that you can pick from in Ozone 8.
The signal path in Ozone 8 flows from left to right. From the image above, you can see that the signal passes through an equalizer first, followed by a multiband compressor, to a dynamic EQ, and then to a limiter.

One of the great things about the new Ozone 8 is its ability to make smart recommendations based on your mix. Enable master assistant and Ozone’s intelligent algorithms will do the heavy lifting for you and suggest processor settings and a signal flow tailored to your mix. Once the assistant is done, you get can take over and add your unique and creative take from there.
How you choose to process your mastering chain is entirely up to you, but here are some general guidelines:
- Equalizers are usually placed early on in the mastering chain. EQs help shape the tone of your master and it is recommended that you take care of problematic frequencies in your mix first before further processing.
- On that note, Ozone has a post-equalizer that you can use later in the chain to even out your master after all the processing.
- In most cases, the limiter (Ozone calls it the maximizer) is placed at the end of the chain. The limiter is used to bring your mix up to a desired target loudness level and prevent clipping. Heard of the loudness wars? In the past, engineers would crank the limiter just to get the master to be as loud as they possibly could. But things are different with streaming platforms and loudness normalization. The more dynamic (less limiting) the master is the better.
2. Metering
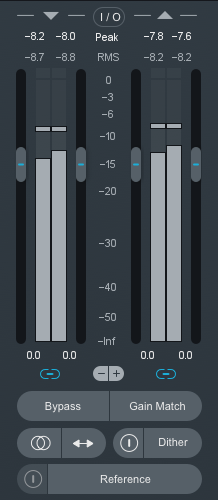
In mastering, metering is critical in order to get a sense of how loud your mix is and to ensure you’re reaching target levels. Ozone 8’s default meter type is set to RMS.
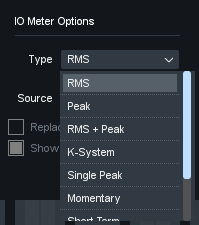
You can toggle between different meter types by clicking on the I/O button at the top of the metering bars. There are many meter types to choose from, but I would recommend using these two:
- RMS: If you are mastering for releasing on a platform or medium that does not use loudness normalization such as Soundcloud, I recommend using RMS.
- Integrated (LUFS): If you’re mastering for Apple Music, YouTube, Spotify, and I recommend using the Integrated (LUFS).
3. Target levels
As mentioned earlier, target levels are levels where you want your master to end up after processing. Here are some general guidelines for mastering for different genres and streaming platforms.
Target levels non-loudness normalization platforms:
- Classical: -18dB RMS
- Jazz: -9dB RMS
- Pop / Electronic Music: -8dB RMS
- Aggressive Pop / Hip-Hop: -7dB RMS
Target levels for loudness normalization platforms:
- Apple Music: -16 LUFS
- YouTube: -14 LUFS
- Spotify: -14 LUFS
- Tidal: -14 LUFS
And that’s the 411 on signal flows and metering. Next up, we take a look at some EQ techniques using Ozone 8.
October 5, 2017
