.svg)
.svg)


This blog post is part of a series on Mastering with Ozone 8 Standard. If you missed a tutorial, click on the topics below to catch up:
Ozone 9 Advanced, the latest version of iZotope’s mastering suite, offers even more powerful features — check out the guide here.
Limiting is the last process in your mastering signal flow. It is here where you get your mix up to commercial loudness to so that it’s at parity with other masters out there on Spotify, Soundcloud, etc. Here are a couple of tips to get you started on your limiting process with Ozone 8 Standard.
Target Levels
In the signal flow & metering tutorial of our mastering series, we talked about the importance of setting target levels. This is an essential step to help guide you to reach the loudness you’d like to achieve.
Target levels non-loudness normalization platforms:
- Classical: -18dB RMS
- Jazz: -9dB RMS
- Pop / Electronic Music: -8dB RMS
- Aggressive Pop / Hip-Hop: -7dB RMS
Target levels for loudness normalization platforms:
- Apple Music: -16 LUFS
- YouTube: -14 LUFS
- Spotify: -14 LUFS
- Tidal: -14 LUFS
Setting up Ozone 8’s maximizer
Every limiter has almost the same type of controls, such as attack, release, gain reduction, input and output gain. Here’s how to apply them.
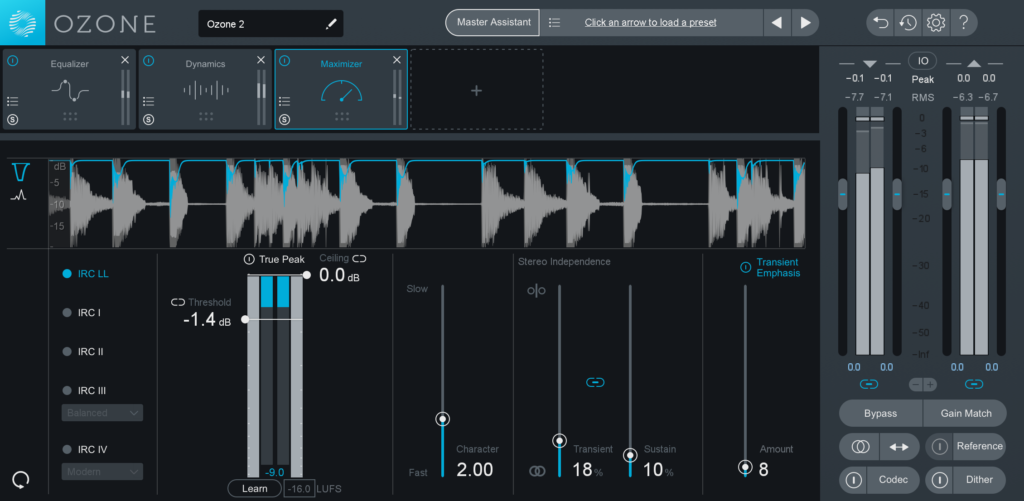
Limiting modes
There 5 different limiting modes in the maximizer module:
- IRC LL: iZotope’s newest limiting mode. Use this if you want a rich and full sound without much latency.
- IRC I: This mode reacts quickly to transients to prevent pumping while reacting slowly to steady bass tones to prevent distortion.
- IRC II: Similar to IRC I, this mode preserves transients even more and will sound sharper and clearer even with aggressive limiting.
- IRC III: This mode provides surgical limiting based on your audio material. You can also choose between four different styles of limiting – balanced, clipping, crip, and pumping. For best results, start with balanced, and then try the other various styles to see which best suits your mix.
- IRC IV: The most complex out of all modes, the IRC IV mode uses dozens of psychoacoustically spaced bands in order to react to any type of audio allowing you to push the limiter to its limits without any artifacts.
Ceiling & threshold
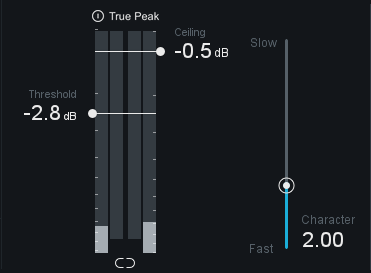
Ceiling: The ceiling value sets the maximum level output by the maximizer. It is generally recommended to use a setting of -0.3 dB or to -0.6 to -0.8dB when mastering audio for streaming platforms in order to prevent clipping.
Threshold: The threshold slider determines the point where the maximizer will begin limiting. Lowering the threshold limits more of the signal, which will create an overall louder mix.
Character
Adjust the character slider to customize the response time of the limiter. For more dynamic songs, try pushing the slider towards “Fast” and for slower songs, move the slider closer towards the “Slow” setting.
Stereo independence
The stereo independence setting decides if the limiter limits both channels equally (0%) or totally independently (100%).
With the default setting at 0%, the limiter preserves the solidity of the bass and left/right balance of the mix. When the setting is unlinked (100%), your master will sound wider and louder, but that thins the bass and changes the L/R balance.
A good compromise would be to set the link control at 50%. However, if a mix has a lot of L/R interplay and difference, leave the link control to a 100% as you don’t want to mess with its stereo image.
Transient emphasis
The transient emphasis feature allows you to preserve transients before limiting takes place. Fine tune this setting to preserve sounds like drums, while still optimizing loudness.
How much should you limit?
The answer to that question really depends on your source material (ie: your mix). Heavy limiting of more than 6dB of gain reduction will only destroy the dynamic content of your mix and would be obvious to the listener.
I generally advise people to keep the gain reduction on a limiter to an average of 3.5dB. If you need to apply more limiting to reach your target level, you should split the work up between Ozone’s exciter and maximizer.
The exciter is a great way to introduce harmonics that help increase the apparent loudness of the mix without the negative effects of harsh limiting, such as pumping.
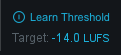
Learn threshold
You can find Ozone 8’s learn threshold function below the mastering modes. When enabled, Ozone 8 will automatically adjust the threshold of your limit until you reach your target value and then turn off. This is a no-fuss way of easily setting your limiter threshold if you aren’t sure how to.
Last in our series on mastering with Ozone 8 Standard, we talk about how to prepare your master for release.
Explore royalty-free one-shots, loops, FX, MIDI, and presets from leading artists, producers, and sound designers:
October 5, 2017

