.svg)
.svg)


This blog post is part of a series on Mastering with Ozone 8 Standard. If you missed a tutorial, click on the topics below to catch up:
Ozone 9 Advanced, the latest version of iZotope’s mastering suite, offers even more powerful features — check out the guide here.
In mastering, a really good EQ can do wonders. EQs are used to balance out the frequency spectrum of a mix, fix harsh tones, and make things sound clearer and more detailed. iZotope Ozone 8 Standard has two mastering-grade equalizers both with excellent functionality and sonic capabilities.
Before we dig deeper into iZotope’s EQs, here are two power-user tips for you to keep in mind:
-
Try not cut or boost over 3dB
The general rule here is that if you have to cut or boost a frequency band over 3dB, it means there’s most likely a problem with the mix. Remember that mastering is all about subtle touches that eventually add up to a polished, professional sound. If you find yourself in this situation, the best thing to do is to speak to the mix engineer (if you have access to him or her) and talk about the frequency spectrum to see if the problem can be addressed in the mix before mastering begins.

In Ozone 8’s EQ, each band can only be boosted at a max of 6dB, and cut at a max of -8dB. Thus, the effective range of Ozone’s EQ is 14dB in total. Ableton’s stock EQ8, for example, can be boosted to a max of 15dB and cut to a max of -15dB which brings its effective range to 30dB. These facts matters because when you compare visually a 2dB boost on both EQ8 and Ozone 8, the Ozone 8 EQ will look like it’s boosted more!
Ultimately, how the visuals of an EQ curve shouldn’t influence you on how much you cut or boost, but if you are boosting anything above 3dB in Ozone 8, you’ll see that it looks like you are processing too much.
-
Use Wide Qs
Wider Qs (wider bandwidths) sound more musical than narrow/surgical EQ bandwidths. AS a result, I recommended that while mastering, you should use try using a wider Q and working on broad strokes rather than notching out resonant frequencies.

Before you start EQ-ing, it’s good to understand the different types of EQ modes and their pros and cons. This will help you use the right EQ at the right time.
-
Analog mode: Minimum Phase EQ (IIR)
- Minimum phase EQ is your typical analog-type modeled EQ.
- The Pros:
- It is generally a low-latency EQ. This means it does not hog up CPU resources.
- It has a familiar sound as it models analog EQs built from resistors and capacitors. You hear them all the time in your amps, analog mixing desks, outboard EQs, etc.
- It does fantastically well with low-end frequencies. Boosting or cutting low end with minimum phase EQs does not muddy the low end at all.
- The Cons:
- There’s a small phase shift that varies with frequency whenever it is cut or boosted. Thus, extreme cut or boosts, especially in the higher frequencies, can pull apart the time alignment of the frequencies and as a result, cause a “smearing” effect. Clarity will be affected and distortion could occur.
- That being said, the resulting distortion may achieve a brighter sound and can be used as a creative effect.
-
Digital mode: Linear Phase EQ (FIR)
- The Pros:
- The latency and phase shift for all frequencies are the same. Therefore, you can perform extreme cuts/boosts without pulling the waveform apart.
- Linear phase EQ gets you extremely smooth highs and offers great clarity at the top overall.
- In digital mode, you can enable surgical mode to get acute with the cuts or boosts needed.
- The Cons:
- Linear phase EQ has high latency and is CPU resource intensive.
- It’s not as natural sounding as minimum phase EQ for the low end.
- The Pros:
Putting our knowledge to practice
Now that you know general guidelines for using EQs , here are some practical steps to get you going.
-
Work in 0.25dB increments
- Remember, mastering is all about subtle moves. While remembering to use wide Q’s, try to also work in 0.25dB increments and listen carefully to the changes. Sometimes, you’ll find a change is more felt than explicitly heard.
-
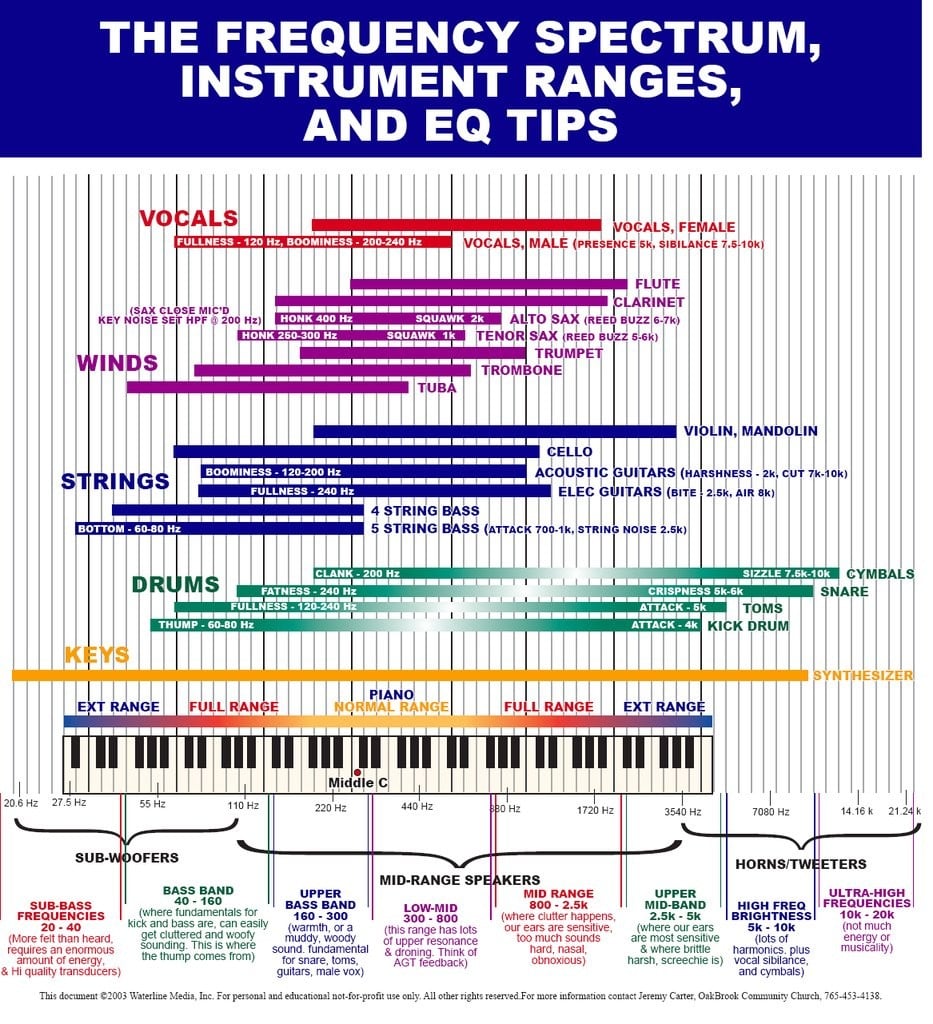
Know your Frequencies
- Knowing what frequency ranges to cut or boost is critical to mastering. If a mix is muddy, try cutting the upper-bass band around 250Hz or take out a little of the low-mids. Sometimes adding high frequencies (I often use high shelves, hardly any bell-shaped EQs in the highs), will help brighten up a mix without the need to cut low-mids. Remember, one move (cut or boost) is relative and affects another.
-
Combine Linear and Minimum Phase together
- We know the advantages of both linear and minimum phase EQs. What I often find myself doing is using a minimum phase EQ to work on the low end and low-mids of a mix and then using a linear phase to tweak the mid, upper midrange and high end of the mix. Combining both in complementary ways can get you great results.
- You can easily switch between linear and minimum phase EQ modes in Ozone 8 by switching between “Analog” and “Digital” modes on each band.
-
Use Mid / Side Processing
- Mid / Side processing (MS) can be a powerful EQ tool. You can enable M/S processing mode in Ozone 8 by selecting the mode on the left of the EQ.
- Use MID processing to EQ a vocal in a mix. If you find a vocal needs clarity, use a digital mode band to bring up the brightness and clarity around 2-4Khz.
- Use SIDE processing to EQ reverbs and detail in the side channels. I often find myself adding a touch of high shelf (8Khz and above) to bring up some detail on the sides of a mix so that the mix appears wider.
-
Make use of Ozone 8’s Matching EQ
- Ozone’s Matching EQ feature allows you to automatically equalize a mix based on the frequency response of another recording.
- The first step in using Matching EQ is to capture snapshots for the source curve and target curve. To do that, just play audio through Ozone 8 and click the “capture” button.
- The source curve is a fingerprint of your current mix while the target curve is a sonic fingerprint of a reference track that you’d like your EQ to be matched to.
- Next, tweak the matching amount and smoothing till it sounds great!


That’s all for EQ. Next up, we take a look at Compression with Ozone 8 Standard.
October 5, 2017

