Illustration: Franco Égalité
While it’s easier than ever for artists to mix and master their own music, mastering is still an important and highly intricate part of music creation.
That’s because mastering engineers perform key services for artists and producers, including checking the mix with a fresh set of ears, fixing any unintentional mistakes, achieving genre-appropriate loudness, and preparing the final file for distribution. In this article, we’ll take a look at five essential tips that will help you prepare your mix for mastering.
1. Make sure the mix isn’t clipping
Rule number one is very simple—if your mix is clipping, turn it down before exporting.
In the world of digital audio, dBTP means “decibels (True Peak).” Think of digital audio like a container; when you put more into it than it can hold, it spills out, causing a mess. If your mix is too loud, the audio will clip, causing unpleasant distortion, and unless you’re playing a harsh noise set in a basement in Bushwick, you probably don’t want your audio to distort.
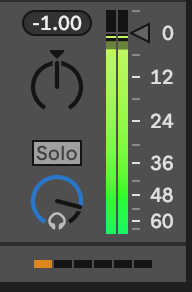
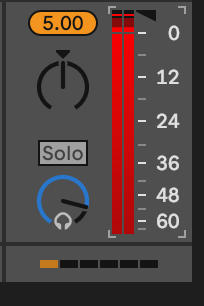
Fortunately, it’s very easy to tell if your mix is clipping. A wise audio engineer once told me, “They didn’t make the lights red because they ran out of green ones.” You’ll likely be able to simply hear if your mix is distorting, but most DAWs also have visual aids to assist.

This looks okay!

This could use some work!
2. Leave some headroom
Headroom doesn’t have anything to do with your hat size. Rather, headroom refers to how much space there is between the loudest peaks of your mix and the limit of how loud the mix can possibly be (0 dBTP, as we discussed above).
When a mastering engineer is working on your track, they’ll likely be applying processing that will make the track louder, but if your loudest peaks are already hitting 0 dBTP, they’ll be unable to apply that processing. That’s why it’s good to leave some headroom!
This is easy to do. First, remove any limiters you may be using for loudness—mastering engineers will limit your audio, and they’ll possibly use some fancy outboard gear to do it in a way that sounds great. Then, simply move your channel or bus faders down to the desired level.
I usually do this in Ableton by clicking on a group header, pressing cmd + A to select all group buses, and moving the fader down by a few decibles. This should adjust all of your groups, ensuring that your mix balance doesn’t change.
How much headroom should I leave for mastering?
There’s no real consensus when it comes to exactly how much headroom is necessary when preparing a mix for mastering. Different engineers ask for different levels: some want -6 db, some want -10 dB, and some don’t really care as long as the mix isn’t clipping. Use a loudness meter like Youlean to analyze your audio and ensure that you deliver the mix with the appropriate amount of headroom as requested by your engineer.
3. Check your mix in mono
Stereo issues like phasing can be really tricky. Certain production techniques that employ time-based effects can create phase issues, so it can be worthwhile to check your mix in mono. I use the Utility audio effect in Ableton to do this, but pretty much any DAW should have a way to listen in mono instead of stereo.
As you listen to your mono mix, make sure you can hear everything—although it will definitely sound different in mono vs. stereo, nothing should be completely canceling out. If your mix is missing entire elements when playing back in mono, that’s a telltale sign of phase issues. Check the channel that’s missing, and adjust any time-based effects until the cancellation in mono is gone.
4. Export a lossless file
This might be a no-brainer for the more experienced producers reading this, but it bears reinforcing: Give your mastering engineer a lossless file. Typically, that’s going to mean .wav, .flac, or .aiff, although other lossless file formats do exist.
Don’t send your mix as an .mp3 or .m4a! These formats are “lossy,” meaning that they have reduced quality in exchange for decreased file size. That’s not really a problem if you’re just listening to tunes, but if you’re sending a mix off to be mastered, using a lossy file will lead to significantly inferior results. Your mastering engineer will (should) reject the file and ask you for a lossless version.
By the way, if you’re sending files to your engineer using Messages for MacOS, don’t just drag-and-drop your file in the message box and send it! Messages automatically compresses audio files to .m4a, even if the original file is lossless. Instead, send a link to download the file using Dropbox, Hightail, WeTransfer, or another file transfer service to guarantee that your engineer receives your mix in the lossless quality it deserves.
5. Don’t dither
When exporting your track from your DAW, you may have seen an option called “dither.” Dithering is a process that preserves the quality of digital media, including audio files. For an in-depth explanation on dithering, check out our blog post below that’s dedicated to the topic, but for our purposes here, it’s enough to know that dither works by adding some random noise to the end of a truncated digital file.
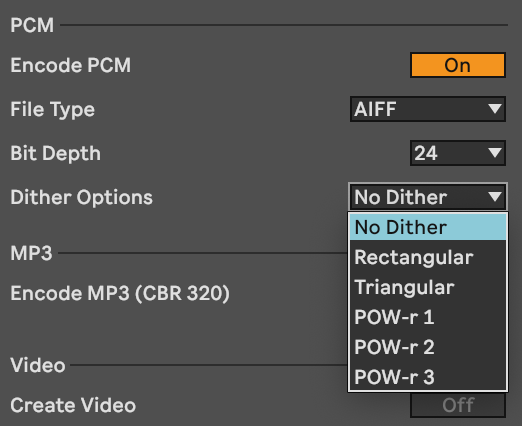
A mastering engineer will apply dither if necessary, so if you’re sending your mix off to be mastered, you should avoid doing it yourself. Dither should be the last processing step applied (even after encoding)—since the engineer will be applying processing, you should avoid dithering.

Screenshot of the dithering options in Ableton
What bit depth should I export at?
Here’s a little bonus tip since it’s visible in the screenshot above: Export your mix at the source bit depth. That means if you recorded audio at a bit depth of 24, you should also export at a bit depth of 24. This likely won’t make a huge difference, but a 16-bit audio file will have less dynamic range available for your mastering engineer to utilize, so you might as well give them the best possible quality file to work with. The same idea also applies for sample rate—export at the highest sample rate you used in your project (which should typically be 44.1 kHz for most music projects).
How to prepare your mix for mastering: Conclusion
Hopefully, this post gave you a good idea of how to prepare your mix for delivery to a mastering engineer. Just remember—mastering engineers are your friends, and they don’t bite (as long as you follow the five tips above).
Interested in mastering yourself? Access industry-leading versions of all the tools you’ll need with iZotope’s Ozone:
May 3, 2024

.svg)
.svg)


