.svg)
.svg)


Illustration: Robin Lewallen
Any instrument with physical properties will respond to the amount of force it’s struck or played with.
The harder you hit a drum, the louder it sounds. The faster you strike a note on the piano, the harder the hammer hits the string. This dynamic is inescapable in nature, but has to be replicated in the digital realm using a MIDI parameter called velocity. Normally, velocity considers how quickly you’ve struck a note on the keyboard and translates this to note volume; just like an acoustic piano, pressing the key gently will make the instrument sound softer, while pressing harder will make it sound louder. However, the reality is that velocity doesn’t have to be married to a physical strike, or even volume at all.
In this article, let’s explore five advanced techniques that can open up several creative doors for you. While these tips work just as well with hardware, today we’ll specifically be focusing on their implementation in software. Keep in mind that some of these techniques will require a modular workflow (i.e. a plugin that will take over velocity values in a DAW). Many DAWs have stock tools to assist in this endeavor (such as Ableton Live’s Velocity and Logic Pro X’s Velocity Processor), but there are also third-party devices (such as this) that will come extremely in handy.
1. Create unpredictable grooves with dynamic sample switching
Real instruments never play the same note in the exact same way, so playing back the same sample repeatedly can make a virtual instrument sound quite artificial. To accommodate for this, high-quality multi-sampled instruments will typically contain recordings of each note played at various intensities. Most stock samplers will then allow you to map each sample to different velocity values, so that the sample recorded at a higher intensity is played back when you press a key harder.
But, if this type of realism isn’t necessary, you can simply map entirely different sounds to different velocity ranges. This works great for creating things like unpredictable percussion loops. First, remove velocity from volume. Then, add a handful of random sounds to your sampler, and split them up evenly across velocity ranges.
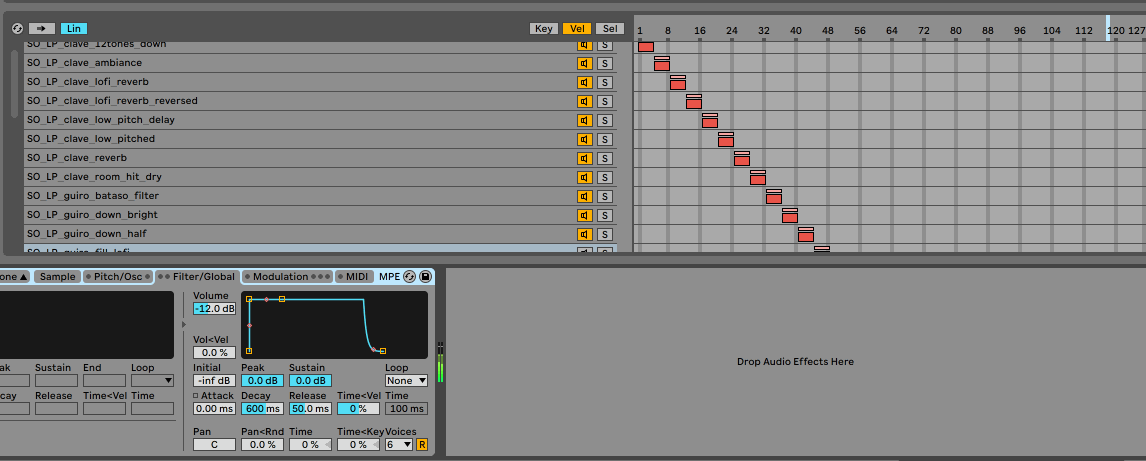
Repeat the root note across a MIDI clip, but draw in velocities for each note at random (or use a tool that does this for you). Then, hit play and see what you get!

After you get a rhythm going, try muting a few samples to create space—here’s an example:
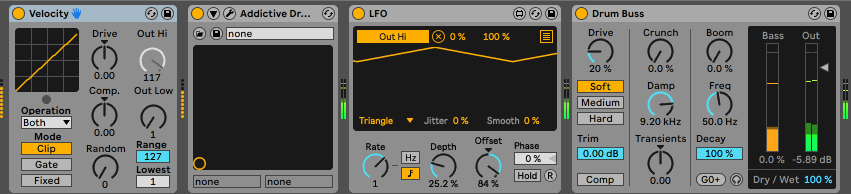
2. Add expression to your performances with global velocity control
This technique provides a way for you to gain control of the overall velocity for an instrument, allowing you to adjust dynamically as required by your music. To achieve this, map a knob or fader on your MIDI controller to the parameter that corresponds to the maximum output on your velocity tool. While playing back your arrangement, adjust the overall velocity in real time by moving the controller and recording the automation.
This essentially gives you the feeling of ‘performing’ your instrument. If you don’t have a controller, you can simply map the automation in your DAW as you go. This works really well on expressive orchestral instruments that change dynamics based on velocity.
The example below is of spiccato strings, where all notes are set to full velocity in the MIDI clip, but the actual values are controlled by a knob in real-time. Notice how the strings swell in both their volume and the intensity of their playing style:
3. Map velocity to an envelope stage
Another great way to get expression from a performance is to map velocity to a time-based attribute. While attaching velocity to various parts of the volume envelope can yield interesting results, decay is probably the most obvious go-to. Try lowering the sustain and decay of a hi-hat to be short enough to the point where it sounds closed. Then, detach velocity from volume and instead map it to decay. You can now play the notes harder or softer to get a more realistic drum feel.

Check out an example of this technique in action below:
4. Map velocity to a filter
This is a fairly standard practice in synth design. Mapping velocity to a low-pass filter (similar to a low-pass gate) is actually a more accurate representation of what happens in the physical world—sounds that are far away sound duller, while sounds that are closer sound brighter. But what happens when we map the parameter to a bandpass filter? It turns out you can get a tonality that varies wildly without a lot of effort!
Take a listen to how we applied this idea to a synth texture:
5. Modulate velocity using LFOs
Last but not least, if you’re willing to take things a step further, you can modulate velocity with an LFO after using one or more of the tips above for some potentially wild results.
Even something as simple as modulating overall velocity on a drum loop can give your groove an entirely different feel. Check out this example—the first half is the drum loop without the LFO, and the second half is the same loop with the LFO engaged:
Here, I used a triangle wave and offset the start so that the snare always lands at the peak velocity. You’ll also notice that the drum loop had varying velocities programmed in, which were enhanced by the LFO—it’s important to experiment and sculpt the oscillator so that it suits the material you’re pairing it with.
I hope you find these five tips useful and inspiring—in reality, the only limit is your imagination. What else can you attach velocity to? Share your ideas in the comments below.
Browse, preview, and license Splice samples directly inside Ableton Live with our new in-DAW integration:
June 22, 2021


