.svg)
.svg)

Tempo is far more than an arbitrary number displayed in your DAW.
As we each have a heartbeat that drives our bodies and minds forward, music too treats tempo as the compass to pace our sonic journeys. If you’re learning how to produce with Avid Pro Tools, you might have noticed that the default tempo is 120 BPM. This is well above our average resting heartbeat, and while that might be what you opt for, every genre has its different standard range which you can lean into or push the boundaries of.
Whether you’re recording live musicians, syncing to video, or producing electronic music with MIDI instruments, knowing how to adjust and control tempo in Pro Tools is essential. Let this serve as your go-to guide for how to change tempo in Pro Tools, including how to create and use tempo maps for more complex arrangements and how to troubleshoot some of the most common tempo-related issues.
How to change tempo in Pro Tools: A step-by-step guide
One of the biggest challenges of becoming a music producer is understanding the glossary of techniques and parameters at your disposal—not only being able to define them, but being able to bend them to your will as you need for each groove, swing, and moment of a track. Some effects like reverb might make sense to you without explanation; others like distortion might come from your experience with an instrument like the guitar.
But, compression, busing, and polar patterns? Perhaps not.
Before these essential recording, mixing, and mastering terms, however, come the core features of any digital audio workstation. Let’s dig into tempo, or beats per minute, with one of the most classic DAWs out there, now fully integrated with Splice.
1. Accessing the tempo ruler in Pro Tools
Whereas some DAWs allow for a randomly-assigned tempo at the start of a new project, you’ll kick off any Pro Tools session at that 120 BPM we mentioned earlier. Chances are that you’ll be changing this for the majority of your projects, both at the start and for any changes mid-song. Before you can change it, however, you have to be able to see it!
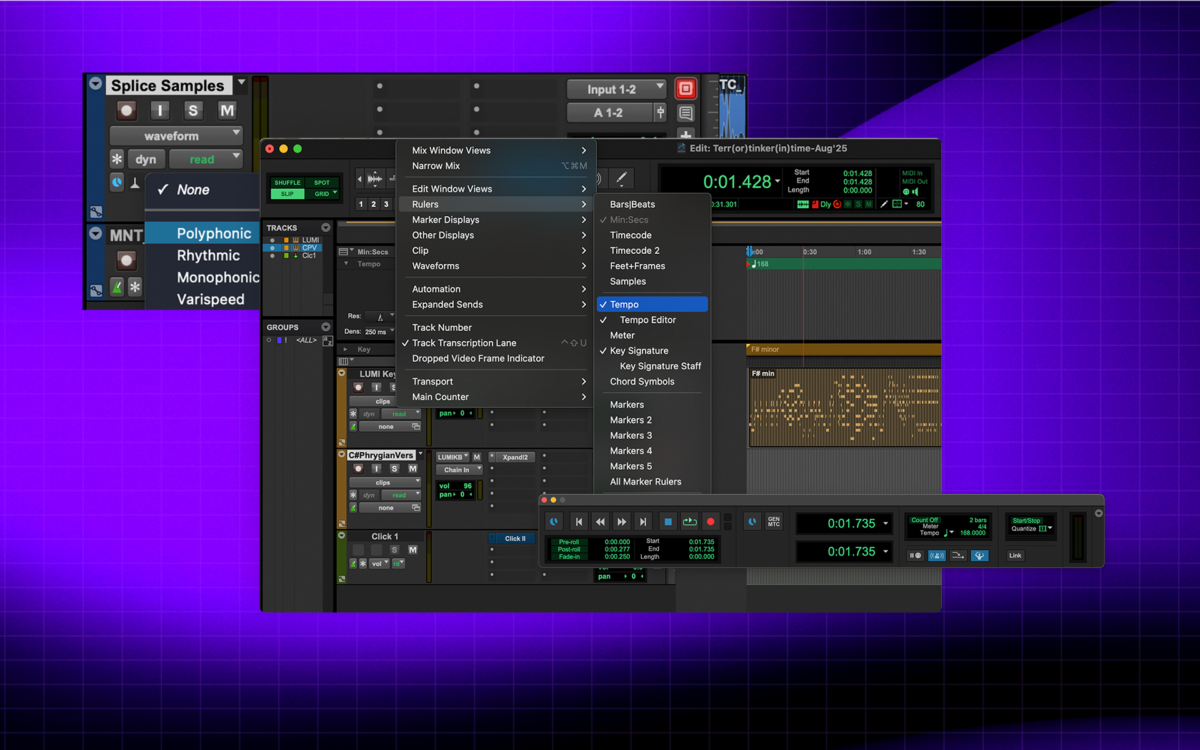
This is where the Tempo Ruler comes in. You can make sure that it’s visible by navigating on the top bar to View → Rulers → Tempo. You’ll then see a red triangle near the top of your edit window indicating the BPM.
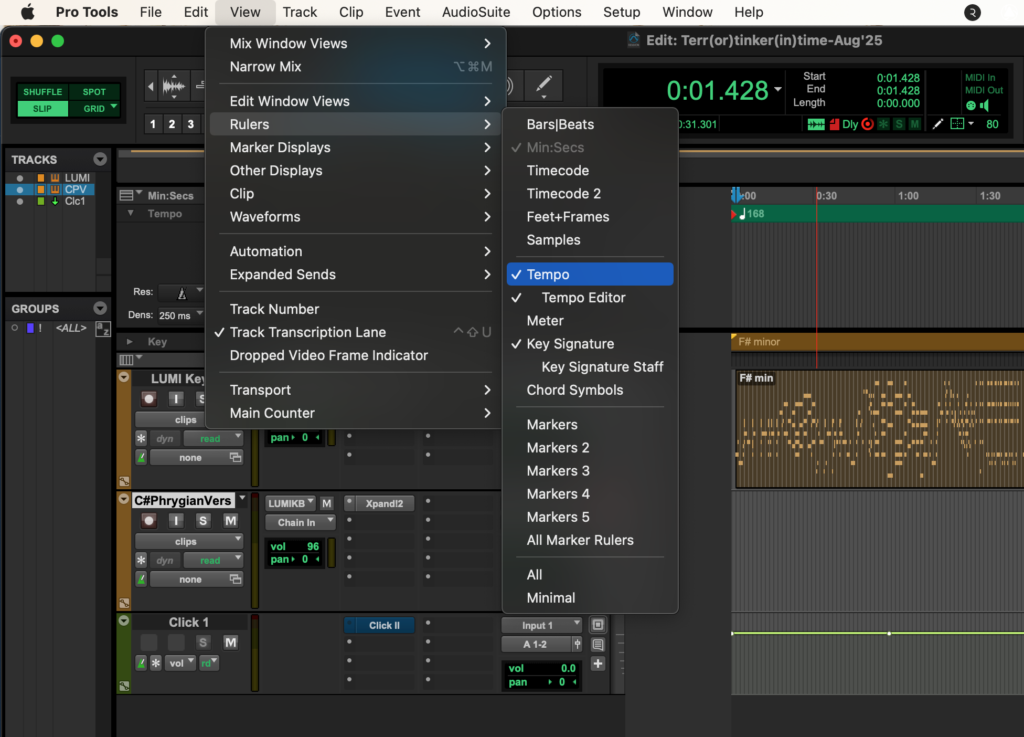
This Tempo Ruler is where any and all of your tempo changes will live, so it’s a good idea to keep it visible when working on tempo adjustments. If you go ahead and double click that red triangle, you’ll open the Tempo Change window, which allows you to adjust the tempo for the entire project or only at a specific time.
2. Manually changing the tempo in the Transport window
In our Pro Tools shortcuts guide, we touched on the wide range of ways to conserve time and energy when working with a DAW. Given the extensive controls available with shortcuts, some as a standard are connected to the numeric keyboard, which differs from the numbers on the top of a standard laptop keyboard. If you have access to this, you can open up the Pro Tools Transport window with command / control + 1.
Otherwise, you can simply navigate to Window → Transport. This window enables you to change the tempo of your entire project, as well as the meter, quantization, and count-in setup for recording. It’s designed so that every piece of text in green can be changed by simply clicking and typing in a new value.
Be sure to also always ensure that the Conductor icon is highlighted blue. This is what enables everything we’re talking about here. If it’s off, your project will revert back to the global BPM—but don’t worry, it’s easy to toggle on and off and doesn’t delete any work you’ve done.
You can also change the tempo rhythmically. This is called Tap Tempo mode, which allows you to physically input a tempo. By repeating a mouse click, or in some cases the hotkey “T,” you can set up the tempo you’re actually feeling, even if you don’t know the exact number by heart. Anyone who has used a loop pedal will be familiar with that way of going about finding that perfect groove for your ideas.
You’ll see the above project is set to a standard 4/4 with no count-in set for recording, and is at a tempo which will work quite well for an electro cumbia track.
3. Using the Tempo Operations window for advanced changes
If your project requires gradual tempo shifts (in Western music theory, we might call these accelerandos or ritardandos) or multiple tempo changes across sections, the Tempo Operations window is the tool you’ll need.
Start by navigating to Event → Tempo Operations → Tempo Operations Window. Here, you can find a range of tempo options to create a more distinctly human feel for your digitally-produced work.
The tempo changes include:
- Constant: This indicates that the tempo will jump instantly from one BPM to another.
- Linear: This means the tempo changes evenly over time between your two set BPMs.
- Parabolic: This will change the tempo gradually at first, speed up in the middle, and then slow again when approaching the target BPM (having the look of a curve).
- S-Curve: This setting changes a tempo slowly, accelerates smoothly through the middle, and then eases into the new tempo; this could result in a gentler, more natural transition than a parabolic setting.
- Scale: This simply multiplies the existing tempo map by a fixed percentage for the set time frame. As is the case for all of these, you can also select Preserve tempo after selection to continue on with the end tempo rather than snapping back to your global setting.
- Stretch: This will expand or contract the existing tempo map to fit a new selection length, keeping relative tempo changes intact.
Just like the Transport window, here you can define your start tempo, end tempo, and the bar or beat range where the change should occur. This tooling gives you a wider range of flexibility and precision over differing tempos throughout your piece, and again, can allow you to create a more natural feel. These tools can also be used with audio files, if you enable them as Elastic in Pro Tools.
If you’re an aspiring video game music composer, producing video projects which require a constant rhythmic flow, or are interested in film scoring, this tool could be your best friend and a key reason why Avid Pro Tools is your DAW of choice.
Using tempo maps in Pro Tools
What is a tempo map?
Tempo maps are the visualizations that live inside your tempo ruler in Pro Tools. They’re a dynamic, visual tool that can simplify complex audio projects when it comes to tempo. If you used some of the above tools to differentiate your BPM throughout the track, you’ll want to make sure the tempo map is visible.
How to create and use tempo maps
With the Conductor icon enabled in your Transport window, if the tempo header in the Pro Tools Edit view is expanded, you’re likely already all set here. To completely master how this (and all other tools explained) work, we recommend laying down a few MIDI sequences and seeing how you can transform them through tempo changes alone.
Here’s another visual of how you might expand and compress your ideas:
Troubleshooting common tempo issues in Avid Pro Tools
Even seasoned producers run into tempo issues in Pro Tools. These moments can be frustrating but are a part of the learning curve with any DAW, and that feeling of figuring out a new trick tends to be very worth it.
Still, here are a few FAQs to help you solve at least some of your roadblocks as or before they occur.
Why is my tempo not syncing with my external MIDI or hardware devices?
Check your MIDI Beat Clock settings. Go to Setup → MIDI → MIDI Beat Clock and make sure your external device is enabled. Also confirm both devices are set to the same tempo resolution (quarter note vs. frame-based sync).
My tempo is fluctuating or glitching during playback. How can I fix this?
This is often caused by conflicting tempo sources. If the Conductor track is enabled, Pro Tools follows the tempo map. If it’s disabled, Pro Tools uses the manual tempo. Double check that only the mode you want is active.
How can I prevent tempo changes from affecting my audio files?
Audio clips don’t automatically stretch when the tempo changes. The Warp view is one way in which your audio can be affected by tempo changes, which will differ based on your transient markers.
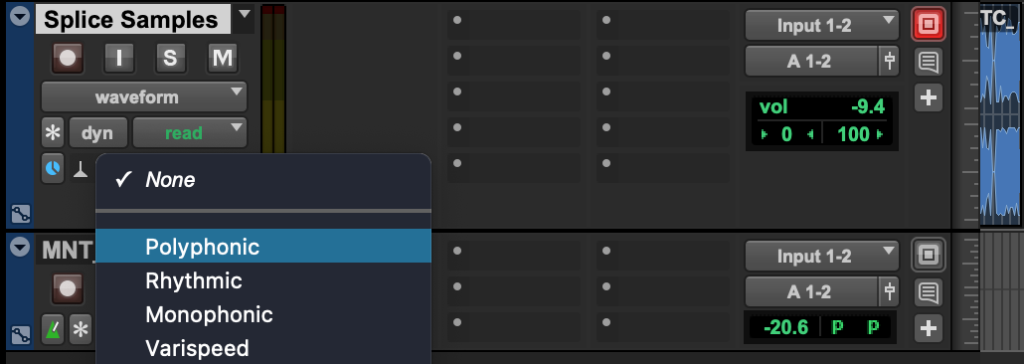
Then, there’s the Elastic audio feature we touched on earlier. With that tool, you can set the elasticity to function as poly / monophonic, rhythmic, or varispeed.
By mastering these tools, you’ll gain command over a key fundamental of Pro Tools and audio production as a whole. Did we miss something? Join the Splice Discord to write us with your thoughts and suggestions, or if you uncover new tricks that we should feature.
Discover, build, and create with Splice—right inside Pro Tools:
September 29, 2025