.svg)
.svg)


Illustration: Niv Bavarksy
Gross Beat has made a big name for itself in the world of music production.
Gross Beat is a volume and time/pitch automation effect VST made by Image-Line, the same company behind the popular DAW, FL Studio. Gross Beat can take a sample or instrument and apply a user-defined time and pitch shifting envelope. It can also automate volume to create gates and other similar effects, and even apply both volume and time/pitch shift effects simultaneously. In this tutorial, you’ll learn about Gross Beat’s inner workings and how you can use Gross Beat to turn a simple sample into your own work of genius – let’s get started.
Getting familiar with Gross Beat
We’ll be using FL Studio 12 to showcase how you can use Gross Beat to soup up your Splice samples. First, let’s take a look at the user interface. Add Gross Beat to any blank Mixer track and click on it to open the UI.
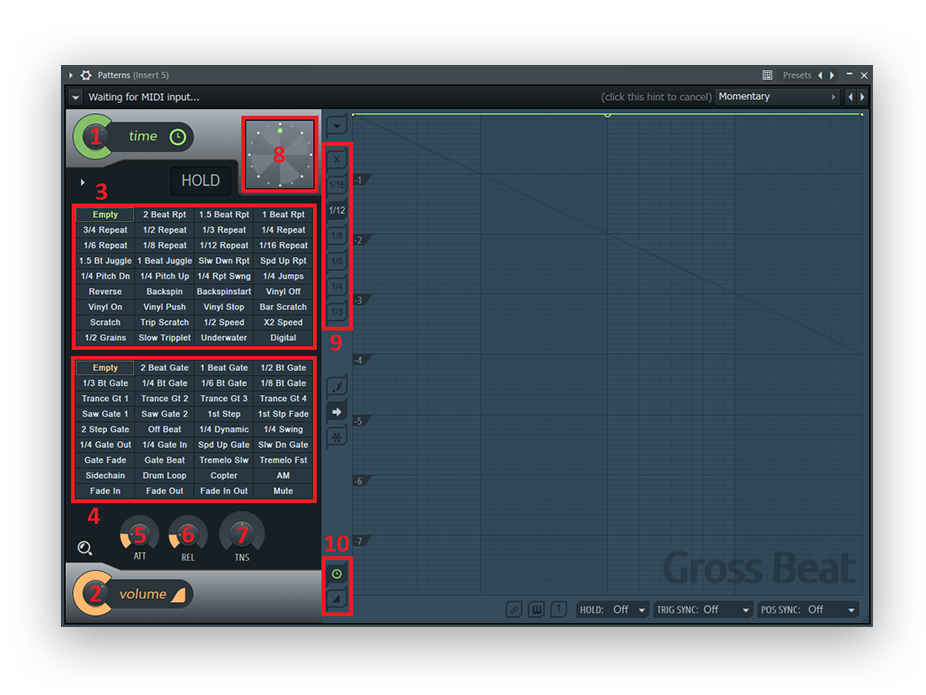
Let’s run through the numbered items:
- The time mix level knob changes how much of the time/pitch effect is being applied to the Mixer track that Gross Beat is on, ranging from 0% to 100%.
- The volume mix level knob changes how much of the volume effect envelope is being applied to the Mixer track, and also ranges from 0% to 100%.
- The time slot preset bank stores time envelope presets.
- The volume slot preset bank stores volume envelope presets.
You can click on the set of arrows or the drop down menu at the top right of Gross Beat’s user interface to access presets that change the volume and time slot banks.
Click a Time or Volume slot to change the active time or volume envelope to that specific slot preset.
-
- The volume envelope attack knob controls how fast the volume envelope will reach its designated values when going from a lower volume to a higher volume, from 0 ms to 100 ms.
- The volume envelope release knob controls how fast the volume envelope will reach its designated values when going from a higher volume to a lower volume, from 0 ms to 1000 ms.
- The volume envelope tension knob controls the ‘springiness’ of the ATT and REL knobs.
- The time offset wheel can be clicked-and-dragged in real time to apply a time and pitch offset. This wheel is what is being automated by the Time envelope.
- Grid snap presets allow for different snapping intervals for your control points.
- These buttons can be used to toggle between Volume envelope editing and Time envelope editing.
Using Gross Beat for gated vocal effects
Volume gates are used on vocals in a wide array of electronic music genres including trance and progressive house. Now that we’re a little more familiar with how Gross Beat works, we can use it with Splice samples to make our own gated vocal effects in FL Studio.
In Gross Beat, volume automation is done using a grid. The horizontal position on the grid is time moving forward, and the vertical position on the grid is volume.
Step 1: Add a sample to the Playlist and match the sample tempo
I chose a nice vocal sample from the “Roniit Silk Vocal Samples” pack on Splice. Once downloaded, just click and drag your sample from the FL Studio Browser/Plugin picker to the Playlist.
For the best effect, we need to change FL Studio’s tempo setting to match the sample’s tempo. In this case, it’s 125 BPM, as indicated in the sample file name and by the Splice library.
Also make sure that FL Studio is in Song mode, since we have the sample in the Playlist. Toggle it on or off using the button in the toolbar circled below:

Step 2: Route the sample to the Gross Beat Mixer track
Find the newly-added sample in the Channel rack and route it to the Gross Beat Mixer track.
The sample gets sent through the Gross Beat patch, and then to the Master bus. Here’s what it sounds like:
Step 3: Change “Default” to “Momentary” and select a trance gate
Next, open Gross Beat from the Mixer track and select “Momentary” from the drop down menu like earlier in the tutorial.
A few trance gate options are available in the Volume slot preset bank. Just click one and hit “Play” in the FL Studio toolbar (or hit the spacebar) to hear the trance gate on your sample. I chose “Trance Gt 2” – here’s what mine sounds like:
Step 4: Adjust the volume mix level and ATT/REL knobs
Next, we can lower the Volume mix knob so that some of the dry sample mixes with the gated sample. It sounds a little less extreme, but it’s ultimately subjective and completely up to you – I settled at 50%.
You can also adjust the attack and release settings, but I would avoid using 0% for either of them, as this would create clicks due to very rapid changes in volume. I left the ATT at 2 ms (18%) and the REL at 4 ms (18%). Again, this is somewhat subjective – choose what sounds right for you and your vision for your track:
Creating your own volume slot
Gross Beat also gives you the option to create your own volume slots. Navigate to “Default” again in the drop down menu. You can see 36 empty slots for both Volume and Time.
Click on an empty volume slot, select a grid snap, and right-click in the grid to create your own control points. Click and drag the control points to move them around.

When editing volume envelopes, the vertical position is volume and the horizontal position is time.
Right-click an existing control point to access a menu with additional options. You can delete points and change the way the line between two control points will behave, just like an automation clip – the “Hold” mode is great for creating your own trance gates.
Gross Beat for time and pitch effects
We now move on to the other half of the plugin’s functionalities, time and pitch automation – these effects essentially do what a turntable does. Gross Beat can get pretty complicated, so I’ve outlined a few simple concepts that can quickly get you started on making your own automations:
- The horizontal length of a line is the amount of time that Gross Beat will play the sample.
- The slope of a line determines the pitch shift of the sample (lines that are level have the same pitch shift).
- Returning to the slanted dark blue line will restart sample playback.
- 12 semitones = 1 octave, and 1 semitone = the amount of pitch shift between 2 adjacent keys on a keyboard
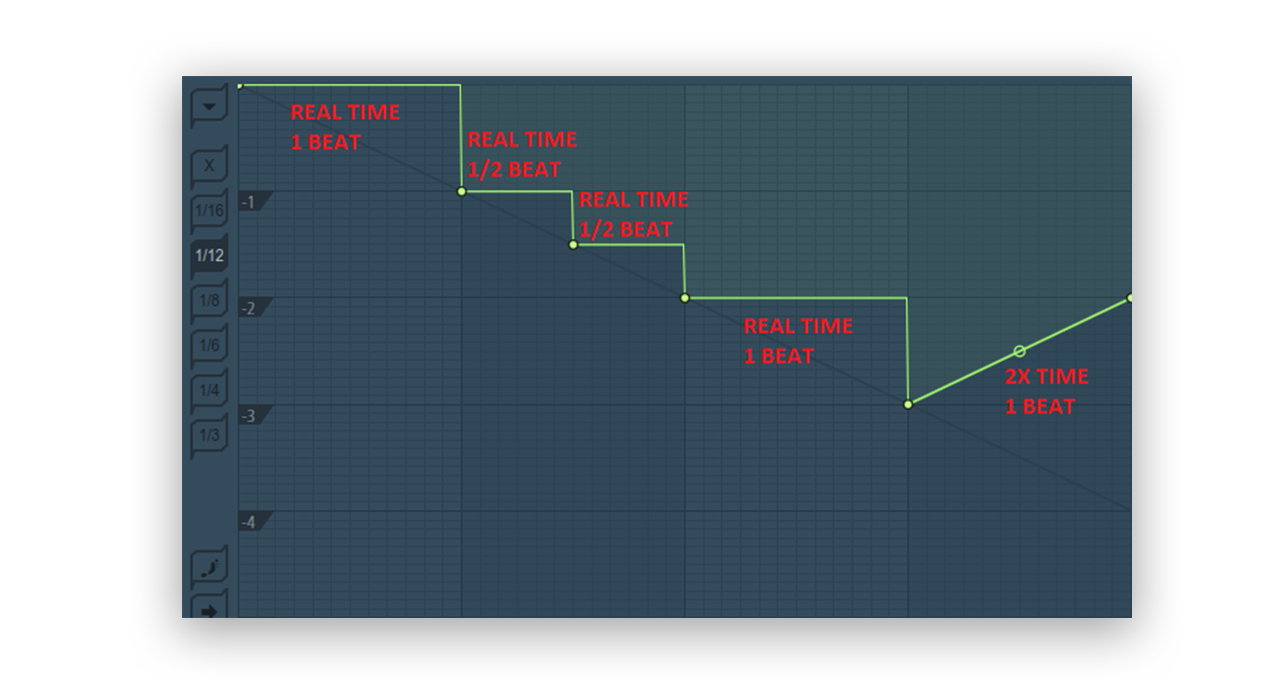
In the next section, let’s look at how we can use this information.
Hard trap leads With Gross Beat
Step 1: Choose a one-shot sample
Trap beats often use aggressive brass instruments as leads. I chose this one-shot brass sample from Splice. Click and drag your sample into the Playlist from your Browser/Plugin picker.
Step 2: Set a tempo
Next, set the tempo for the FL Studio session. There’s obviously a lot of variation from song to song, but approximately 70 – 90 BPM tends to work well as a starting range for trap.
Step 3: Make the sample one bar long
Next, go to the sample in the Playlist. Click the “Slice” tool, change your main grid to “Snap to Bar,” and chop off any part of the sample that runs over one bar in length. If your sample is shorter than a bar, you can shorten it to ½ bar and paste two samples, or ¼ bar and paste four samples, depending on the length of your sample.
Step 4: Route the sample to a Gross Beat Mixer track
Just like we did in step 2 from the previous section of the tutorial, route the sample to a Gross Beat Mixer track.
Step 5: Open the default Gross Beat patch
Now open up the default Gross Beat patch, which contains all of the empty time and volume slots.
Step 6: Automate the time and pitch
Setting your Gross Beat snap value to 1/12 or 1/16 will give you finer control, but there are situations where you’d want to use ⅓ or ¼. Start adding points by right-clicking – I like to begin with something simple in the first slot, and then I copy it into the second slot and make a few changes. You can repeat this process until you have a few progressively more complex-sounding time slot presets.

Use the Copy and Paste states to copy slots. With step editing on, you can right-click and drag to erase points quickly.
You can use a combination of Hold and Single curve shape modes for your lines. If you right-click on a point, you can also shift the pitch of the sample being played prior to that point up or down by a semitone. Below are a few patterns I made – notice that the lines all return to the slanted blue line after the interval’s done playing.
Scrolling through the time slots, we can see the automation clip that controls which one is selected in the Playlist.

I ended up with 10 different slots and created an automation clip to automate which slot is selected. Just right-click a slot and click “Create automation clip” – the height of the automation clip controls which slot is active. Here’s what it all sounds like:
Wrapping up
It should now be clear why Gross Beat has gained so much popularity in the world of electronic music – it allows us to take any sample and make custom-built sounds to suit our needs. This versatile plugin may take some time to get the hang of, but proves to be a very powerful tool to any music producer, whether you’re just starting out or you’re a seasoned pro.
Explore royalty-free one-shots, loops, FX, MIDI, and presets from leading artists, producers, and sound designers:
November 23, 2018