.svg)
.svg)


Illustration: Pete Gamlen
One of Live 10’s standout new features is Wavetable, an aptly named wavetable digital synthesizer that shares much with its cousin, Operator.
While both Wavetable and Operator are powerful, beautiful, and Ableton-native creative tools, both can be intimidating to a new user. This post will explain Wavetable’s functionality by examining its oscillators and modulation in detail, then put what we’ve learned into practice by taking the reader through the creation of a beginner-to-intermediate-level patch.
Navigation/Orientation
First, let’s make sure we understand how to get around Wavetable’s interface. Wavetable’s GUI packs a ton of functionality into the Device View, which may make it intimidating for producers who aren’t already well acquainted with wavetable synthesis. Wavetable’s compressed interface displays the synth’s oscillators on the left, modulators on the right, and a filter in the middle – more on each of these later.

Wavetable’s normal view – I’ll refer to this as “compressed”
Feeling claustrophobic? Click the triangle icon in the top left corner to toggle an expanded view:

“We’re gonna need a bigger boat.”
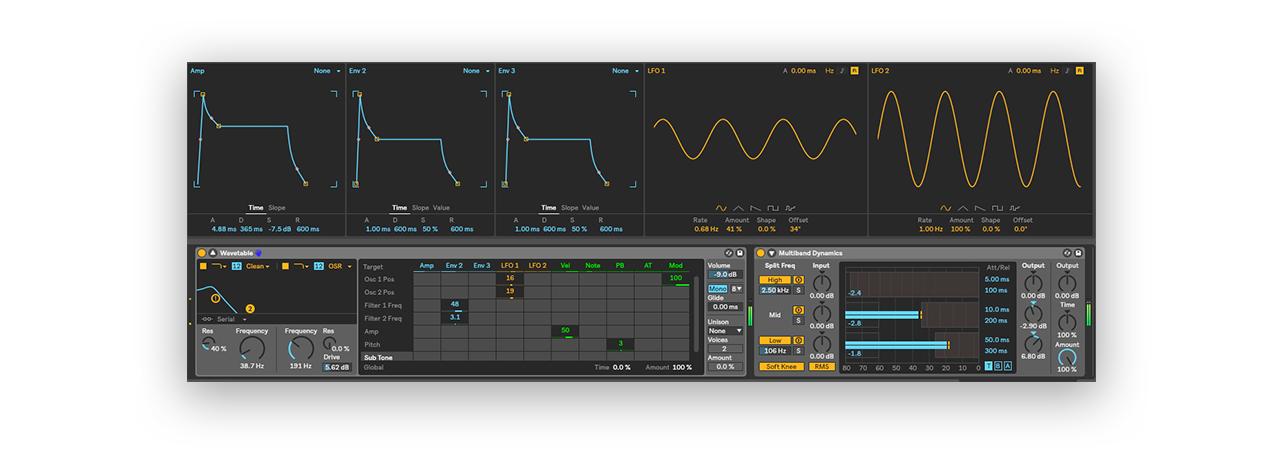
The expanded view blows up the GUI so we can see all of Wavetable’s oscillators, envelopes, and LFOs in the top section, while the filter, modulation matrix, and global parameters remain at the bottom.
Oscillators
Let’s dive into Wavetable’s capabilities by taking a look at its sound sources. Click the cube next to Osc 1 and Osc 2 to turn the corresponding oscillator on or off, or click Sub to activate the sub layer. Gain and wavetable-position faders are located to the left and right of the waveform diagram, along with a few other options like FX and transposition at the bottom.
Wavetable does not allow users to draw in their own waveforms, but Ableton have loaded up their synth with plenty of, well, wavetables. Rest assured that Ableton have done an excellent job including plenty of options for casual synthesists to model everything from instruments and vintage synths to noise and cool shapes. There are too many categories and waveforms to go into detail on each one, so make sure you take some time to poke around through the menus and explore the waveforms offered.
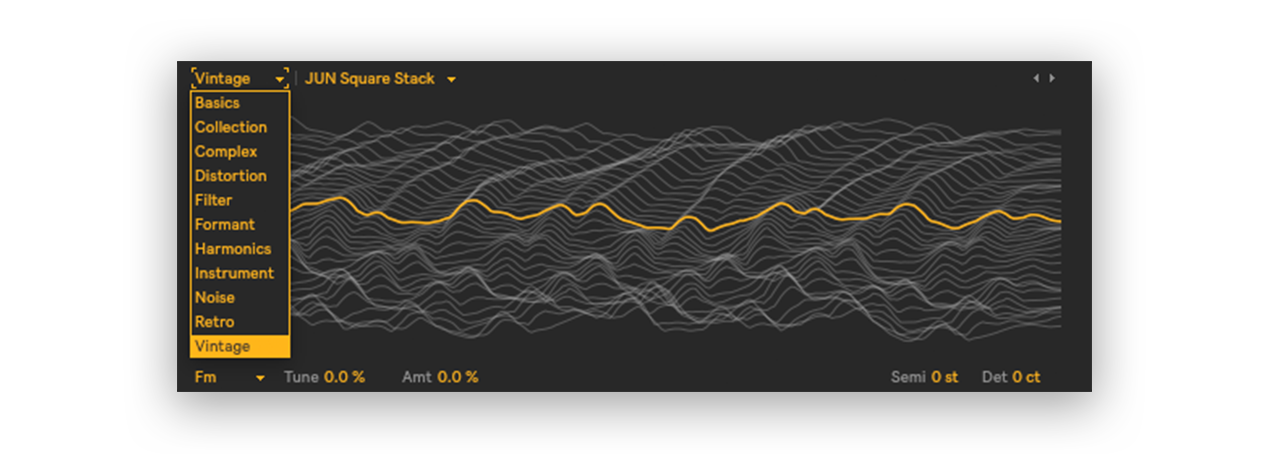
One of my favorite stock wavetables: a Juno 106 stacked square emulation
While you’re at it, don’t overlook one of the coolest visualization options of any wavetable synth I’ve seen. Look for a circle next to a line symbol in the top right of Osc 1 (in the compressed view) or Osc 2 (in the expanded view). This hidden gem will toggle your wavetable visualization from a boring old linear visualization to a cool polar view!

I’m just kidding about the linear visualizer being boring. The polar view is cooler, though.
Modulation
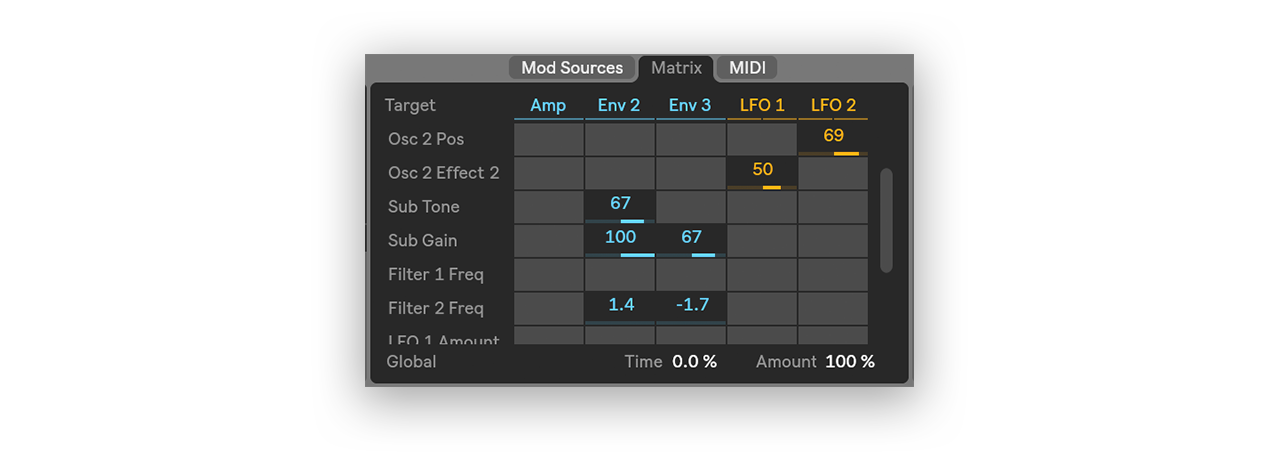
Wavetable offers five modulation sources, including three envelopes and two LFOs. Although some third-party VSTs boast even more modulation options, this level of modulation is unprecedented within Ableton’s native instrument selection. Yet Wavetable’s real modulation power lies within the modulation matrix.
“Do you believe that my synth patch’s width and punch have anything to do with my muscles in this DAW? Do you think that’s audio you’re modulating now?”
Tweak any modulatable parameter inside Wavetable and it will appear as a new row in the modulation matrix grid – then, click and drag to assign a value. If you don’t assign any modulation values to a target inside the matrix, the row will disappear when you change a different parameter. The MIDI Modulation Matrix works the same way, except that instead of your envelopes and LFOs your modulation sources are Velocity, MIDI Note, Pitch Bend, Aftertouch, and the mod wheel.
Global params and misc
The rest of Wavetable’s parameters are relatively straightforward. In the middle of the GUI we have a dual filter, which includes a few helpful bells and whistles like five filter circuit models and three filter routing options.

A parallel filter with independent filter drive settings – a very nice touch.
The global settings are on the right side. Again, these are fairly straightforward. Note that if you bump up the Voices and Unison to 8 each, Wavetable can produce 64 voices, the same as Massive.
Patch design
Now that we’re able to navigate Wavetable’s parameters, let’s put everything we’ve learned into practice by designing a few basic patches. We’ll make three patches using the MIDI notes from John Coltrane’s Giant Steps as sequenced by Eric Elliott.
Keys
Let’s start off with the keys. I wanted to make a modern-sounding but authentic patch with a little bit of a pluck to it to help emphasize the melody, but I also wanted to give the sound a bit of character and intrigue. For sound sources, I started with Ableton’s marimba wavetable, a basic sine, and a sub oscillator with a touch of harmonic content.

The oscillators’ wavetable positions are adjusted ever-so-slightly by LFO 1, which has a long attack of 2.36 seconds (meaning that the LFO’s effect only becomes noticeable on held notes). The dual filter, running in parallel mode, creates the pluck as Filter 1 is modulated by Envelope 2. Meanwhile, LFO 2, moving at 16.5 Hz (an almost audible rate) adds some randomness to both filters’ frequencies. I used plenty of unison on this patch to maximize the stereo information, but you can easily knock down Unison and Poly to 4 or 5 without losing the sound’s character.

Bass
My goal here was to emulate a plucked string bass, but I wanted to make sure it maintained enough harmonic content to express the strings’ character and enough synthetic power to anchor a mix. This patch is completely mono, so even the midrange portion shouldn’t compete with the wide keys for space in the mix.

Osc 1 smoothly shifts between triangular and sawtooth waveforms, providing a strong base to build on. The string pluck sound comes from Ableton’s Jazz Buzz wavetable, which seems like a pretty obvious choice. I’ve also added a fairly loud sine wave sub layer for some extra low-end heft.
Wavetable’s dual filters are doing a significant amount of sculpting here. Filter 1 is creating the pluck effect with a relatively high resonance setting, and Filter 2 produces a subtle rumble via the driver OSR filter circuit. LFO 1 adds a slight vibrato effect by modulating the wavetable positions of both main oscillators.
Rhythm
Finally, let’s add a rhythm section. Instead of a full kit, this MIDI arrangement has one repeated note on B2 throughout, representing the rhythm of the ride cymbal. Cymbals are notoriously difficult to model with VST synths, but I’ll take my best shot at emulating Art Taylor’s chattering ride using Wavetable anyway.

We need to use noisy sound sources to model an atonal instrument like a cymbal, so I chose a high-passed noise and a swept noise wavetable.

The Amplitude envelope has a relatively short decay and a sustain setting of -inf, so if you’d like to tweak this patch try adjusting the decay to taste. LFO 1 is set to move very fast, scrolling through both noisy wavetables quickly but without crossing into the audible audio range. Predictably, the filter is set to high pass, but just for kicks I’ve also added some midrange bite by driving both filter circuits.
I hope you enjoyed this fairly basic overview of Wavetable. If you’re interested in playing around with this beautiful and powerful new creative tool, try getting lost in the many wavetable options Ableton have provided, and don’t forget to experiment with different modulations and routings!
Browse, preview, and license Splice samples directly inside Ableton Live with our new in-DAW integration:
April 11, 2018