.svg)
.svg)


Illustration: Sofia Pashei
You’ve just finished writing a beautiful string orchestra piece but can’t shake the feeling that it sounds off.
It sounds almost unreal in a sense. Modern orchestral samples are extremely high quality, miles ahead of some from previous generations, but we still run into the issue of making those samples pass as a live orchestra. The issue crops up with some frequency, especially with newer orchestral producers, as we expect these $400+ libraries to have a turnkey solution for our realism woes.
Thankfully, the techniques needed to achieve realism are easily within reach – all it takes is a little know-how and some careful mixing. Before we begin, attaining realism with orchestral productions is quite the rabbit hole, especially if we branch out into all the sections of the orchestra. This tutorial will specifically focus on the basics of realism when producing orchestral strings.
Each technique discussed will have an accompanying DNA player so that you can hear how they affect the sound. Feel free to Splice any of the DNA players to open the Logic Pro X session on your own computer – the project contains rendered audio files of the Kontakt instruments and the associated MIDI tracks. If you own Kontakt and a string library, I encourage you to try these techniques with your own samples. For this tutorial, I used Symphony Strings Essentials in Kontakt 5.
This blog post mentions Splice Studio, which is no longer active. Learn more about the shutdown here.
1. Writing realistic parts
First things first: realistic strings rely on realistic writing. It’s tempting to write whatever comes to mind when working in a DAW, since the flexibility that MIDI provides is a creative blank slate. This is a common pitfall when writing for orchestral strings, as our minds can come up with beautiful parts that may not be playable by a whole section, let alone a single performer.
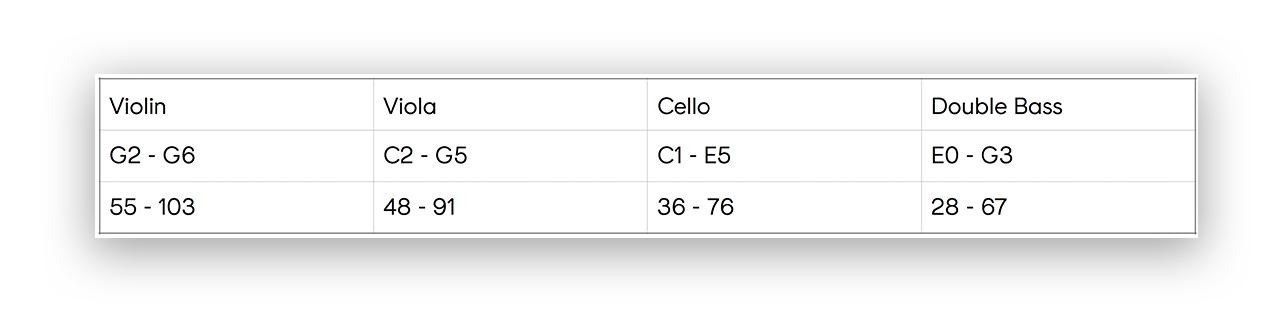
The first thing to consider is the natural range of the instruments. Strings have an upper and lower range for the notes they can play and, often times, the notes of the higher registers can sound strained or thin. It’s easier for a musician to play the notes in the lower registers of their range with more finesse. That’s not to say that the upper registers are off limits. Just remember that they will have a different timbre than those in the lower registers.
Here’s a quick chart outlining the range of each instrument:

These ranges are approximations. Certain string tunings or extended ranges do exist that can affect these.
Next, we cover arranging string parts and basic four-part harmony writing. There’s no expectation to understand music theory, but I encourage you to read up on it if it’s of interest to you.
Now that we know the ranges of the instruments, we can break down how to write parts for them. It can be helpful to think of the string section as one cohesive unit with four possible voices: soprano, alto, tenor, and bass. We generally give the highest voice to the 1st violins, the second highest to the 2nd violas, the 3rd highest to the violas, and the lowest to the cellos. The bass oftentimes will double the cello part, albeit an octave lower, to give the ensemble a foundation.
Remember that these are best practices and not rules. For example, having the 2nd violins cross over into the 1st violins’ range can have a dramatic and impactful effect. There are also times where we may want to create a tight chord using only the high strings. This can create an airy and emotional effect, but requires use of divisi (or divided section) patches, which not all sample libraries have. Following these guidelines will give you a basis for strong part writing.
2. Using velocity
The second most important skill for having realistic virtual strings is using velocity and expression appropriately. When listening to live string musicians perform, you’ll notice that the notes they play are not all the same volume throughout. I’m not talking about slight variations between different notes, mind you, though that’s important. I’m talking about the natural volume envelope that an orchestral musician uses.
Orchestral musicians, especially string players, feel rhythm in a somewhat unique way. They always hit their downbeats, but they don’t always hit them at full volume. They have an attack time for the note to reach its apex. In more forceful sections, the attack is more staccato (short) with a legato (long) tail.
First, you must understand how your library deals with MIDI velocity. Most libraries use this to change between dynamic levels. In sheet music writing, we notate this using symbols like p or f to indicate whether a passage should be played quietly or loudly. The dynamic level at which a note is played changes the overall timbre of the note. Quietly played notes often have less high frequency information, giving them a softer overall tone, while louder notes can sound sharper, forceful, or even harsh at times. Below, I have two examples of a staccato string section part, one with all notes at the same velocity and the other with velocity editing.
Staccato notes at full velocity (no velocity editing)
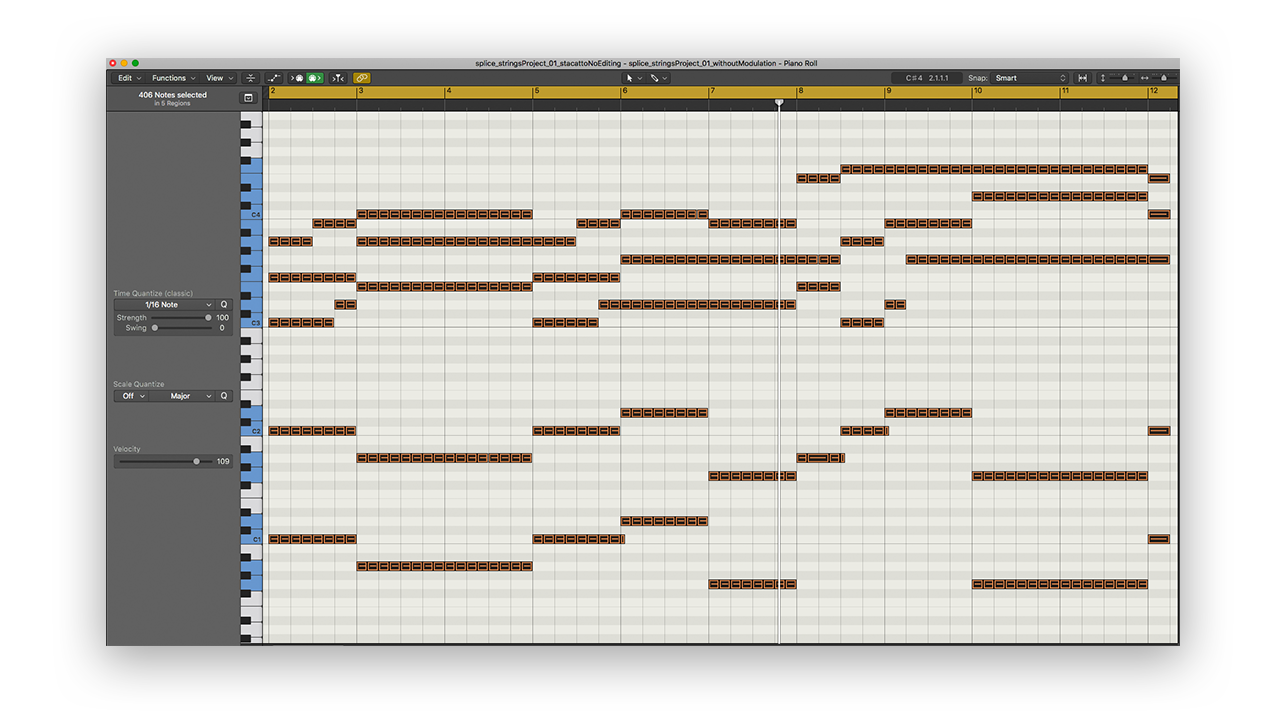
Staccato notes after velocity editing

The first example is stale and lacks emotion. The example with MIDI editing now has an emotional context to it. The music has more feeling, rather than sounding stiff and robotic.
3. Using expression for legato phrases
How do we create this type of feeling with long legato phrases? We can’t change the MIDI velocity of a note as it’s playing, so we now focus on expression. Expression and velocity are similar in how they both affect volume. The difference is that expression may or may not affect dynamic level. This depends on the library and how it was programmed. Some libraries combine volume and dynamic switching into the expression controller (usually the mod wheel), while others don’t.
I have created a legato string part below. In the first example, I play the phrase with only MIDI velocity changes. You can hear a little bit of attack from the sample, but it still feels a little too unreal.
Here’s what the part sounds like before modulation has been applied:
String parts after modulation has been applied
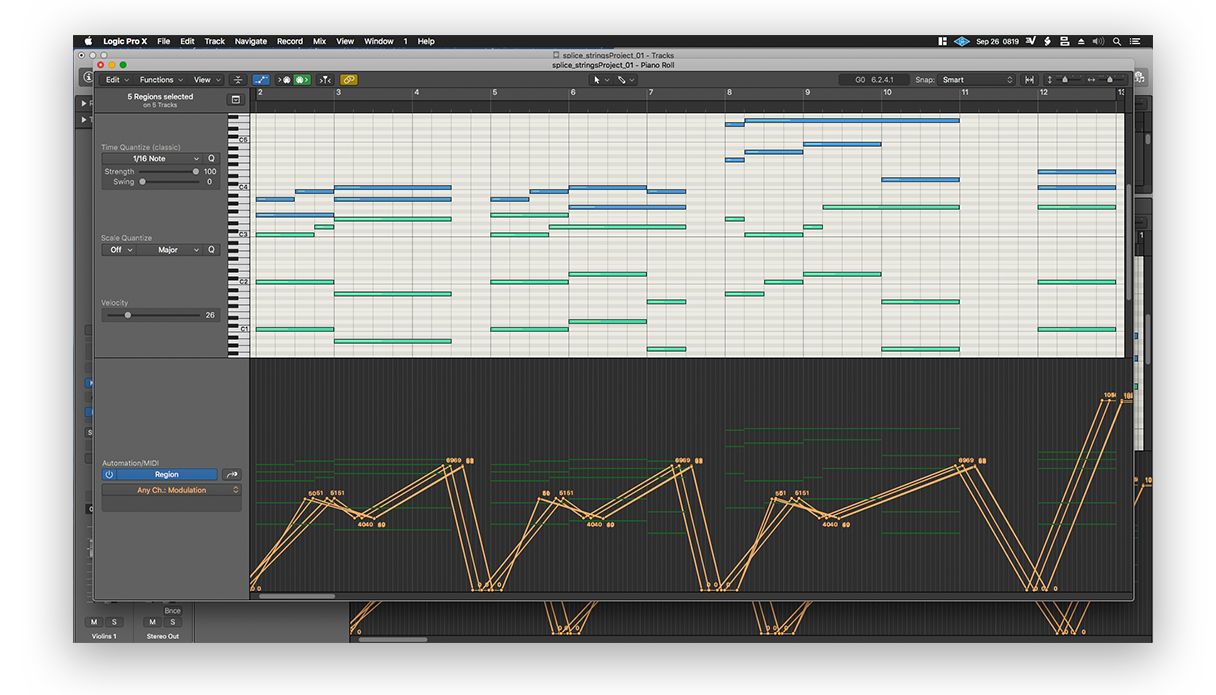
And here’s what the part sounds like once the modulation has been applied:
Adding modulation to a violin line using the piano roll
 Adding modulation to a violin line using the piano roll
In the second example, I write in some mod wheel information to automate the expression of the phrase. Do you feel how the emotional context of the part has changed? This is because of the way string players naturally feel out a part – we’re easing in and out of phrases to create more convincing parts.
4. Humanizing MIDI notes
Lastly, we need to humanize our MIDI note position. This is a similar concept to expression editing, as we’re trying to account for the way humans approach beats. It doesn’t take much and can be as simple as running the humanize function in your DAW.
Humanizing the staccato parts

A good example of this is when you have the entire string section playing chords. Having them all hit the downbeat at the exact same moment can sound incorrect. Introducing a subtle imperfection to the hits can make all the difference. Here are two examples, one without humanization and one with it:
Pro Tip: Some libraries record natural expression into their samples. While this is all well and good, it can sometimes prove frustrating when you’re trying to make your samples hit the downbeat. In these cases, it might be better to manually humanize the MIDI notes to hit those downbeats. This is especially apparent in brass libraries.
Where to now?
You now have a solid understanding of writing parts and editing MIDI notes for realism. The next step is to mix those parts using imaging, EQ, and reverb. In a future tutorial, we’ll cover how to use these techniques specifically in the context of orchestral string production.
Explore royalty-free sounds from leading artists, producers, and sound designers:
October 12, 2018