.svg)
.svg)

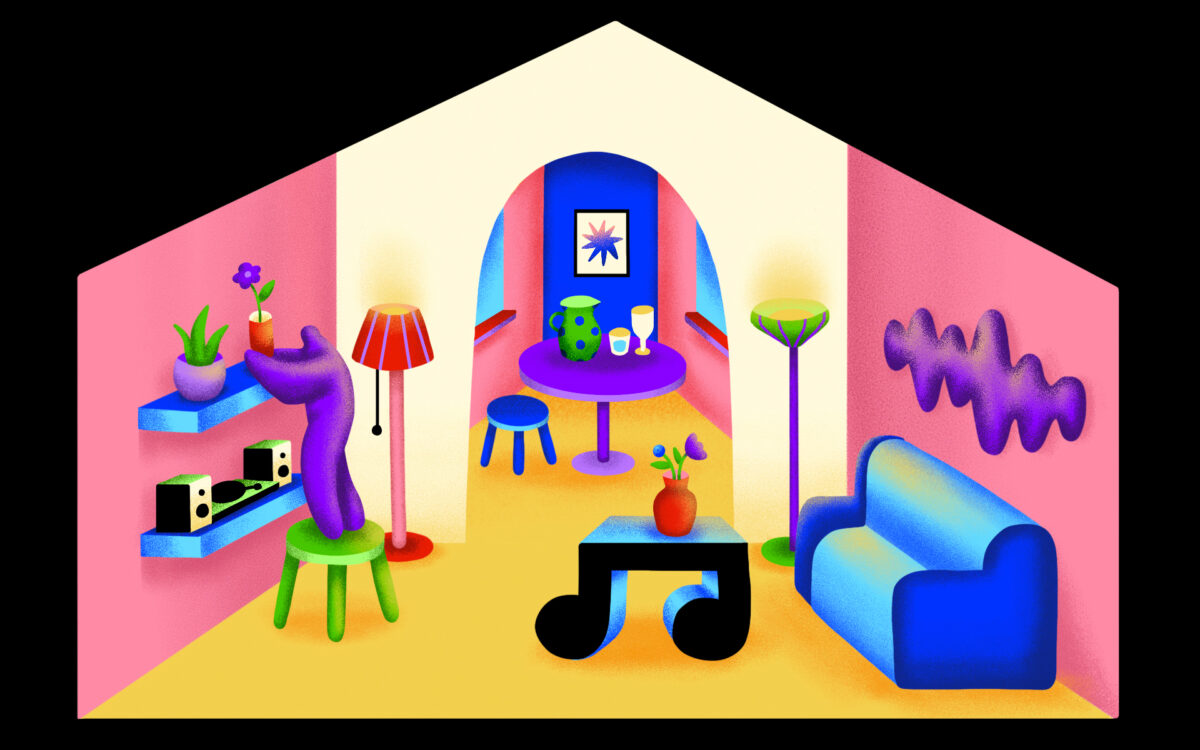
Illustration: Jocelyn Tsaih
Music isn’t just something we hear—it’s something we can see.
Close your eyes while listening to a great-sounding mix and a space opens up. Instruments sit in specific spots. Vocals hover close or far away. Some sounds feel low and grounded, while others stretch toward the ceiling. The whole thing has a shape.
Plenty of great resources cover the technical side of balanced mixing. This article approaches it from a more visual angle—how to hear the stereo imaging of your mix like a room you’re building. We’ll explore song examples as well as specific tools and techniques that will help you achieve your own goals when mixing.
Feel free to use the table of contents below to easily navigate to a specific section.
What you’ll learn:
- What is stereo imaging?
- Width: The x-axis of stereo imaging
- Height: The y-axis of stereo imaging
- Depth: The z-axis of stereo imaging
- Practice makes perfect for stereo imaging
Feeling ready? Let’s dive in!
What is stereo imaging?
Stereo imaging refers to how sound is distributed across the left and right channels of a recording’s stereo field. It determines the sense of width, depth, and spatial placement in a mix.
A mix with effective stereo imaging feels three-dimensional, and can help reinforce the creative intent of the piece of music.
Take Billie Eilish’s “i love you” for example. Close your eyes, and it feels like you’re sitting right next to her on a plane, mid-conversation. Her vocal is intimate and close, while the subtle foley details pull you into the scene around her.
Then, put on ODESZA’s “La Ciudad,” and the room changes completely. Suddenly, you’re somewhere wide and cinematic, like watching a sunrise from the top of a mountain, with the vocals catching the alpenglow.
Both songs create space, but they build very different rooms. I like to think of this as decorating sonically.
Decorating sonically—what is it?
Decorating sonically means making arrangement and mixing decisions based on where you want each sound to live.
Before you reach for any plugin, ask yourself: where is the listener standing? Are they sitting beside the singer in a quiet room? Standing in front of a small band? Looking out over a massive, cinematic landscape?
I like to compare it to decorating an actual space. You can pick out cool individual pieces: furniture, decorations, paint, curtains, lighting. Then, you can hand them off to someone else and hope they understand how everything should fit together. Maybe the pieces work. Maybe they don’t.
Or, as you choose each piece, you can define the room as you go. You decide the color palette. You choose what anchors the floor, what opens up the walls, and what draws the eye deeper into the space. By the time the room comes together, every detail has a role.
The same idea applies to a mix. Do you want the listener in a dark room with one voice and a guitar? A big concert hall like Adele’s “Skyfall?” A tight club groove? A wide, glowing landscape? The answer changes how you arrange, pan, EQ, filter, layer, and add space.
A good mix gives every sound a place to live. Something anchors the floor. Something opens the walls. Something pulls the listener deeper into the room.
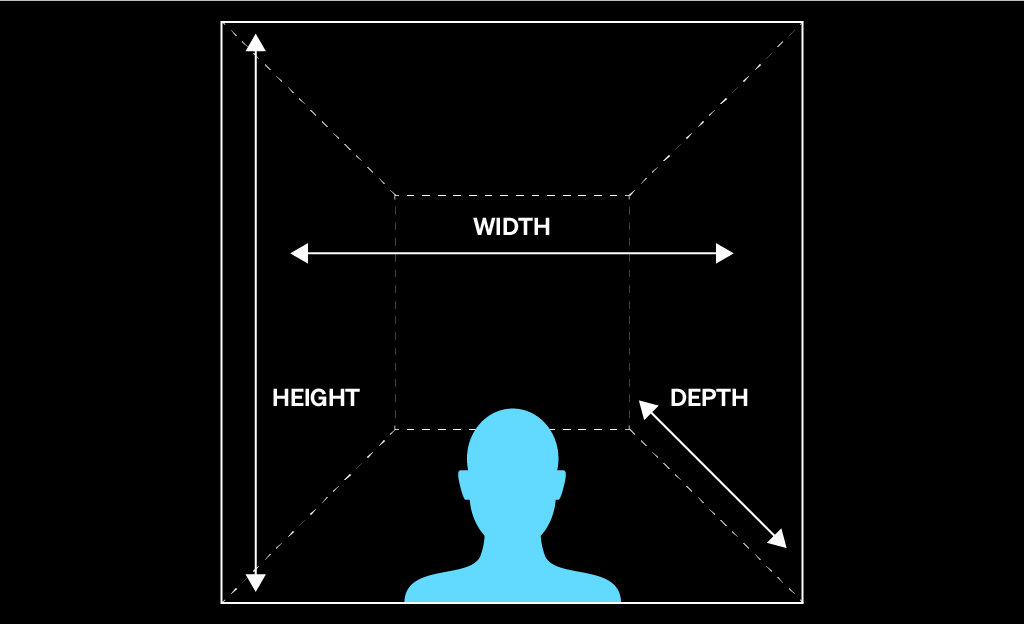
The three axes to stereo imaging: Width, height, and depth
In this article, we’ll explore how to curate sonic space across three axes:
- X-axis – width: what sits left, right, center, or wide across the stereo field
- Y-axis – height: what lives low, mid, high, or stacked across the frequency spectrum
- Z-axis – depth: what feels close, far away, dry, wet, intimate, or expansive
By the end, you’ll have a simple way to listen to any mix in 3D: width, height, and depth—and a few production moves for shaping each one.
Width: The x-axis of stereo imaging
The x-axis represents the width of the space. In a mix, this is the left-to-right placement of each sound: what sits in the center, what leans left or right, and what stretches wide across the stereo field.
When you walk into a physical space, you naturally read the left and right boundaries. A small room feels narrow. A concert hall feels wide. The same thing happens in a mix. Some songs place everything close to the center so the listener feels intimate and focused. Others spread sounds across the stereo field so the track feels bigger, wider, or more cinematic.
Before touching a pan knob, ask: where is the listener standing? Are they right in front of a small band? In the middle of a crowd? Inside the headphones, with sounds moving around them?
Song examples for approaching width in a mix
1. “So Easy (To Fall In Love)” (Olivia Dean)
The intro of this song (0:00 – 0:35) is a great example of using width to make a small arrangement feel alive.
- 0:00 – 0:02: The guitar plucks a scale on the left, immediately giving the listener a sense of space. Even before the full groove settles in, your ear has something to locate.
- 0:05: The acoustic guitar enters with a strumming pattern that, while still panned, feels more centered and present. It gives the arrangement a steady body while leaving room around it.
- 0:05: The shaker sits toward the left, adding movement and texture without crowding the vocal or guitar. These small placements make the band feel like they’re arranged in front of you, not stacked on top of each other.
The takeaway here is that width doesn’t always need to be dramatic. Sometimes, a small left-side detail is enough to make a track feel more human and dimensional.
2. “Please Please Please” (Sabrina Carpenter)
This is a more subtle example, but it’s a good one to listen for. The plucked sounds on the left and right aren’t perfectly identical, and that slight difference helps the stereo field feel more natural.
Instead of copying the exact same sound on both sides, the production gives each side its own tiny variations. That contrast creates width without making the arrangement feel obviously “panned” or gimmicky.
This is one of the easiest ways to make a part feel wider: use two related sounds, place one left and one right, and let the small differences between them create movement.
3. “Left and Right” (Charlie Puth, Jung Kook)
This is the most literal example of the x-axis at work. The stereo field isn’t just used to place instruments. It becomes part of the hook itself.
When sounds move or answer each other from left to right, the listener feels the motion physically, especially in headphones. The x-axis can localize instruments in a space, but when you get creative with it, it can also become a playful interaction with the listener.
The takeaway here is that panning isn’t only a mixing tool. It can be an arrangement idea.
How to create width in your mix
Panning is your best friend on the x-axis. It lets you decide where each sound lives from left to right.
Most DAWs give every track a pan knob or slider, and that’s usually the cleanest place to start. Some plugins offer extra stereo imaging or widening controls, but basic panning is often more reliable because it keeps the session easier to manage and easier to mix.
A simple way to think about width is this:
- Center: the sounds that need to feel strong, focused, and grounded
- Left and right: the supporting details that create space, contrast, and movement
- Wide: the layers that are meant to surround the listener or make a section feel bigger
Tips for managing width in the stereo image
There are no hard rules, but here are a few widely-used approaches:
- Kick and bass: Keep the kick drum and bass centered most of the time. Treat them like the foundation of the room. When the low end is centered, the groove usually feels tighter and more grounded.
- Lead vocal: Keep the lead vocal centered if it’s the main emotional focus. This helps the listener know where to look.
- Harmonies and backing vocals: Try panning one harmony left and another right. If you add more layers, spread them out in pairs to create a wider vocal stack around the lead.
- Guitars, synths, and percussion: These are great candidates for left-right contrast. You can pan one guitar slightly left and another slightly right, place a shaker off to one side, or use a small synth detail on the opposite side to balance the space.
- Stereo width: Wider isn’t always better. If everything is wide, nothing feels wide. Keep some elements centered so the wider parts actually feel like they open up the room.
Height: The y-axis of stereo imaging
The y-axis represents the height of the space. In a mix, height comes from frequency range: low sounds feel like the floor, high sounds feel like the ceiling, and everything in between fills the room.
You don’t necessarily need to think like an audio engineer to understand height. If you already think in notes, octaves, and parts, you’re halfway there.
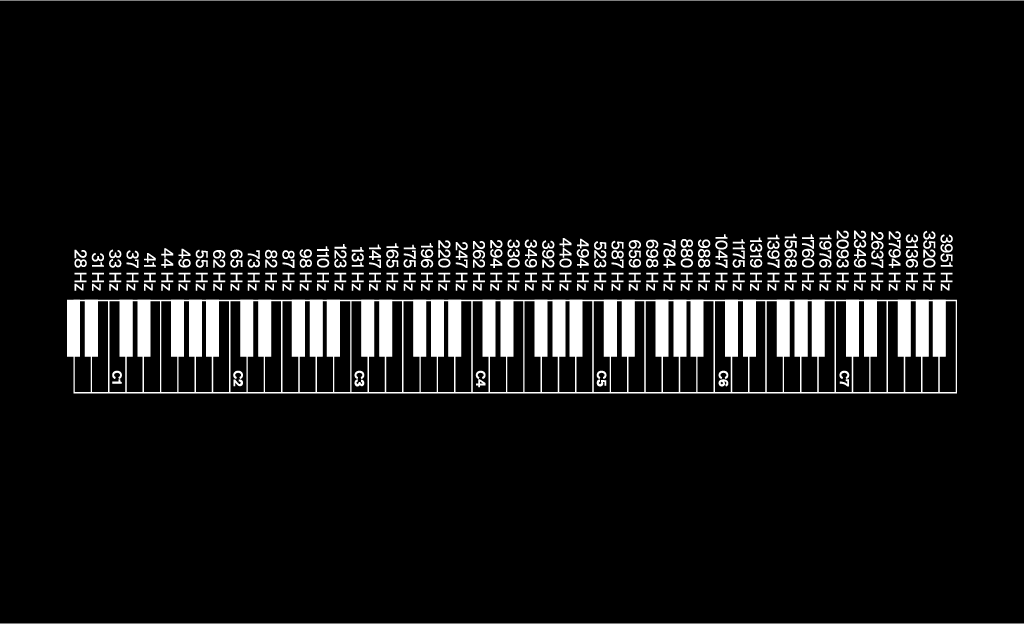
Working within the y-axis means arranging sounds so they’re not all fighting for the same vertical space. If every instrument sits in the same octave or frequency range, the mix starts to feel crowded. But when each part has a role, one sound can anchor the bottom, another can carry the middle, and another can add brightness on top.
Think of it like hanging pictures on a wall. You don’t want every frame clustered in the same spot. You want each one to have room to breathe.
Song examples for approaching height in a mix
1. “i love you” (Billie Eilish)
One of my favorites—there are so many interesting sounds and placements sprinkled throughout the arrangement.
- 0:00 – 0:40: Billie’s vocal and the guitar feel light, close, and airy. There isn’t much low-end weight yet, so the space feels intimate and suspended.
- 0:40 – 1:25: When Finneas’ vocal comes in, the room starts to feel more grounded. His voice sits lower than Billie’s, which gives the arrangement more vertical shape without taking away from the softness of the section.
- 1:24 – 1:52: When the bass pad enters and holds those long notes, the floor of the mix finally appears. The track still feels delicate, but now there’s a deeper foundation underneath it.
When I listen to this track, I picture a dark room with just Billie and a guitar. As the song progresses, the room gradually lights up, revealing more elements across the frequency spectrum. The higher parts create air, the lower parts create weight, and by the time the bass arrives, the full shape of the room comes into view.
2. “The Motto” (Tiësto, Ava Max)
This is a great example of arranging parts in a similar frequency range without letting the mix feel crowded.
- 0:00 – 0:03: The chopped vocal intro sits around F♯4, giving the track a hooky, rhythmic motif right away. It feels more midrange than bassy or airy: present, tight, and slightly dark.
- 0:04 – 0:19: Ava Max’s lead vocal comes in around A3 to C4, close to the chopped vocal’s range. But, the two parts don’t blur because they have different jobs. The chopped vocal acts like a rhythmic hook, while Ava’s vocal carries the lyric and melody.
- 0:20 – 0:37: When the hi-hats enter, they add brightness above the vocal and chopped hook. They don’t compete for the same space. Instead, they lift the top of the mix and give the darker midrange groove and some sparkle.
- 0:36 – 0:53: The bassline now takes over the chopped vocal motif two octaves lower, around F♯2 to A2. This makes the same musical idea feel more physical and grounded without crowding the lead vocal. Because the hook has moved lower, Ava’s vocal can stay clear in the midrange while the bass carries the weight underneath.
3. “Espresso” (Sabrina Carpenter)
Last but not least we have “Espresso,” which features Oliver’s well-known sample.
- 0:00 – 0:08: The opening vocal has that filtered, radio-like quality. It feels narrowed and slightly muffled, as if the top and bottom of the sound have been tucked away. This keeps the intro playful and compact before the full groove opens up.
- 0:08 – 0:28: As the vocal layers build, the mix starts to stretch upward. The main vocal sits around B3 to C5, while a higher layer doubles parts of the line around G4 to D6. That octave lift adds brightness and attitude without needing the whole arrangement to get bigger yet.
Height isn’t only about what sounds “high” or “low;” It’s about how parts are stacked. A filtered vocal can make a section feel smaller. A higher double can make it feel brighter. A bass part can make the same hook feel heavier. The y-axis helps you decide where each part belongs vertically.
How to create height in your mix
There are two big moves here.
1. Understanding frequencies and how to work with them
Before reaching for an EQ, listen to the parts themselves. Are too many instruments playing in the same octave? Are the vocal, synth, guitar, and keys all crowding the same middle area? Is there anything supporting the low end? Is anything opening up the top?
A clean mix often starts before mixing. It starts with choosing parts that naturally fit together.
For example, if the vocal lives in the midrange, you might keep a supporting synth higher and thinner, move a bass part lower, or simplify a guitar part so it’s not competing with the melody. The goal isn’t to fill every inch of the wall. The goal is to give each important sound a clear place to live.
2. Filters and EQ
Filters and EQ help clean up the edges of each sound so the arrangement feels more intentional. Instead of letting every track take up the full frequency spectrum, you can decide what each part actually needs.
A bass might not need a lot of extra top-end noise. A backing vocal might not need as much low-mid body as the lead. A synth pad might sound better when its low end is trimmed so it doesn’t blur with the kick and bass.
Tips for managing height in the stereo image
Here are a few ways you can think about height in your own stereo imaging:
- Bass: If a bass part has unnecessary top-end noise, try gently low-passing around 8 – 12 kHz. If the click, grit, or air is part of the sound, leave it open.
- Kick drum: If the kick has too much extra high-end information, try low-passing around 3 – 6 kHz, or lower depending on the sound. Keep what gives it punch and remove what adds clutter.
- Vocals: For an airy, bright vocal, try a gentle boost around 10 – 16 kHz. That’s where a lot of breath, shimmer, and “air” can live.
- Backing vocals: I like to record several layers, pan them left and right, group them to a bus, and add a high-pass filter to the group. Then, I play with the cutoff until the layers feel like a light choir around the lead instead of a crowd standing on top of it.
Depth: The z-axis of stereo imaging
The z-axis represents depth: what feels close to the listener, what sits further back, and how big the space around the sound feels.
Were you ever one of those kids who would stand in a cave or stairwell and yell “Hello!” just to hear it bounce back? Aside from the thrill of hearing your own voice travel, it’s actually a useful way to think of sonic depth.
The bigger the space, the more the sound reflects around you. The smaller or closer the space, the drier and more direct it feels.
We can use the same principle to build the sonic room of a song:
- The drier a sound is, the closer it feels
- The wetter a sound is, the further back it sits
Before reaching for reverb or delay, come back to the world you’re creating. Is this an intimate piece that should feel close, quiet, and almost whispered into the listener’s ear? Or, does it live in a bigger, more open environment, like a stage, a hall, or a wide cinematic landscape?
Depth isn’t only about making something sound “pretty.” It tells the listener where they’re standing.
Song examples for approaching depth in a mix
1. “Promise” (Laufey)
This is a beautiful example of closeness—Laufey’s vocal feels dry, soft, and almost private, like she’s sitting right next to you, singing and playing piano in the living room. There’s space around her, but the space doesn’t feel huge. The intimacy comes from how direct the vocal feels.
Depth doesn’t always mean adding more reverb. Sometimes, the most emotional choice is keeping a sound close.
2. “Skyfall” (Adele)
This is the total contrast: a much larger room, built for drama.
- 0:08 – 0:31: The piano immediately feels further away than Laufey’s. It doesn’t sound like someone playing right beside you in a small room. It feels placed in a larger space, with more air around the notes.
- 0:32 – 0:57: When Adele’s vocal enters, she still feels present and powerful, but not right next to your ear. The light reverb tail places her in a grander environment, closer to a stage or concert hall than a living room.
The biggest difference between “Promise” and “Skyfall” isn’t just the vocal performance. It’s the size of the room being created. Laufey feels close and private. Adele feels cinematic and expansive. Instead of sitting on a couch beside the singer, you’re in a concert hall with the curtains pulling back to reveal the orchestra.
3. “lovely (with Khalid)” (Billie Eilish)
This is a great example of using depth for contrast inside the same song.
- 1:11 – 1:28: Coming out of a fuller, more dynamic chorus, this minimal post-chorus suddenly opens up. Billie’s vocal has more space around it, and the reverb and echo make the section feel wider and more distant without making it feel empty.
That’s the trick: the production creates distance, but still keeps emotional focus. The space becomes part of the dynamic journey. The listener feels the room expand, and then gets pulled back into the song.
The takeaway here is that depth can create movement. A dry section can feel close and intimate. A wetter section can feel open and suspended. Moving between the two makes the arrangement feel alive.
How to create depth in your mix
Depth comes from three main tools.
1. Volume
The further away something is, the softer it usually feels. Before adding effects, try adjusting level first. Sometimes, simply turning a background part down can push it further back in the room.
2. Reverb
Reverb creates the feeling of a sound reflecting inside a space. A short, subtle reverb can make something feel like it belongs in a room without pushing it too far away. A longer, wetter reverb can make a sound feel more distant, dreamy, or cinematic.
3. Delay
Delay repeats a sound back to the listener, which can create movement, width, and depth at the same time. A short delay can add thickness without sounding obvious. A longer delay can create an echo that makes the space feel larger.
But, too much delay can clutter the mix quickly, especially when the timing fights the groove. Delay works best when it supports the rhythm of the song instead of floating randomly on top of it.
Tips for managing depth in the stereo image
Lastly, here are some common practices for approaching depth in your own stereo imaging:
- Use buses: Instead of putting a separate reverb on every track, create a reverb bus tuned to the room you’re building, and then send different tracks to it. This helps the sounds feel like they belong in the same world.
- Start dry, and then add space: When adding reverb or delay, start with the effect low or fully dry, and then slowly bring it up until the space feels right. Stop before you notice the effect more than the emotion.
- Keep the lead intentional: If the vocal is the emotional center, be careful not to drown it in reverb. A vocal can have space and still feel close if the dry signal stays present.
- Sync delay to the song: For tightly produced music, try syncing delay to rhythmic values like 1/16, 1/8, or 1/4. This keeps the echoes locked to the groove instead of making the section feel messy.
- Check the room: Once you add reverb or delay, ask yourself: did this sound move further back, or did it just get blurry? Depth should create space, not fog.
Practice makes perfect for stereo imaging
The best way to train this kind of listening is to do it on purpose. Pick one track you love, close your eyes, and map the room. Start with width: what sits in the center, what leans left or right, and what stretches wide? Then, listen for height: what anchors the low end, what carries the middle, and what opens up the top? Finally, listen for depth: what feels close, what sits further back, and what tools helped create that distance?
Do this with three tracks in a row, and you’ll start hearing your own mixes differently the next time you open your session. Decorating sonically isn’t one skill—it’s a habit. The more rooms you visit, the better you get at building your own.
Explore royalty-free one-shots, loops, FX, MIDI, and presets from leading artists, producers, and sound designers:
June 5, 2026