.svg)
.svg)


Illustration: Script & Seal
One of the best ways to get better at making your own music is by learning from other people’s music.
By analyzing and deconstructing your favorite songs, you’re intentionally articulating the elements that make up a song and seeing what elements make the song great. Soon, you’ll start to see patterns worthy of depositing into your own musical idea bank for future reference. If you’ve never practiced analyzing music before, here are four tips to get you started.
PS: I’ve included a FREE download for a music analysis template at the end of the blog post!
1. Practicing active listening
The first rule of music analysis is to listen to a song with intent and complete focus. Clear away any distractions (such as notifications on your computer or phone) and be in a comfortable listening environment. Listen to the piece at least three times, start to end. Here are some guidelines as to what you can do during each listening pass:
- First pass
- Take note of each individual musical element in the following list, and write down your observations for each category. What do you notice? What do you like or dislike?
- Melody – the tune of the music
- Harmony – the individual chords as well as the overall chord progression
- Rhythm – the beat and groove of the song
- Form / Song structure – the different sections in the song
- Texture – the number of layers of music going on
- Tempo – the bpm
- Timbre – the different qualities of the sounds used
- Dynamics – the ebb and flow / musical arch of the song
- Mix – the sonic qualities of the arrangement
- Take note of each individual musical element in the following list, and write down your observations for each category. What do you notice? What do you like or dislike?
- Second pass
- Focus on two or three of the individual elements in the first pass that stand out to you. Answer the following questions:
- Why did these elements stand out? What is it that makes each of these elements unique?
- How is each of the elements used in the song? Can you determine their functions?
- Are any of these elements repeated in the song? Can you determine a pattern?
- Focus on two or three of the individual elements in the first pass that stand out to you. Answer the following questions:
- Third pass
- Switch your attention from the musical elements to the sonic elements of the mix, and answer the following questions:
- What are the sonic colors of the mix? Dark, bright, dirty, muddy?
- Are there any particular sounds or samples that stick out to you?
- How is the balance in the mix? Is there an instrument that’s intentionally louder than another? How does that affect the perception of the song?
- Switch your attention from the musical elements to the sonic elements of the mix, and answer the following questions:
As you can tell by now, performing active listening with just three full passes may be a little difficult. So for starters, I recommend really taking the time to sit down for an hour each week to perform this exercise with more than three passes. Not only will this give you musical ideas, but it will also improve your ability to identify instruments and elements in a song.
2. Recognizing drum patterns
Another useful tip for music analysis is to learn how to recognize drum patterns. Every drum part is a pattern of some sort – there is repetition. Think of patterns like shapes – for example, a major triad chord shape (the root, the major third, and the fifth) will always sound major. Similarly, a drum pattern will always sound somewhat similar, even if it’s slowed down or sped up. Trying out different drum patterns over the same arrangement is a cool exercise to carry out, but before you can do that, you have to learn how to identify different drum patterns. Here’s how: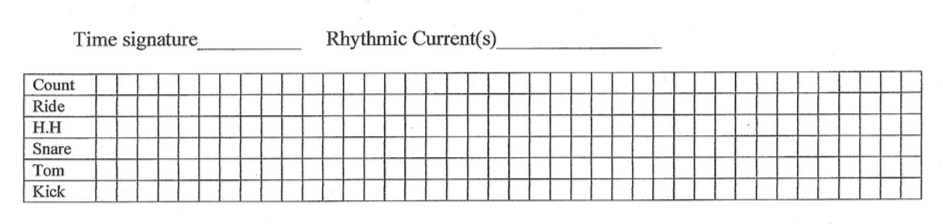
- Write down the beat
- Use the chart above to notate the drum pattern of the song you’re studying.
- Write in the time signature (4/4, 3/4, 6/8, 7/4, etc.), then write the count for each beat on the first row.
- For example, if a song is in 4/4, write “1 2 3 4 1 2 3 4…. etc.” on the count row. If the pattern has subdivisions – which it probably does – you can either include those in your count or just write out subdivision notation such as “1 and 2 and 3 and 4 and” for eighth note divisions and “1 e and a 2 e and a” for sixteen note divisions. You can read more about the “1 e and a” counting system here.
- Next, mark an “x” in the box where each drum element falls. For example, for a “four on the floor” beat, the kick drum will have an x on each beat.
I do this for a number of my favorite songs every week, and I save my work in a folder where I can reference them when I’m writing and producing. You can easily visualize the pattern and transfer it into your DAW, as most sequencers use the same UI for inputting drum patterns as the template above. But, I have an even better solution for you.
3. Using the Splice Beat Maker
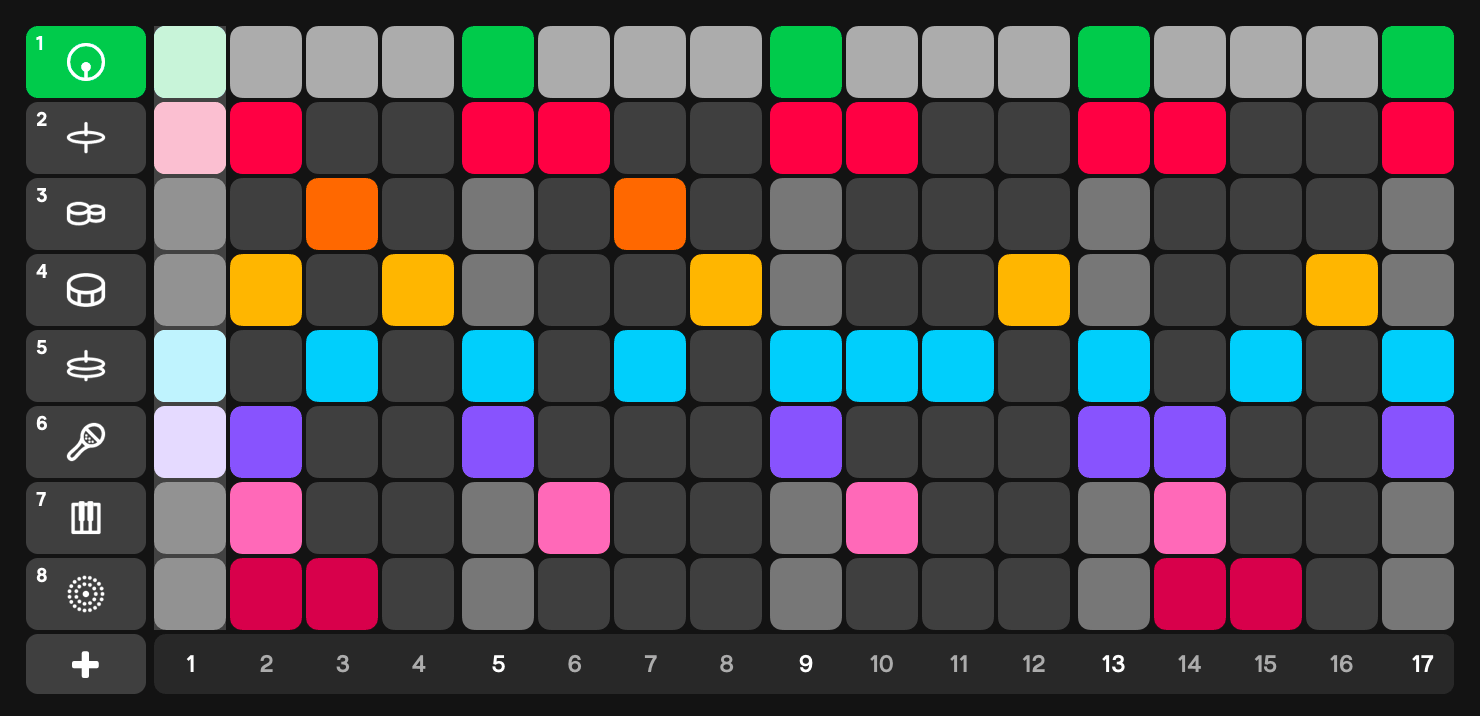
For a more intuitive and hands-on experience, use the free Splice Beat Maker to visualize your drum patterns, hear them, and save them. You can even export the beat from the Beat Maker straight into an Ableton drum rack.
4. Understanding the melody
Understanding melody and harmony may be challenging. Without much music theory knowledge, you may feel unsure of where to start. Don’t fret – here’s an easy method, using a little bit of trial and error, to analyze the melody of a song:
- Focus on a small section of the song like a chorus, verse, or hook.
- Using your DAW’s piano roll or a keyboard, figure out the first and last notes of the melody.
- Now write those first and last notes as far apart as possible on a horizontal plane on a piece of paper.
- Listen to the melody again and draw a line according to the pitch of the melody over time from the first note to the last. If you hear a note rise in pitch, your line should go up. If the next note goes down in pitch, then the line should go down. If the note remains at the same pitch, the line should be straight for that portion of the song.
- At the end, you should get a line that mimics the pitch of the melody. Now, try using your piano roll to match that line you’ve drawn by inputting notes via trial and error.
This may sound ridiculous, but it’s a good way to train your ear if you’re just getting started. Of course, knowing the key of the song first will greatly help you. This practice trains your ear to listen to and recognize intervals (the musical distance between two notes). Like chords and drum parts, intervals are patterns. Every interval sounds the same and evokes a particular feeling depending on the musical context. For example, take the hook of The Simpson’s theme – those three notes are C, F#, and G. The interval between C and F# is what we call a tritone, and is instantaneously recognizable in any piece of music.
I hope that you’ve gained some tips to be able to start analyzing your favorite pieces of music! If you have a favorite way of breaking down tracks or want a more in-depth article on each step, let us know in the comments below!
Click here to download your free music analysis worksheet template
Explore royalty-free sounds from leading artists, producers, and sound designers:
June 2, 2017