.svg)
.svg)


This blog post is part of a series on Mastering with Ozone 8 Standard. If you missed a tutorial, click on the topics below to catch up:
Ozone 9 Advanced, the latest version of iZotope’s mastering suite, offers even more powerful features — check out the guide here.
Part of a mastering engineer’s job is to successfully deliver masters according to the requested deliverable format made by the client. Depending on where and how the music is going to be consumed, there are several methods of delivery and file formats that you would need to take note of. We will go through some of the common formats and how you can assemble them.
1. Standard file format for music streaming & online stores (Spotify, iTunes Music)

File Format: WAV
Bit Depth: 16-bit
Sample Rate: 44.1Khz
Preparing files for online music stores and music streaming companies is pretty straightforward. All you need to do is to make sure your files meet the specified format. A couple of things to remember:
- Trim the start and end of each song so that when you press play, it starts right where it’s supposed to start and ends where it’s supposed to end.
- If you’re running a higher sample rate and bit depth than what is specified (you should be definitely running at least at a higher bit-depth), you would need to sample convert / dither them accordingly.

When running Ozone 8 in standalone mode, you can export your files and specify the sample rate that you like. This will automatically sample rate convert your files for you. There’s even an option to dither if you’re moving from a higher to lower bit rate. - You also need to ensure there are no bit-stream overs on your master. Most, if not all, streaming stores convert your music to either AAC or mp3 format, and you want to make sure your master does not clip after it goes through the encoding. To ensure this doesn’t happen, enable True Peak Limiting in Ozone’s Maximizer, which will allow you to catch clips.
- Lastly, you may be required to submit ISRC Codes / Metadata (Artists information, Album titles, Track titles) to an aggregator. There’s no easy way to do this but to type it out and double check to make sure that there are no mistakes.
- If you’re helping an indie artist or if you’re submitting your own music for distribution yourself, aggregators such as Tunecore, CD Baby, or Distrokid often offer you the ability to get ISRC codes for your tracks.

2. Mastered for iTunes(MFiT)
![]()
File Format: WAV
Bit Depth: 24-bit
Sample Rate: 441.Khz – 192Khz (Project Dependent)
You can read pretty much everything there is to know about the Mastered for iTunes format here. Or, you can just read our summary here:
- MFiT requires that you submit the highest possible resolution master if possible. That said, if you are running a 44.1Khz / 24bit project, do not up-sample your masters to a higher sample rate, as it does not make any difference in any way.
- An important step in MFiT is that there are no bit-stream overs using Apple’s AAC encoder. Apple will reject your master if there are overs. Thus, it will be good to use a tool to help you check with the overs.
- MFiT also recommends about 1dBFS of headroom on your masters. Therefore, when you are submitting files for iTunes under MFiT, you might want to re-bounce your masters to accommodate this specification.
3. Audio CD (DDP Image)
File Format: WAV
Bit Depth: 16-bit
Sample Rate: 44.1Khz
If you’re submitting the masters to replicate on an audio CD, the pressing plant will most likely want a DDP Image (Disc Description Protocol).
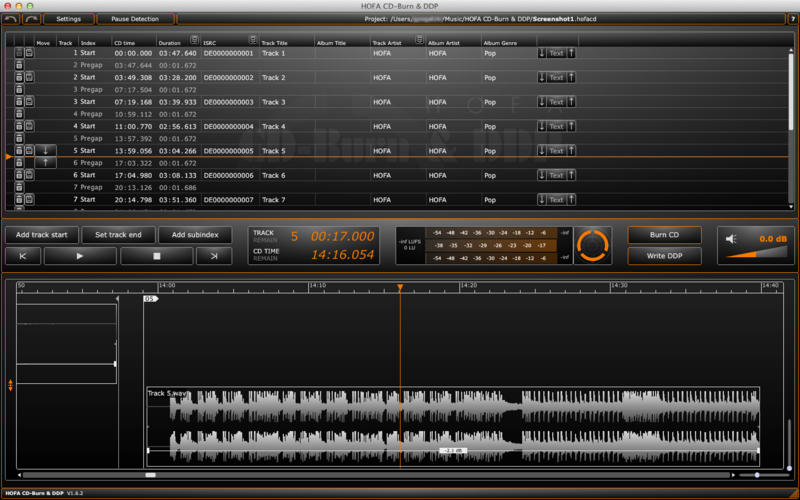
A DDP image consists of data that holds all your audio tracks, metadata, CD-Text and ISRC Codes. In order to make a DDP Image, you need a DDP authoring software. One of the best ones I know is by HOFA called the HOFA CD-Burn & DDP. It’s a simple and straightforward DDP maker that allows you to easily make DDP images within minutes. All you have to do is line up your tracks, make sure you trim the starts and ends, and enter all the necessary metadata for your track and you are done!
The preparation process is a meticulous one. Make sure you double and triple check your masters before you submit them to an aggregator or directly to a label or client. Mistakes usually aren’t forgiven in the industry.
This blog post concludes our six-part mastering series with Ozone 8 Standard. If you have any questions or feedback, do write in the comments and let us know!
Explore royalty-free one-shots, loops, FX, MIDI, and presets from leading artists, producers, and sound designers:
October 5, 2017
