.svg)
.svg)


Illustration: Script & Seal
Creating and curating a personalized music production library is one of the most worthwhile things that you can do as a producer.
By developing your own personalized framework of instruments and tools, you can completely revolutionize your workflow and give yourself the ability to execute creative decisions with greater accuracy and fluidity. It’s important to keep in mind that there’s no one correct way to organize your digital workstation; it’s ultimately up to you to set things up in a unique way that makes sense to you personally. That being said, let’s take a look at some general guidelines to keep in mind when developing your custom production library.
This blog post mentions Splice Studio, which is no longer active. Learn more about the shutdown here.
1. Make a plan
This is the first and most crucial step. Since you’re just starting out (or starting over) with creating your library, you’re at an exciting point because you can decide for yourself exactly how you’d like things to be set up, and what methods would make the most sense to you during the writing and production process. With that in mind, take as much time as you need at this stage to sit down and make a game plan for exactly how you’d like things to be organized within your own ideal workstation. It can be very helpful to sit down with a pencil and paper at this stage to brainstorm – try drawing a file tree and experimenting with several configurations to represent possible structures for how your folders and file paths should nest within each other.
 2. Back up everything
 2. Back up everything
Before you begin and start rearranging your local files, it’s essential that you back everything up. While you could always back up your projects and related files the old fashioned way, syncing everything with Splice Studio is a breeze and ensures that you can always backtrack if you need to. Don’t have an account yet? Sign up for Splice to get unlimited storage and to sync all of your project files and related samples to your account. This allows you to freely rearrange, merge, divide, or even delete files and folders from your local working disk without constantly second-guessing your choices. It also means that your older projects remain intact and available in the event that local file paths or folder structures change.
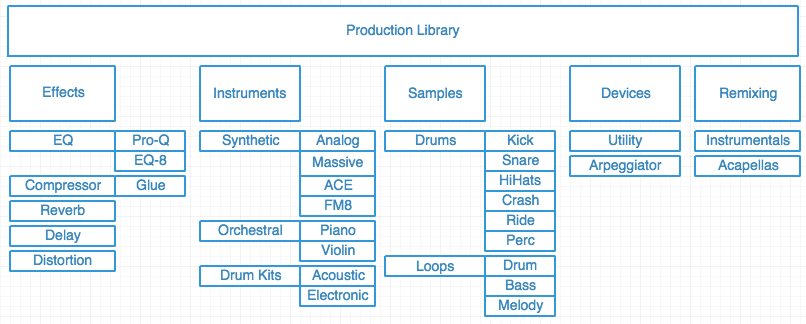
3. Build a file system
Moving forward, go ahead and construct the new file system that you’ve designed within a central Production Library folder. This top-level folder could contain any number of broadly categorical sub-folders such as Instruments, Samples, Presets, Effects, or anything else that you might require based on your own production needs. Again, this is entirely up to you and depends on what you’re trying to accomplish and which methods compliment your workflow best. The goal here is to make things easier on yourself when you’re in the mood to sit down and actually create music. There’s no better way to halt the creative process in its tracks than by having to dig through hundreds of sub-folders to find that one elusive sound or tool that you’re after.

4. Clean up
Creating a new and improved music production library is the perfect occasion to do some much needed purging. A good next step before filling up your brand new file structure with largely mediocre samples is to delete samples that don’t meet your criteria for sound quality or usefulness. This process may take some time since you’ll be going through every single sample one-by-one, but it’s a necessary step for getting things in order and ultimately making your life easier during the writing and production process. Don’t be afraid to take breaks during this process or even come back to it a day or two later so that the task seems less monotonous.
Consider spending one session to focus on snare samples, another to focus on kick samples, and so on. It’s not uncommon to end up keeping just 10-20% of the samples that you run through during this process, but you can be sure that what you’re left with are truly the best of the best, and have been hand-picked by you and you alone for quality. Remember, having 50 snare drum samples that sound amazing is much more powerful than having 5,000 that sound mediocre or even downright bad. Always think quality over quantity – it’s often the smaller number of great-sounding samples that you choose to keep that ultimately come to define your signature sound as a producer.
Download top samples and presets each month
Start browsing and find the sound that will inspire your next track.
5. Organize your samples
Now that you have a collection of hand-selected samples that you know fairly well, your next task is to place them into the file structure you’ve designed so that you can access them without even having to think about it. Go ahead and begin the process of populating your customized file system with samples, and don’t be afraid to alter the file system as necessary by merging or dividing folders along the way as you see fit. The goal here is to organize all of your material in as easy a way as possible so that you can easily recall them when needed. Keep things as simple as possible.
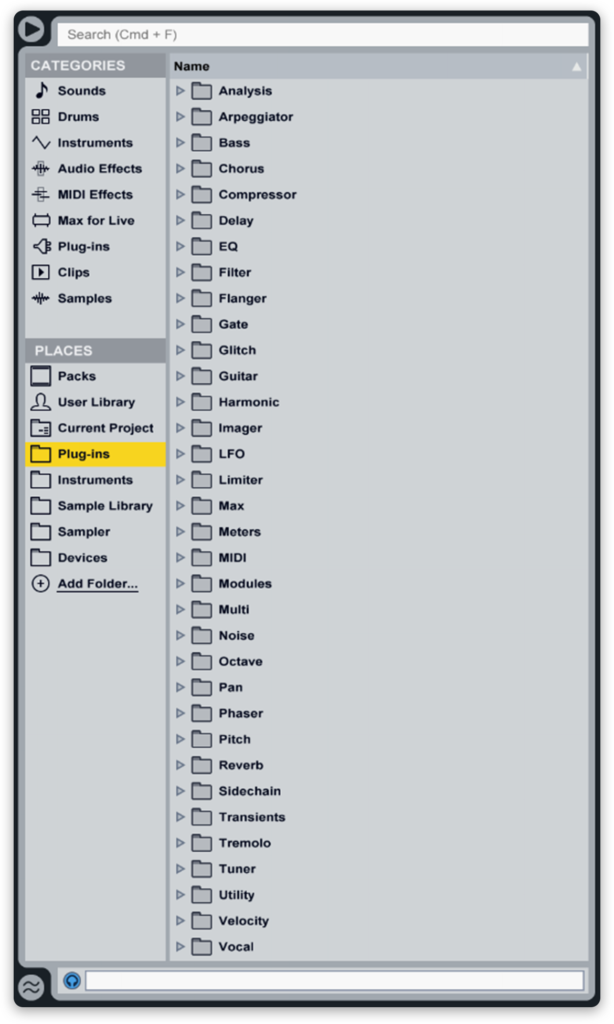
6. Organize your plugins
The same sorting logic that applies to samples also applies to plugins and utilities; while it’s certainly wonderful to have hundreds of plugins available to you, do you really need twenty or more compression plugins available at arms length at all times? Try creating a designated Plugins folder that organizes all of your favorite and most frequently used tools categorically rather than by brand or manufacturer.
As with samples, the goal here is to preserve quality over quantity, so choose a few great sounding plugins of each functional type and then learn them inside out – you’ll find that your workflow becomes much more fluid and effortless and that you achieve more musical results by not spending so much time sorting through your entire collection every time you need one simple tool to get the job done.
7. Stay organized and plan for the future
Creating and managing a customized music production library is one of the best ways to step up your game as a producer and to take your productivity in the studio to the next level. Set up your music production library in such a way where it can be easily added to and further tweaked so that it can grow with you as your production skills improve and your palette of samples and tools increases. A little time spent organizing your tools and materials can reap immeasurable benefits down the road when you’re in the thick of the creative process and working toward your next big track.
Take your music further with the new plugins, fresh sounds, and more available in the Splice Creator plan:
May 13, 2015