.svg)
.svg)

Multiband Processing in Live
When adding effects to sounds that cover the full range of the frequency spectrum, it might be a good idea to use a multiband processing setup. This means that you split the frequency content into multiple bands – usually three: low, mid, and high – and process each separately. Ableton Live makes it easy to create this type of setup using Audio Effect Racks and clever macro mapping. To get the most of this tutorial, read through the article below and then open up the Splice file below to see each step in action:
But First, Some Inspiration from Live’s Effects
Before we dive into building our own racks, I want to show you a couple built-in Live effects that we’ll use as starting points. First up is an obvious one: Multiband dynamics.
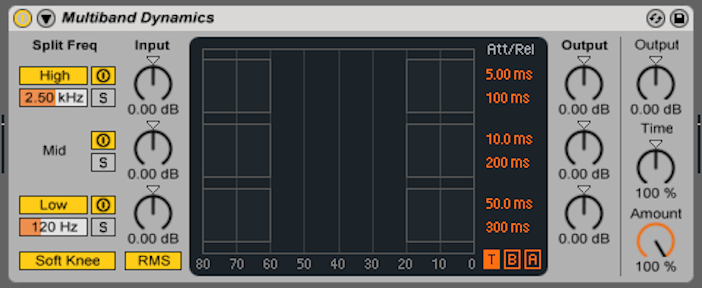
If you’d like to split your audio into a few bands and compress them separately, look no further than this effect. Look at the “Split Frequency” section and you’ll see two sliders (2.50 kHz and 120 Hz). Under the hood are some hi-pass and low-pass filters used to split the incoming audio at those set frequencies. We’ll see this effect come back later in this tutorial.
Now, let’s observe the Filter Delay:
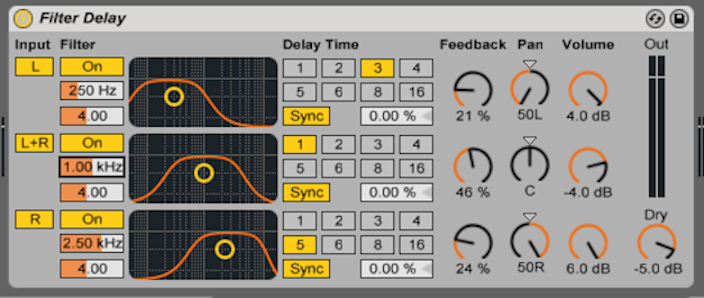
The Filter Delay is not a strict multiband effect, but notice how you can split the three available delay lines into three different bands using band-pass filters. Also, this device has a different take on the dry/wet knob by not having one. Instead, there’s a volume knob for each delay line and then one for mixing the dry signal. Now, on to building our own rack.
Step 1: Start with Musical Material that Covers the Frequency Spectrum
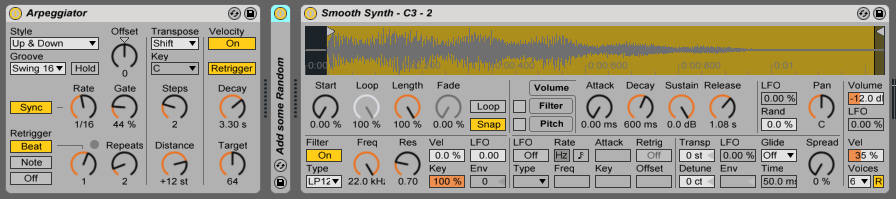
For this example, We’re using an Arpeggiator to make sure that I cover the frequency spectrum. I want to stress that there be a good range of frequencies to work with, or else you won’t be able to hear the effect.
Note: I recommend listening to these examples with a good set of headphones or proper monitors so you can hear the widening effects used later on.
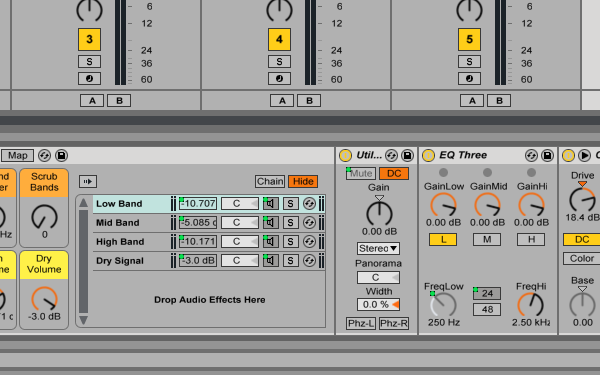
Step 2: Add an Audio Effect Rack and Create Four Chains
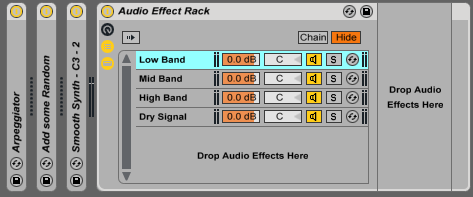
In the Audio Effect Rack, right-click where it says “Drop Audio Effects Here” and you’ll see the option to “Create Chain”. Create four separate chains and name them Low Band, Mid Band, High Band, and Dry Signal. We’re taking after the Filter Delay effect and giving ourselves the option to bring some of the dry signal back in. Essentially, we’re going to use the chains as internal Return tracks and bring the effects up to 100% wet.
Step 3: Add EQ Three and Set Up the Frequency Splits

Drag and drop Utility and EQ Three onto the Low Band, Mid Band, and Low Band chains. Utility is there to help correct any phasing issues we may have later on. On the EQ Three, the Kill Switches (labelled L, M, and H for Low, Mid and High, respectively) to isolate the appropriate bands. So, for the Low band, kill the Mids and the Highs by deactivating the M(id) and H(igh) switches.
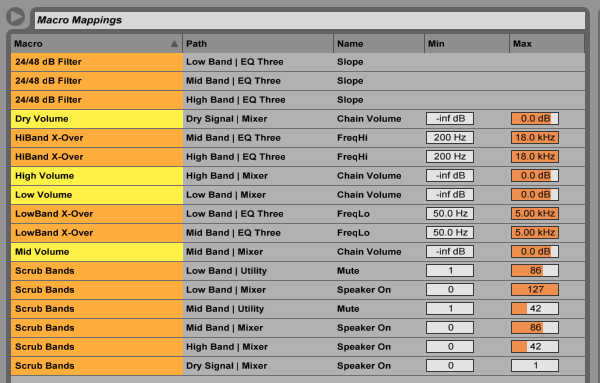
Step 4: Set Up the Rack’s Macro Mappings

Next, show the macro controls and name them as such:
- LowBand X-Over: the crossover frequency separating the Low and Mid bands
- 24/48 dB Filter: toggles between 24 and 48 dB per octave slopes at the crossover frequencies
- HiBand X-over: the crossover frequency separating the Mid and High bands
- Scrub Bands: use this knob to solo the separate bands (more convenient than the solo buttons)
- Low Volume: the volume of the of Low band after effect processing
- Mid Volume: the volume of the Mid band after effect processing
- High Volume: the volume of the High Band after effect processing
- Dry Volume: the volume of the unprocessed Dry signal
As you can see, the macros are dedicated to the mulitband separation process. To map a parameter to one of the eight macros, right-click on the parameter and select which macro you’d like to map it to. For a detailed look at the macro mapping, open the Splice file and click on the Macro Map Mode Switch on the top of the Audio Effect Rack. The Live Browser will then become the Mapping Browser.
Step 5: Add audio effects to the separate chains

Now that the setup is done, it’s time to have fun and experiment with different combinations of Audio Effects on the different chains. There are no right or wrong effects to add, but there are some better choices you can make like widening the Mid band or keeping the Low band in mono. But, again, it’s your choice. Also, I highly recommend adding a compressor after the Audio Effect Rack to glue all three or four chains together (the Glue Compressor would be useful here). Here’s where I ended up:
And just so you can here it all together, here’s the before and after clips with an added drum loop at the end to put everything in context:
Some Suggestions for Multiband Processing Racks

First, I’d advise you to open the Splice file and save the racks that I’ve made for you to your User Library. There are three racks for each of the different ways of building a Multiband Processing rack:
- Multiband EQ Three: the tutorial above covers this methods. Tip: try right-clicking on EQ Three and selecting “Flat Response” since the device does alter the sound a fair bit
- Multiband EQ Eight: instead of using the kill switches in EQ Three, you can use a combination of Hi-Pass and Low-Pass filters in EQ Eight to achieve the same effect. Tip: right click on EQ Eight and you’ll see that it has an “Oversampling” mode, formerly known as “Hi-Quality” mode
- Multiband M.D. (Multiband Dynamics): try using the solo buttons in Multiband Dynamics to achieve the same effect. This, in my opinion, may be the best sounding option of the three (and you get built-in compression/expansion if you want it)
And what kind of racks can you make? Whatever you want–you can multiband anything! But if you need some help, here’s a few suggestions:
- A multiband Sidechain rack using Compressor, Gate, and/or Auto Filter
- A multiband distortion rack using Overdrive, Saturator, Vinyl Distortion and/or Dynamic Tube
- A multiband slicer rack using Beat Repeat and/or Auto Pan
Decide what you want to make, go for it, and then save your work. As you’re producing your tracks, you’ll have your own custom made racks at your disposal.
Browse, preview, and license Splice samples directly inside Ableton Live with our new in-DAW integration:
November 3, 2014


