.svg)
.svg)

The FabFilter Pro-Q is one of the most powerful software equalizers available today. It offers a high degree of control and precision by combining an abundance of features with an easy to use interface that renders even the most challenging of equalization tasks simple and straightforward. Here, we explore some of the features of the FabFilter Pro-Q to see how it can strengthen the quality of your mixes and enhance your workflow.
The Spectrum Window:
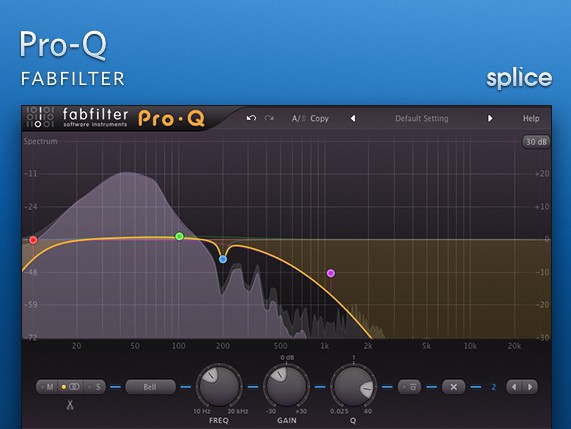
First, the SPECTRUM window of the FabFilter Pro-Q is a dual-axis graph that gives context to the representation of all harmonic content present in the audio signal and allows you to make educated mix decisions with a great deal of accuracy. The horizontal axis represents the entire frequency spectrum and ranges from 0Hz to 20kHz. The vertical axis represents amplitude in decibels and ranges from -30dB to +30dB. The DISPLAY RANGE menu at the upper right hand corner allows you to control the resolution of the vertical axis so as to zoom in on the region you’re working on and fine-tune the augmentation or diminution of specific frequencies.
The Help Menu:
Located above the DISPLAY RANGE menu is the HELP menu, which offers a quick and easy reference guide for all of the features and functions of the FabFilter Pro-Q. You’re also presented with the option of activating interactive tool tips; by simply hovering over any section of the interface, you’re presented with contextualized tips that give you valuable information about the operation and functions of the selected parameter.
The Analyzer:
One of the most useful features of the FabFilter Pro-Q is its broad range of analysis modes that provide visual feedback while working with incoming audio material. There are three active analysis modes, PRE-EQ, POST-EQ, and PRE+POST. PRE-EQ provides a visualization of the audio signal that is unaffected by any changes you may have made. Conversely, POST-EQ shows you a visual representation of the signal after all of the changes you have made within the SPECTRUM window. Of the three modes, PRE+POST is often the most useful as it’s a combination of both modes and accurately displays the difference between the unaffected signal and the affected signal in real time. There are also various settings within the analysis menu for the resolution and reaction speed of the visualization. Higher and faster values result in more visual precision but are more taxing on CPU resources. It’s recommended to use these visualization modes during active operation of the FabFilter Pro-Q and to switch them off while not in direct use to conserve these resources.
Processing Modes:
The PROCESSING MODES menu defines the way in which the FabFilter Pro-Q handles phasing issues that may result as a byproduct of equalization. Filtering any audio signal introduces artifacts that alter the phase relationships of various frequency bands in the harmonic spectrum. Artifacts materialize when we mix a filtered signal with another similar signal that has not been filtered, or that has been filtered in a different way. It is likely that the various phase components of both signals will not match up properly and will negate each other to some extent. This can affect transients as well as cause the processing mechanisms themselves to become less transparent. While this is neither good nor bad, it is something that you should be aware of when working with any equalization module. Linear-phase processing was developed as a solution to this as it changes the phase of the incoming signal globally for all of the frequencies in the spectrum and thus corrects for these imbalances. This ensures that no unwanted phase cancellation will take place, preserving both transients and transparency. The FabFilter Pro-Q offers us five distinct processing modes:
- ZERO LATENCY,
- LOW LATENCY,
- MEDIUM LATENCY,
- HIGH LATENCY,
- MAXIMUM LATENCY.
Herein lies the disadvantage of employing linear-phase processing techniques; you are constantly compromising between the preservation of phase resolution and the latency of the processed signal. If the latency is too great, the signal may suffer from pre-echoes that cause low-frequency transients to lose their edge or bite. These graduated modes allow you to choose the phase correction/latency ratio that is most appropriate for the desired result. Choosing the latency settings correctly is a compromise and depends entirely on the material that you are working with as well as your own personal tastes. While ZERO LATENCY is the most CPU efficient of these settings, MAXIMUM LATENCY is the most taxing on CPU resources and should be used with discretion.
Channel Modes:
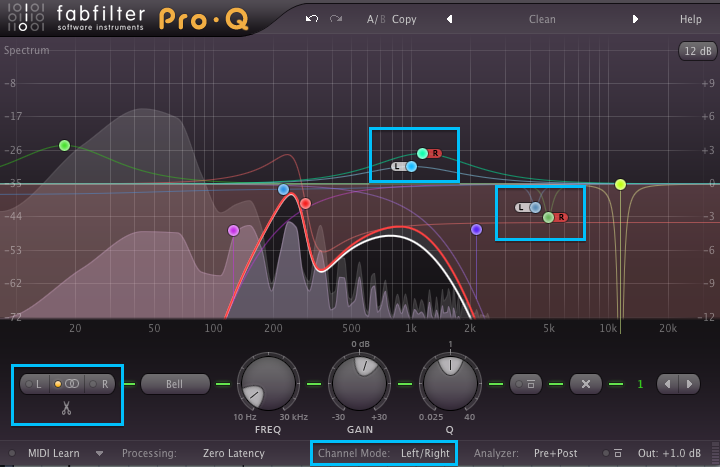
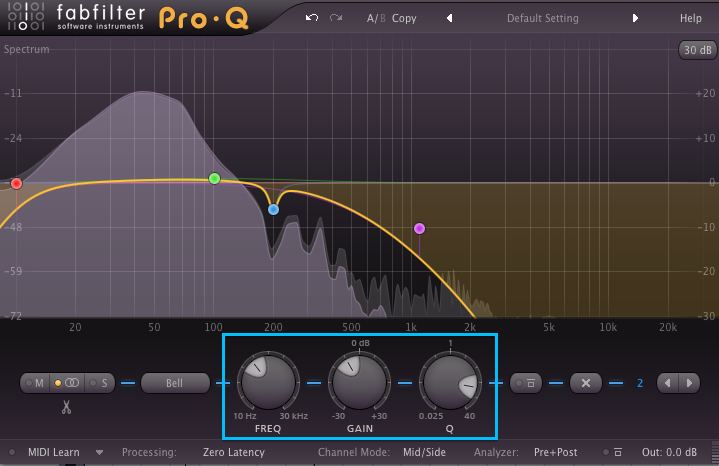
Another of the FabFilter Pro-Q’s most valuable assets is that it can simultaneously process separate stereo channels independently. This functionality presents you with an effective way to augment or diminish audible frequencies on a per-channel basis. The FabFilter Pro-Q’s CHANNEL MODE switch provides you with the means to choose an appropriate signal-processing algorithm, either LEFT/RIGHT or MID/SIDE. In LEFT/RIGHT mode, the specified band becomes active on either both stereo channels or on the left or right channel only. By clicking the L or R switches you specify that the selected bands affect only the left or right channel. By clicking the STEREO LINK switch in the center you specify that the selected bands affect both stereo channels equally. Clicking the SPLIT switch below will duplicate the selected band, creating two identical copies, one operating only on the left channel and one operating only on the right channel. In MID/SIDE mode, the incoming stereo signal is converted in to separate MID and SIDE signals, which can then be filtered independently. This is most useful for eliminating artifacts or modifying stereo information as it represents the stereo signal in a more natural way. Independent channel equalization is very effective in correcting stereo signals that contain unbalanced frequency content over the stereo field. By utilizing independent channel equalization, it is possible to properly balance these elements so that they do not compete. Independent MID/SIDE equalization is also often used during mastering. For example, raising high frequencies in the SIDE channel can open up the sound, while a low-cut filter in the MID channel can be very effective in cleaning up the low end. Consider using linear-phase processing when filtering both stereo channels (either in LEFT/RIGHT or MID/SIDE mode) independently to avoid introducing unwanted changes in phase relationships.
Working with Nodes and Curves:
To create a node and curve simultaneously, we simply click anywhere on the yellow OVERALL LINE in the spectrum window and drag upward or downward. We can also double click on the OVERALL LINE to create a node in place. Once you’ve created a node, there are several options for sculpting the frequencies at and around it. We’re presented with a series of options for manipulating the shape of the curve depending on what we’re trying to accomplish. There are several available curve types:
- BELL: A versatile parametric EQ shape.
- LOW SHELF: For boosting or attenuating low frequencies.
- LOW CUT: For eliminating all sound below the specified filter cutoff frequency.
- HIGH SHELF: For boosting or attenuating high frequencies.
- HIGH CUT: For cutting all sound above the specified filter cutoff frequency.
- NOTCH: For diminishing or eliminating a portion of the frequency spectrum.
The FabFilter Pro-Q allows you to create up to 24 nodes on any given channel, which should be more than enough to accomplish even the most daunting equalization tasks. The precise manipulation of a node’s location and its associated curve properties can be achieved through the use of three knobs located at the lower center of the module. These are the FREQ knob, the GAIN knob, and the Q knob. The FREQ knob specifies the operating frequency of the desired filter node. The GAIN knob specifies how much the module will raise or lower the specified frequency at the selected node, measured in decibels. The Q knob establishes the bandwidth of the filter. The lower the Q value is, the wider the bandwidth of the filter will be and thus a broader range of frequencies around the operating frequency will be affected. The higher the Q value is, the narrower the bandwidth of the filter will be and thus a smaller range of frequencies around the operating frequency will be affected. For finer control of these features we can double click each knob to type specific values into the dialog box that appears below it. By hovering over a node, you’re presented with a tooltip window that gives you valuable information about the node’s current settings as well as the option of putting the band in to SOLO mode for even greater precision and control of specific bands.
Functionality and Workflow:

The FabFilter Pro-Q provides you with several more features to improve functionality and enhance workflow. The PREVIOUS/NEXT switches at bottom right allow you to cycle through nodes so that you can visually identify the active bands and the affect they are having on the incoming audio. As we cycle through the nodes, each node and its associated curve become highlighted in an array of colors. The equalization process can sometimes be one of trial and error; the FabFilter Pro-Q is full of features that make it easy for you to audition your settings and ensure that you are indeed improving the overall mix while also providing you with a way to compare the affected signal to the original signal. Two of these features are the BYPASS switch and the GLOBAL BYPASS switch. The BYPASS switch allows us to bypass the effect of the selected frequency band, whereas the GLOBAL BYPASS switch allows us to bypass the effect of the entire plugin on the incoming signal. If you’re not satisfied with the changes you’ve made, the DELETE switch at right is an easy way to remove a node from the SPECTRUM window so that it no longer affects the signal. The FabFilter Pro-Q also provides you with a simple method of backtracking through the use of the internal UNDO/REDO switches located at the top of the module and represented by backward and forward arrows. Also included is a MIDI LEARN function at bottom left which can be used to synchronize operation of the module to an external physical control surface via standard MIDI protocol. Located at the bottom right of the module is the OUTPUT knob which allows you to adjust the final outgoing gain level as well as the final outgoing position of the signal in the stereo field. This is useful in the event that equalization processes or techniques have over-adjusted the overall gain or stereo position of the signal.
FabFilter Pro-Q Presets:
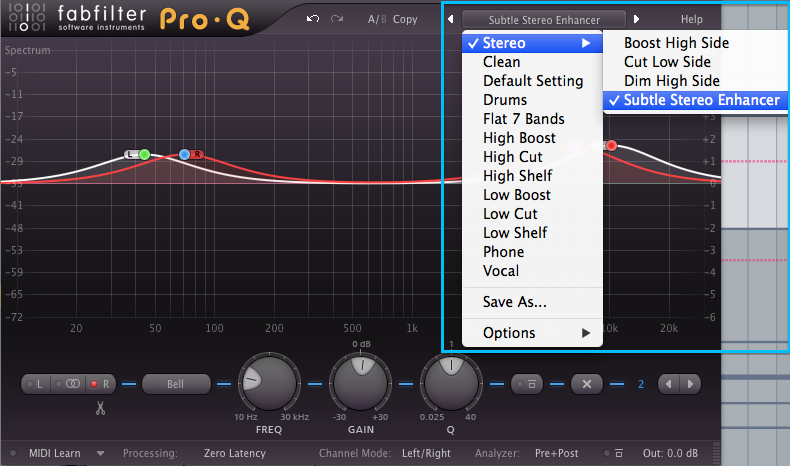
The included factory presets can help you to achieve your equalization goals quickly and easily. They can also assist you in learning more about common techniques when applying equalization processes to specific situations. The Pro-Q also gives you the option of saving and recalling your own settings as custom presets for use on other channels or in other projects.
The FabFilter Pro-Q is one of the most powerful and easy to use equalization solutions available. It combines powerful features that deliver pristine sound quality with an easy to use interface that provides useful visual feedback. Start getting the most out of the FabFilter Pro-Q today to create mixes that are clear and impactful.
The FabFilter Pro-Q is available in VST, VST3, AU, AAX Native and AudioSuite formats (all both 64-bit and 32-bit), as well as RTAS (32-bit only), for Mac OS X and Windows.
You can purchase the Pro-Q at FabFilter’s website here.
Explore royalty-free one-shots, loops, FX, MIDI, and presets from leading artists, producers, and sound designers:
June 30, 2014


