.svg)
.svg)


Logic Pro X has several new features, a dramatically overhauled user interface, and a powerful set of advanced tools. Both beginner and experienced users will want to take a look at the Advanced Preferences to make sure all these functions have been enabled in Logic Pro X, so you can take full advantage of what this powerful DAW can do. This is the first complete upgrade Apple has released in four years. This is the longest period of time Logic users have had to wait in the twenty-one years of the product’s history for a comprehensive new build.
Advanced Preferences in Logic Pro X
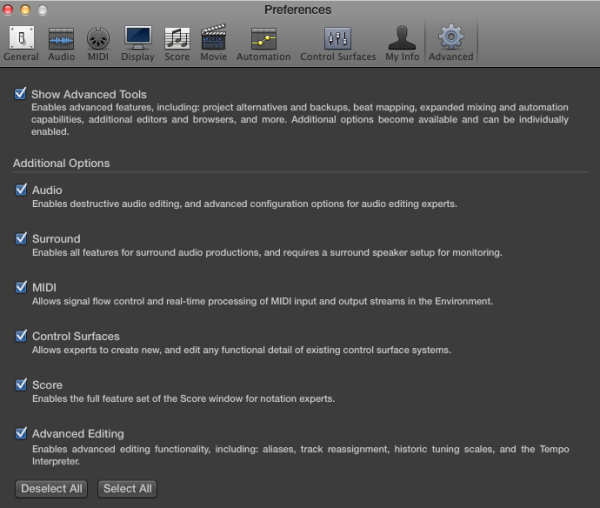
Logic Pro X Preferences
To make sure the advanced tools are enabled go to: Logic Pro X -> Preferences -> Advanced Tools. Next, make sure to check the boxes of the features you want to use. For example, the tools allow you to:
- Use project alternatives (which functions as an internal ‘save as’ feature)
- Enable advanced editors (such as the hyper editor and file editor)
- Provide access to the MIDI environment, and the capability to mix in surround sound
- Enable features like the Event, Marker, Tempo and Signature Lists, and MIDI Draw and step input recording.
Curiously, when Advanced Tools are turned off, Logic adds fake wooden panels to it’s display. If you are upgrading from Logic 9, Logic Pro X will install with the advanced tools and additional options already enabled. If you are making the jump from Garageband to Logic Pro the process is smooth, as all your Garageband projects will open seamlessly in Logic. Splice supports Logic Pro X with or without Advanced Tools enabled, but we expect most users will want to work with them turned on. Using the tools don’t noticeably impact CPU performance or audio playback, so check out your preferences and start exploring these powerful features.
Explore royalty-free one-shots, loops, FX, MIDI, and presets from leading artists, producers, and sound designers:
September 3, 2014