.svg)
.svg)


Illustration: Derek Abella
When it comes to acoustic treatment for your home studio, every unique space brings a unique set of challenges.
At home, we might be looking to deaden reverberations from untreated walls, soundproof the room to be more courteous to roommates, or address phase issues that standing waves in the room can cause. Acoustic treatment can address all of these issues and ensure that your space sounds great—but unfortunately for us, acoustic treatment costs money.
That said, there’s no need to break the bank to make significant improvements to your recording environment; in this article, we’ll discuss effective DIY home studio acoustic treatment options for your home studio that you can employ within three different budgets: $0, $500, and $1,000.
Let’s get started!
1. Home studio acoustic treatment with no budget at all
We’ve all been there. You’d like to have a more acoustically neutral room, but that costs money, and you can’t really spend it on treatment right now. Not to worry—even if you can’t spend any money at all, it’s likely that you can still achieve a decent-sounding room just by gathering and intelligently arranging things that you’ve already got around the house.
Home studio speaker placement
First of all, it won’t cost you anything to arrange your space in such a way that minimizes reflections. Your objective here is to reduce opportunities for the sound produced by your speakers to bounce off the surfaces in your room.
So, start by moving your speakers away from the walls. You’ll want your desk to be centered on one dimension in your room, and at least a foot away from the walls on any side. It’s also a good idea to orient your desk so that the sides are parallel to the longer walls of your room; this will give the sound waves more space to bounce around, instead of getting stuck between the two shorter walls.
You want to hear as much of the signal coming directly from your speakers as possible, and as little of the reflections as possible. So, point your speakers such that the two speakers and your head form an equilateral triangle when sitting at your mix position. That way, you’ll hear more of the sound going straight to your ears and less of the sound bouncing off from the walls.
For more information on optimal desk and speaker placement, I highly recommend checking out this excellent article from PreSonus.
Absorbing sound with household items
The next step will be to find any soft fabric materials you’re not currently using, and arrange them in your studio space. Start by looking around your home for any larger fabric items that absorb sound: old blankets, fluffy towels, comforters, pillows, window curtains, or Pokémon plushies, for example.
Then, arrange or hang them on any flat, hard, reflective surfaces (like bare walls or windows) that are in your studio. Basically, you’re just trying to find as much soft, absorbent material as possible that you can put all over the place.
Here are a couple of examples from my own experiences treating home studios when I didn’t have a budget to spend:

My studio in Rwanda, where I stapled donated blankets to the walls. Maybe don’t try this one at home, especially if you rent. Also, don’t try the headband thing (in my defense, it was really hot in there).

My current apartment, where I’ve stuffed some fabric bags with a couple of old comforters. Apparently, these are dry-clean-only, so in other words, I’m never going to clean them. Might as well put them in a window?
2. Home studio acoustic treatment with under $500
If you want to effectively do some home studio acoustic treatment for under $500, I recommend making your own acoustic panels and / or diffuser. This is a great price point if you’re able to explore the DIY route, especially if you already have access to relatively common tools like a saw, power drill, and staple gun.
The prices for this section are just estimates, since your costs will vary based on what you already have access to in your home:
- Tools: ~$200
- Wood blocks: ~$50
- Fabric, 2x4s, and labor: ~$250
I’ll come clean here—I’ve never actually built any of my own acoustic treatment. I’m just not that handy, and I live in an apartment where space for crafting is limited. I have, however, long fantasized about doing this, so I’ve done plenty of research.
Here are a few links to high-quality tutorials on how to make your own acoustic treatment:
- John Heisz on making a skyline diffuser
- SW Hammond on making a skyline diffuser
- Acoustics Freq’s how-to guide for building your own acoustic panels
- Charles Hoffman’s how-to guide for building your own acoustic panels
- Music City Acoustics on how acoustic panels are created professionally
DIY panels can be just as effective as store-bought ones, and they offer a more customizable look as well as better value for money. What better way to spend a weekend than making your own acoustic treatment? It’ll be fun, and your studio will sound so much better once you’ve hung them up. If you’re a young person reading this, and you plan to try to make your own treatment, good for you! You’ve got it together way better than I did at your age. Also, please ask an adult for help.
An honorable mention: Sonarworks
If you don’t have the funds to buy a full set of panels, but you still need accurate monitoring capabilities for mixing or mastering, I love to recommend Sonarworks’ software. Although this won’t directly help in terms of treating your room, it’ll provide a trusted reference point. SoundID basically applies parametric equalization to flatten out the response curve generated by your headphones (or speakers if you get the full version).
In other words, it brings your setup closer to a truly flat frequency output. This makes SoundID a great option for those who have a bit of money to spend, but not enough to invest in a full set of panels. I use SoundID whenever I’m mixing with headphones, and I suggest switching between your headphones and speakers as you mix. Just don’t forget to turn off the equalization, which is optimized for headphones, when you’re listening through your speakers.
3. Home studio acoustic treatment with under $1,000
Now we’re cooking with gas. If you can afford to spend up to $1,000 on the acoustic treatment for your home studio, you’ll likely be able to achieve a really solid sound without having to DIY that much. All of the recommendations from the lower price points still apply, but if you’ve got a little more budget to spend, it’s a lot easier to purchase treatment.
- Rug (Ikea has some good options; I’d also recommend checking vintage stores in your area): ~$100
- Output’s Eco Acoustic Panels (one pack): ~$450
- Output’s Bass Traps (one pack): ~$450
At this budget, it’s time to consider the floor and ceiling. These are reflective surfaces just like your walls, and treating them can make a huge difference, especially if you’ve got hardwood floors in your home.
Laying down a rug will isolate vibrations from your desk and absorb additional stray reflections. If you’re really feeling it, try hanging a panel from your ceiling. The ceiling is another reflective surface, and adding a hanging panel (a.k.a. a ‘cloud’) can have a great effect on absorption in your room.
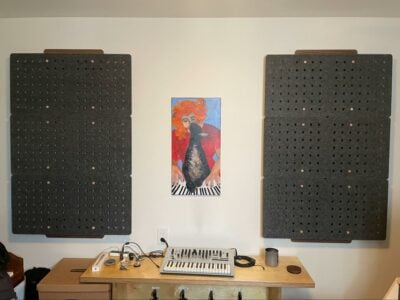
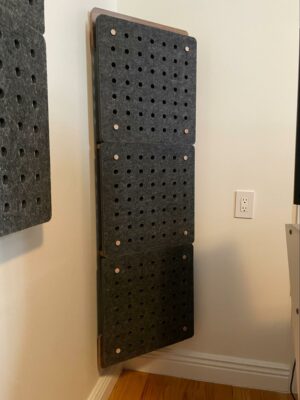
For my personal home studio, I chose Output’s new Eco Acoustic Panels. They look attractive and perform admirably in my space (Output didn’t sponsor this post, but in case anyone from Output is reading this—call me). These panels absorb sound when the sound waves go in through the small holes, and then become trapped in between the panel and the wall.
Output’s Bass Traps are very similar in form, but they’re designed to fit in the corners of your room. Obviously, these are meant to address issues in the lower frequency ranges.
An honorable mention: GIK Acoustics
I’ll give an honorable mention to GIK Acoustics’ panels as well. I considered these, but decided that the Output panels fit better with my room’s decor. They’re similar in price to the Output panels, if not a little cheaper, and I know several colleagues who’ve use them and experienced great results. GIK also offer a nifty room planner calculator on their site, which allows you to figure out how many panels you need in order to achieve a given level of absorption.
Go forth and enjoy your acoustic treatment journey
And there you have it! Hopefully, this guide has given you some inspiration on how to treat your home studio on any budget. Do you have any ideas, questions, comments, or recommendations of your own? Let us know and start a conversation alongside an ever-growing community of music creators via the Splice Discord.
Explore royalty-free sounds from leading artists, producers, and sound designers:
October 29, 2025


