.svg)
.svg)


As a follow-up article to building Production Ready Drum Racks in Ableton Live, the focus here is on creating custom tools for production sessions. Specifically, we’ll be creating VST plugin racks and mapping all of the most used parameters to Macros. When you’re ready to make some music, you don’t want to build your tools from the ground up, so we’re taking care of that now.
We want these VST plugins to be as flexible as the native Live devices when it comes to Session/Arrangement View automation. We want to be able to use our MIDI controllers to dial-in the sound of the plugins. And we want to be able to save our custom builds for future use. Fortunately, all of this is possible in Live with a little bit of setup.
STEP 1: Add a VST Plugin to a MIDI Track

Add an instance of your favorite third party instrument or effect to a new MIDI track – for this example, we’re using iZotope Iris. If you’re following along in the Live Set, and you don’t have Iris, you can replace it with any plugin that you do have. Click on the Unfold Device Parameters hide/show arrow (it’ll go from pointing down to pointing right) to show the Configure button.
STEP 2: Configure the VST Parameters
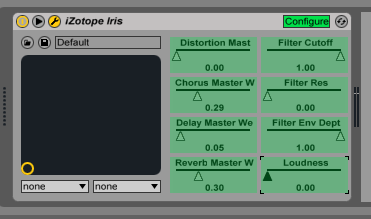
Now, go ahead and click on the Configure button. It will turn green and also open the plugin window. At this point you’ll need to decide which parameters you plan on using the most, the ones that will be mapped to Macro knobs (more on that in Step 4). When you’ve made up your mind, click on those parameters in the plugin window and they’ll show up in the device parameters panel. I’ve decided to go with Iris’ master effect knobs, its global filter parameters, and the overall loudness.
STEP 3: Group the VST Plugin to an Instrument Rack
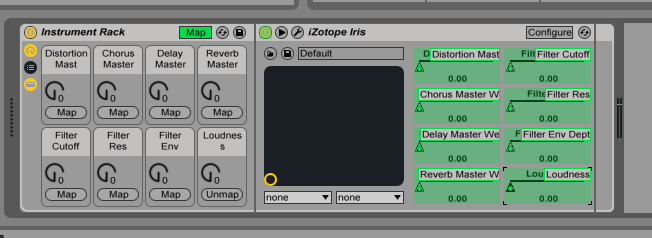
Now that you’ve decided on which parameters you’re going to control, right-click on the title bar of the VST plugin and select Group to place it within an Instrument Rack. The reason you do this is so you can save the rack at the end. You may have noticed that the third party plugin devices do not have Save Preset Buttons as the native Live devices do.
STEP 4: Map the Parameters to Macro Knobs
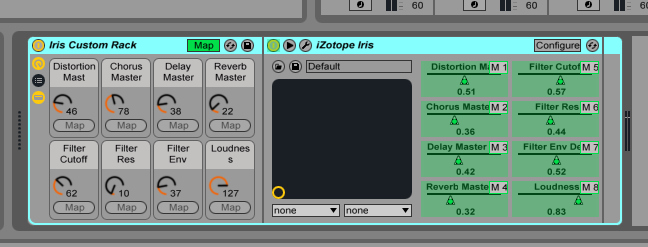
On the Instrument Rack, click on the Macro Map Mode Switch (it says “Map”). You can then map the device parameters in the Configure panel to the Macro knobs: first click on the parameter and then click on the Map button under the individual Macro knob.
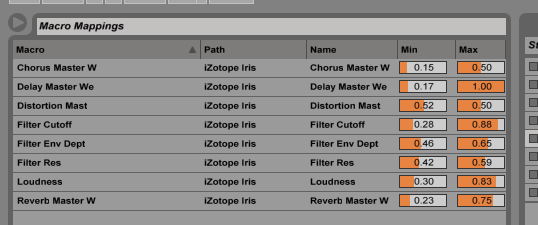
While you’re in Map Mode, open the Live Browser (which is now the Mapping Browser) and design the overall sound of the rack while the eight Macro knobs are turned hard-right and then hard-left. You do this to control the minimum and maximum settings of the Macros.
STEP 5: Save the Rack to Your User Library
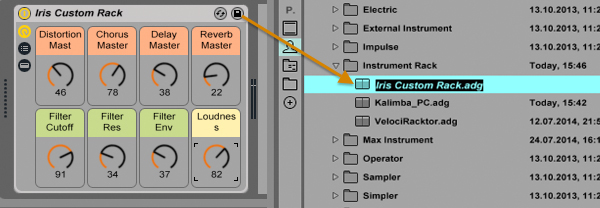
You just did all of that work, so make sure that you save it. First, name your new custom VST plugin rack, something that you’ll be able to remember and search for in the Live Browser. Then, click on the Save Preset Button in the top-right hand side of the Instrument Rack’s title bar (it looks like a little floppy disk, if you know what that is). Your User Library will open up because you have to confirm the save. Double check that everything worked by creating a new MIDI track and dropping your new custom preset on it.
NOTE: saving this preset Instrument Rack does not save the preset of the VST plugin if you were using one, unfortunately.
Hopefully this tutorial will come in handy for those who regularly use VST plugins and what to cut down on some setup time. Keep in mind that you can configure other parameters that aren’t mapped to the Macro knobs of the Instrument Rack and just have them at the ready in your saved preset. And, of course, you can map multiple parameters to a single Macro for further sound shaping possibilities. It all depends on your personal preference, so write some music and figure out what your preference is.
Pat Cupo is a veteran studio musician and national award winning educator based in NYC. Having taught and guest lectured at premiere schools such as Dubspot, New York University and Columbia University, Cupo now dedicates his time to composing and performing with Ableton Live.
Browse, preview, and license Splice samples directly inside Ableton Live with our new in-DAW integration:
February 9, 2015


