.svg)
.svg)

From hardware synths and MIDI controllers to powerful software, Arturia boasts a wide range of music production tools, including some of Splice users’ favorites on Rent-to-Own.
Given their love for hardware, a lot of Arturia’s software products emulate legendary hardware units, but Arturia has started to add some new plugins to their collections that fit right into the modern landscape of innovative audio tools.
Newly added to FX Collection—and available now as a standalone plan—is Efx Fragments, an effect plugin that turns the power of granular synthesis into an intuitive and unique-sounding insert effect.

In this tutorial, we’ll go through each of the major sections and features in Efx Fragments and show a few ways that it can bring new life to a sound, from subtle texture to drastic modulation. For a refresher on granular synthesis and everything it can do, check our overview article on granular synthesis here.
Note that Efx Fragments also has a helpful Tutorial mode that explains the major controls and their uses.
How does Efx Fragments work?
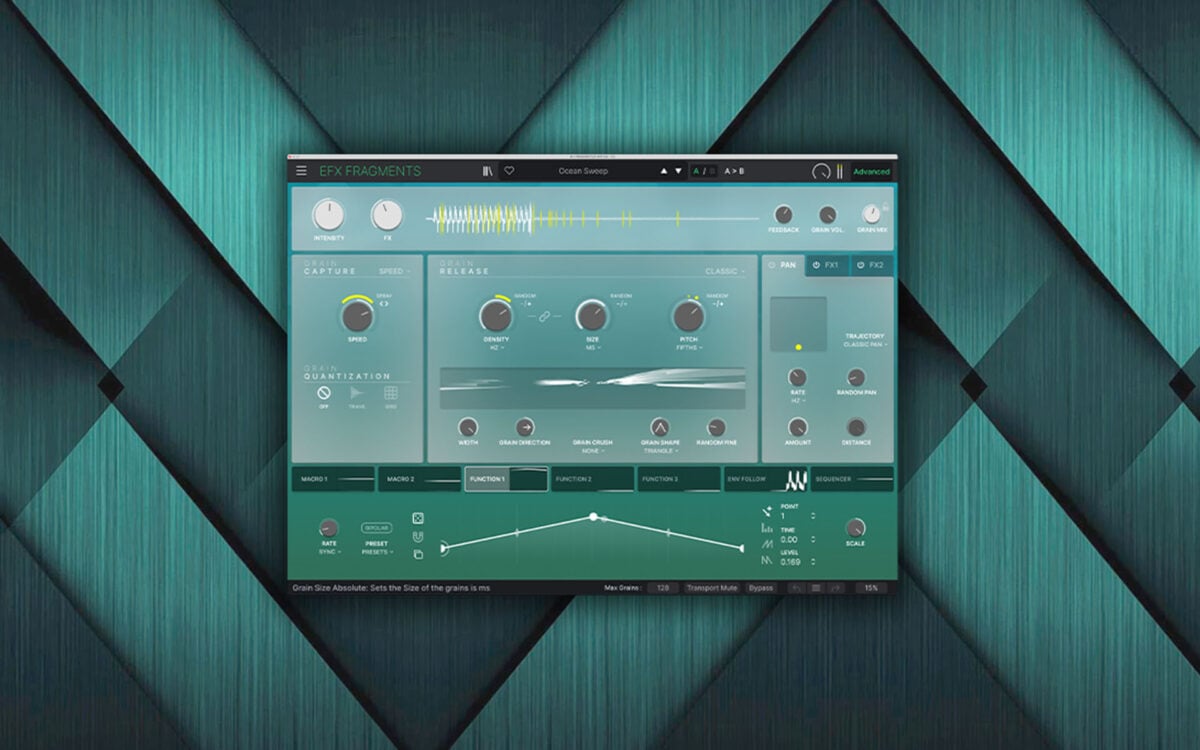
First, it’s worth noting that Efx Fragments has a simplified view and an Advanced view, which can be toggled with the button in the top-right corner. The Advanced view reveals some additional controls for the Grain Capture, Grain Release, and Pan & FX sections, plus a Modulation section.
For the sake of this tutorial, we’ll run through the plugin already open in its Advanced mode, but you can still access the majority of the crucial controls from the simplified view.
Given Efx Fragments is a granular effect, its main goal is to use an audio source to generate grains—short bits of audio as short as a few milliseconds.
Most granular synths operate by having the user load in a sample, and use that sample to generate the grains. While we can do something similar in Efx Fragments (we’ll see that in a bit), the plugin mainly operates by generating grains from an incoming audio input. To do this, Efx Fragments stores incoming audio in a buffer, which it then uses to create the grains.
The major sections of Efx Fragments
Let’s run through all of the major sections of the UI, starting at the top with the Buffer.
Buffer

As incoming audio plays, you’ll notice a waveform generating and overwriting itself, with a bunch of lines scrubbing through that waveform. There’s a taller white line, a taller yellow line, and shorter yellow lines scrubbing throughout the buffer.
The tall white line is the record head, which shows audio being pulled from the channel containing Efx Fragments into the buffer. The tall yellow line is the play head, which shows how audio is being pulled from the buffer into the granular engine, creating grains. The short yellow lines show where in the buffer grains are being created.
In short, the record head retrieves audio from your DAW to fill the buffer, and the play head retrieves audio from the buffer to turn into grains.
If you hover over the buffer area itself, four controls become visible:

Buffer Length is set relative to your in-DAW tempo. It’s especially important to set this parameter appropriately if you plan to use any tempo-synced parameters later in the plugin.
When you click Freeze, whatever is currently in the buffer is frozen in place. Without Freeze engaged, the buffer will continue to get overwritten by the white record head as new audio enters the plugin.
If you want to “load a sample” into Efx Fragments like a typical granular synth, you can set the Buffer Length to the length of the audio you want to sample, and then let the buffer record that audio during playback. Then, hit Freeze at the end of the loop. You should be left with that sample in its entirety, ready to turn into grains.
Clear pretty simply clears the buffer. By toggling the Play Head Retrigger on, the play head returns to the beginning of the buffer at the start of every buffer cycle, regardless of where it is in the buffer at the time.
Before we get to the granular processing itself, let’s touch on the remaining controls in this top Buffer section.
- Intensity & FX: These are actually macro controls, controlled by Macro 1 and Macro 2, which we’ll touch on later in the article. These can be assigned to anything, but for most presets, Intensity is linked to parameters that control granular processing, and FX is linked to parameters in the FX section.
- Feedback: This parameter sends the output of the granular engine back into the granular processor. Be careful if you’re applying pitching to the Grain Release (we’ll see this later), as that can create unwanted and extreme pitching effects with too much feedback.
- Grain Volume: Since the grains are generated by Efx Fragments, you can set the playback volume of those grains with this control.
- Grain Mix: This acts as the dry / wet balance of the entire plugin, allowing you to balance granular processing with the dry sound. If you want to maintain maximum control over levels, it isn’t a bad idea to use Efx Fragments as a send effect with maximum Grain Mix.
Getting into the granular processing part of the plugin, it’s important to note that some of the major controls in Efx Fragments have what Arturia calls a “collar” around them: a faint bar going around the knob.

Because granular synthesis relies on randomization to make more organic-sounding washes of grains, Efx Fragments allows for easy randomization on these major controls using these “collar” bars. Simply click and drag to adjust the percentage of randomization applied.
Grain capture
The Grain Capture section dictates how grains are pulled from the Buffer. In the simplified view, you’ll only be able to see Grain Capture, but the Advanced view reveals a Grain Quantization section too.

Using the main knob in this section, you can set the speed at which the yellow play head scrubs through the buffer. You can have the play head move through the buffer faster or slower than the record head, and negative settings will have the play head scrub backwards through the buffer.
You can set the Grain Capture to one of three modes: Speed that sets the play head speed as a multiple of the record head speed, Offset that sets a standard distance between the play head and record head, and Manual Position that sets the play head to a specific part of the buffer and keeps it there.
You can also apply randomization to this control using Spray by dragging up or down on the collar. This will cause the yellow play head to jitter through the buffer at a varying speed.
What you’re really doing in this section is working with different modes, the main control knob, and the Spray control to set the speed, direction, and randomness with which the play head moves through the buffer, choosing bits of audio to become grains as it goes.
The Grain Quantization section allows you to choose more specifically where in the Buffer grains will be chosen. The Transient and Grid modes both help when using Efx Fragments on rhythmic elements like drums, allowing you to ensure that grains are being created on specific drum hits.
Grain Release
While Grain Capture takes grains of audio from the buffer, Grain Release rearranges these grains for playback—the essence of granular synthesis.
There are three modes for Grain Release: a Classic mode that offers flexible controls for most uses, a Texture mode that stacks streams of grains for creating great droning pads, and a Rhythmic mode that excels at turning grains into glitches and stutters for rhythmic effects.
All of these modes have a very similar approach to the three main knobs in this section. The middle knob in all modes is Size, which sets the length in milliseconds of each grain (randomizable). The knob on the right is Pitch, which allows you to adjust the generated grains’ pitch. The drop-down menu below this knob is an extremely helpful Scale select, which quantizes grains to notes within a specific scale, avoiding the sometimes unmusical sound of warbling grain clouds.
The left knob changes depending on the Grain Release mode, but it always dictates the rate at which new grains are introduced. In Classic, this knob becomes Density and can trigger new grains at rates ranging from 0.25 Hz to 250 Hz.

In Texture, this knob becomes Layers and sets the number of layered grain streams, introducing more grains with each added layer.

And in Rhythmic, which fires new grains using a step sequencer, this knob becomes Sequence Rate and sets the speed of that step sequencer’s playback. This step sequencer is also pretty malleable, letting you divide steps into quicker rhythmic subdivisions, set the sequencer to play backward or even ping-pong, and adjust the sequence length.

With the Advanced view open, you’ll see five more controls beneath the main Grain Release controls and the visualization / step sequencer.
Width sets grain stereo width, Grain Direction sets the likelihood that a grain will be reversed when played, Grain Crush applies bit-crushing to the grains, Grain Shape sets the grains’ volume envelope (the general shape with the drop-down menu, refined further with the knob), and Random Fine applies some light detune pitch drift for a more organic—or unstable—sound.
Pan & FX
This section is straightforward but powerful. The Pan tab has a spatializer that applies more dynamic and expressive movement than a standard pan pot.

There are also two FX tabs that can each be assigned to one of nine types of effects (Multi Filter, Distortion, Compression, Delay, Pitch-Shift Delay, Tape Echo, Chorus, Flanger, and Reverb). Each effect has essential controls to dial in the settings you want.
Modulation
The modulation section at the bottom is only viewable in the Advanced view, but it offers a few helpful ways to get even more movement and control. Modulation sources can each be assigned to parameters in Efx Fragments by clicking the modulation option and then dragging up or down on any parameter. You’ll see another collar tab in light blue, showing the range assigned. Double-click to reset.
There are four types of modulation sources in the plugin:
1. Macros
Earlier in the Buffer section, we talked about the Intensity and FX knobs. These are just Macro 1 and Macro 2, which can be reassigned and renamed to anything.

2. Functions
This is a combination between LFOs and envelope generators, featuring a flexible envelope editor which can have up to 32 breakpoints to create complex shapes. This modulator is constantly cycling and can be synced to the in-DAW tempo.

3. Envelope Follower
This modulator reads the level of an incoming signal—either the audio input entering the buffer or a sidechain signal—and outputs a usable modulation source. This is helpful for creating modulation that seems to react to the sound source.

4. Sequencer
With a similar setup to the sequencer in the Rhythmic mode in the Grain Release section, this modulator offers a 16-step sequencer for positive and negative values. You can’t apply additional rhythmic subdivisions like the Grain Release step sequencer, but you can apply swing, randomization, and smoothing to the sequence.
Back to the top
Before you head off to make some new sounds with Efx Fragments, there are a couple other helpful things to point out in the very top navigation bar.

1. Make use of the preset browser if you’re lost. You can use the simplified browser by clicking the preset title, or you can click the button that looks like four books to open a more in-depth preset browser.
2. Efx Fragments has an A and B layer; only one can play at a time, but this is still helpful for exploration and sound design. If you’re working on a sound but want to try something different, you can copy these settings to the other layer and take a new approach while saving the first version.
What will you make with Efx Fragments?
Granular synthesis is often an exploratory type of sound design, best applied when you can spend the time to dial in the sound you’re after. Thankfully, you can try Efx Fragments for free using the link below, and then pay less than $5/mo until it’s yours. We hope this overview helps you dive right in.
Try Efx Fragments for free, and then Rent-to-Own it for $4.95/mo until you own it outright:
May 9, 2023