.svg)
.svg)


There’s tons to love about the endless drum loops and melodic phrases on Splice.
However, many of the samples you’ll encounter on Splice Sounds aren’t seamless loops. A lot of these are what are called one-shots – a single strike of a snare, a single decaying note played on a synth, a vocal note of some sort, etc. While you can of course drag any of these samples straight into your DAW’s timeline and come up with single-use ideas, there’s a whole lot more we can do to with the power of key mapping. In this article, we explore three creative ways you can key map your one-shots.
What is key mapping?
Samplers allow us to map snippets of sound across a playable range on our keyboards and controllers so we can alter the pitch (and other characteristics) of a sound. We can make all kinds of decisions about how the sampler handles the audio too – where to play it from, how many samples can play at once, whether or not to respond to velocity, and much more.
There’s a lot that samplers and mapped MIDI controllers can do, as you might know if you incorporate them into your workflow. But, here we’re primarily focusing on ways to synthesize new sounds using sampled one-shots, taking a page out of my brand new online course, “Advanced Synths and Patch Design for Producers,” on Soundfly.
What are we working with?
For the examples below, we’ll use Logic Pro 10.5’s cryptically-named new sampler instrument, Sampler.
However, if you’re following along in Ableton Live or with any other sampler tools, you’ll be able to learn from these ideas and apply them without too much trouble.
Technique 1: Mono to poly
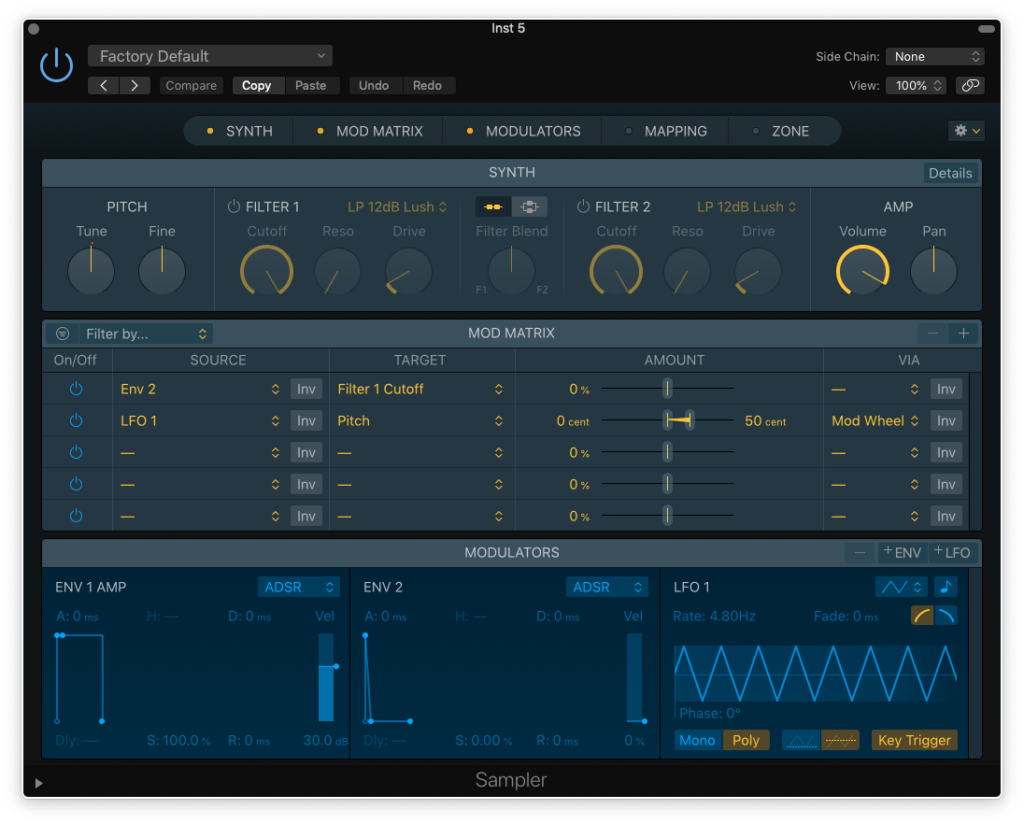
Many legendary synths are monophonic instruments – the Minimoog Model D is an iconic example. This means that when you play a key, the instrument can only generate one sound at a time.
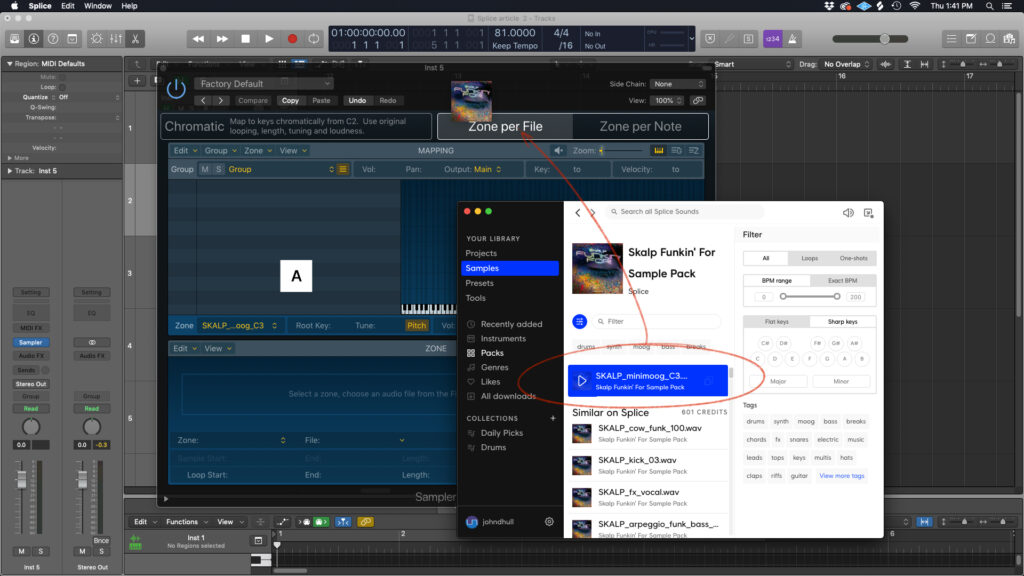
Yet, with a sampler, we can easily take a monophonic synth and turn it into a lush polyphonic instrument. Let’s try it with “SKALP_minimoog_C3.” I’ll just drag the sample from Splice to the top of an instance of Sampler. Now, it prompts me for how I’d like it to process the file. Zone per File will map the sample across the keyboard automatically, and will even check the tuning and try to loop the one-shot so I can sustain the sound.
Now, just like that, we’ve got a playable polyphonic Minimoog:
I can take this a step further and also adjust other parameters. For instance, I can lengthen the release of the sound with Envelope 1 (A), add a low-pass filter (B), and modulate the cutoff with Envelope 2 (C) so it’s got a slower, more interesting onset of brightness.
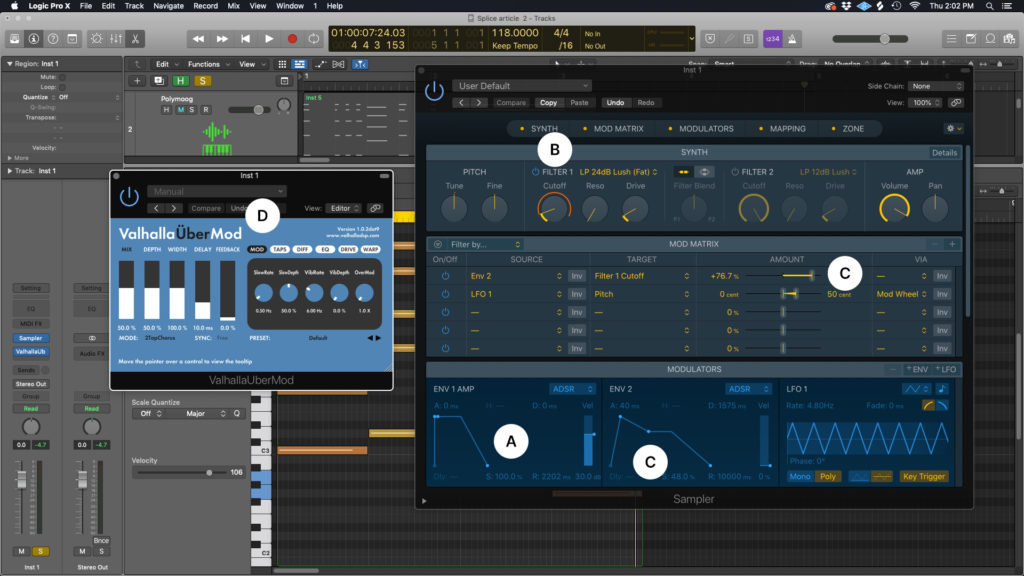
Even add an effect like Valhalla’s UberMod (D), and voilà, you have an awesome new polyphonic instrument!
Technique 2: Layering samples and unique filter movement
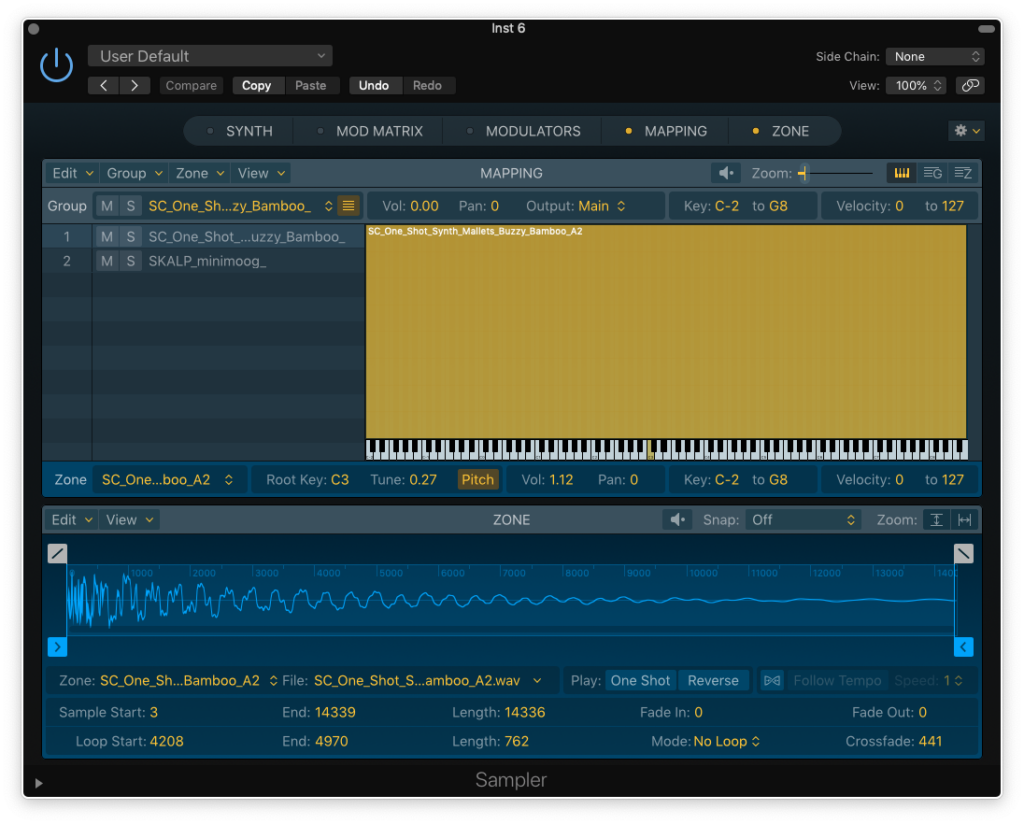
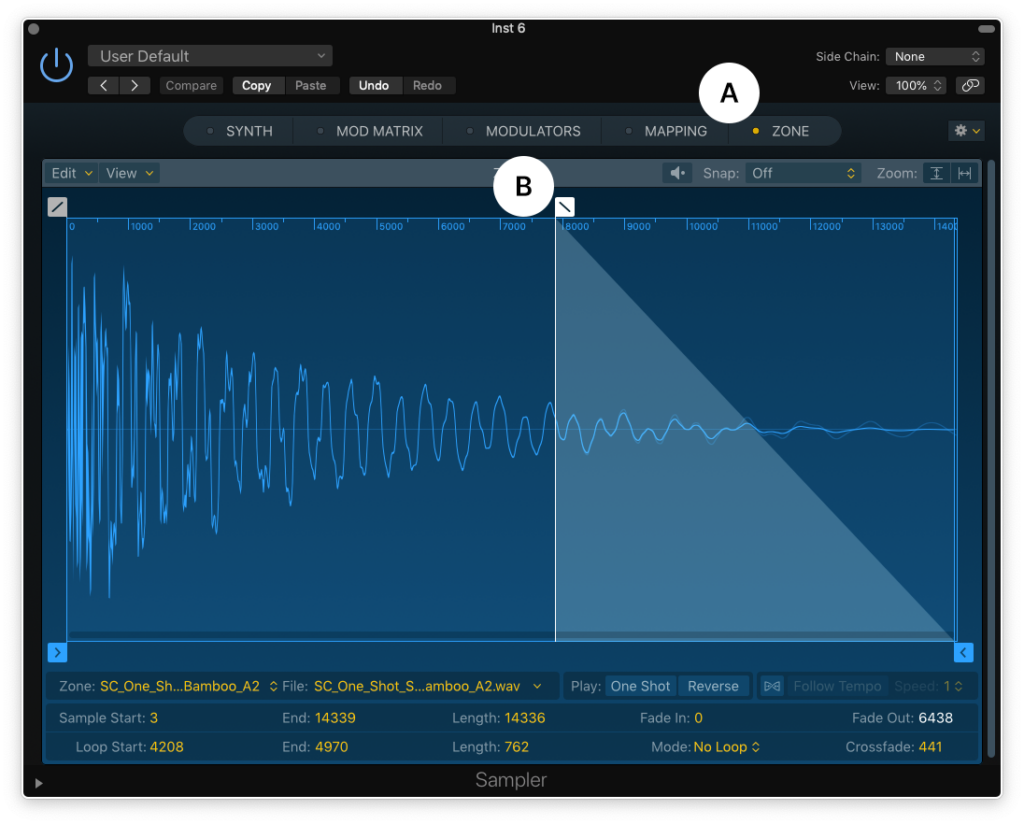
You’ve likely layered kick samples, snares, and even soft synths. Using a sampler, we can layer different one-shots to create the exact sound we want. For instance, I like my previous patch, but I wish it had a more organic texture to it. Exploring Splice, I discovered the “SC_One_Shot_Synth_Mallets_Buzzy_Bamboo_A2” sample.
I’ll drag this file in the same way – to the top right of Sampler – and again select One Zone per File. Sampler creates a new Group containing this Zone, and maps it across the keyboard.
If you’re following along, this doesn’t sound that great. So, let’s clean this up a little.
First, the end of this bamboo sample isn’t very clean. I can click the Zone tab in the top right, and add a fade to the end within the editor.
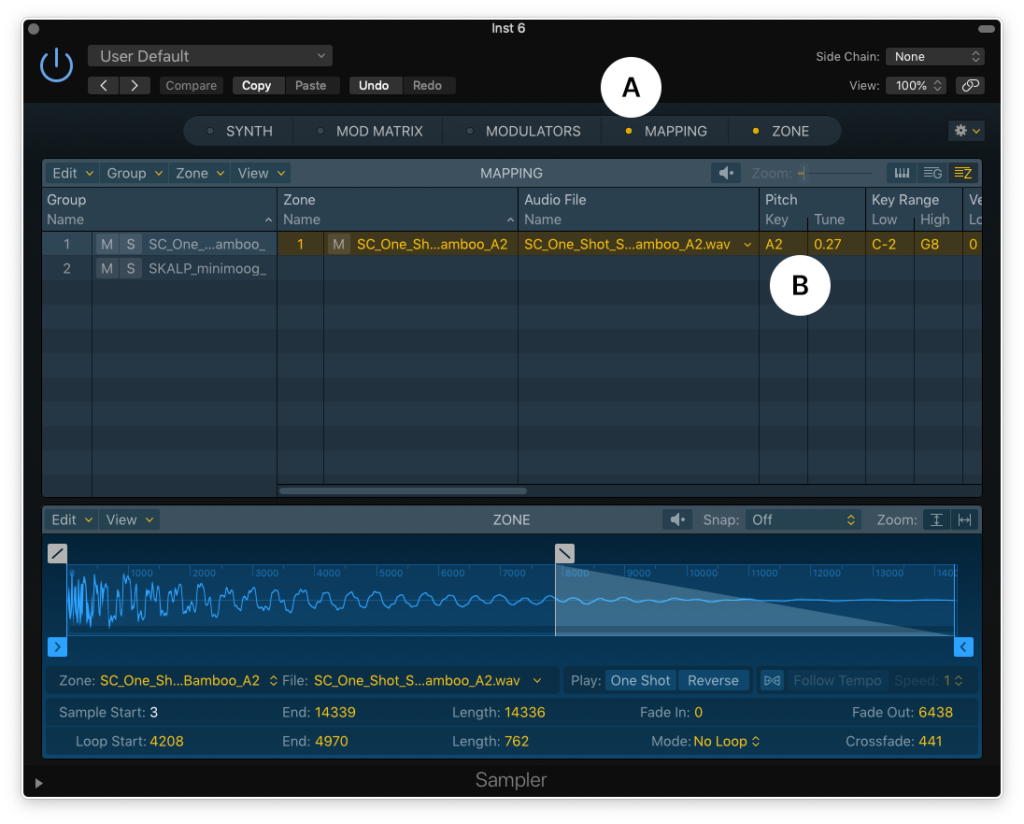
Let’s also double check the zone to make sure the root key is correct. The root key is the reference point for how your sampler re-tunes the file across your keyboard, so the note needs to line up if you’re planning to match pitches later on.
To do this, head to the mapping panel (A), click the ‘z’ key on your keyboard to access Zones (B), and then check the root key. In Sampler, this is labeled as Pitch / Key.
You may notice that it’s currently set to C3, even though the sample is labeled A2. Sampler’s good at figuring out the pitch most of the time, but it’s not always perfect. Before you continue, change the Key from C3 to A2.
Cool, but the sound is still kind of dark – we want that lovely bamboo click for the attack. We can also use Groups to create unique filter behavior.
Click the little ‘g’ key to access the Group parameters to the right of the Mapping editor (A). Now, we need to make a couple of hidden parameters visible to make this work. Right-click on the header, and then select Filter Offsets and Envelope 2 Offsets (B).
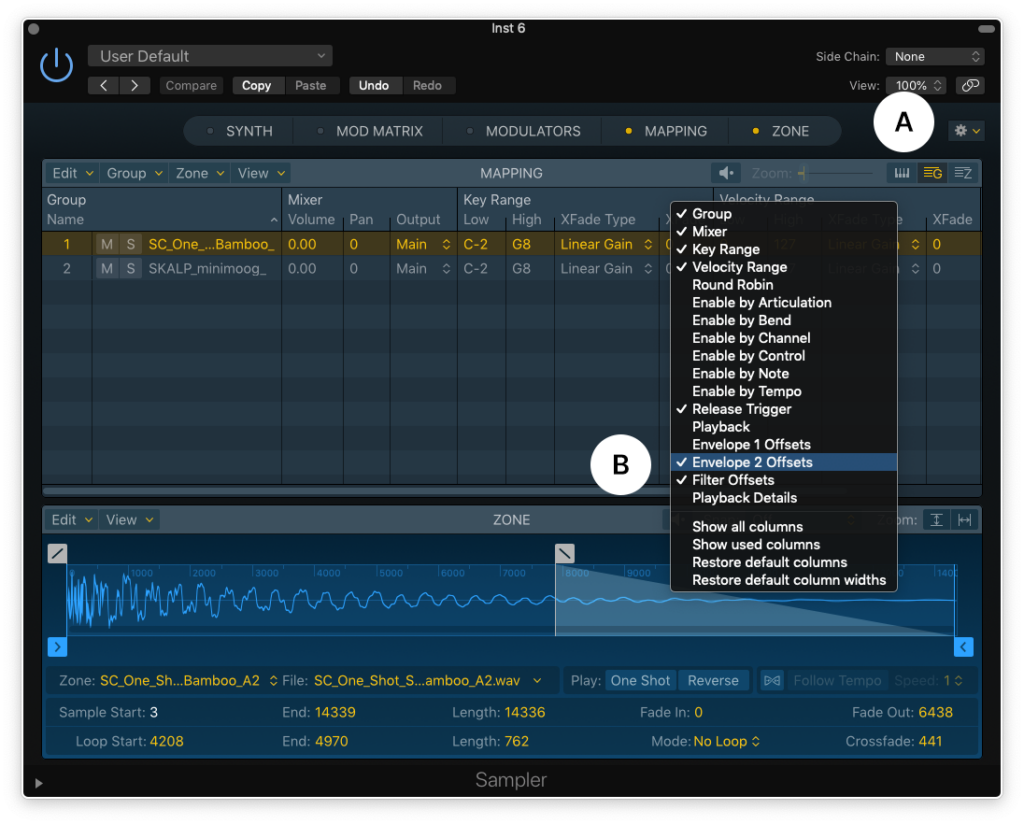
Because our Minimoog pad sound has a slow filter attack, causing a gradual onset of brightness, we need our bamboo group to have a faster attack. So, we can make the attack time a value less than 0 to make it faster; here, we chose -100.
We can also give the filter for this group an offset. If we want it to be brighter, we might set it to something greater than 0 – try 30.

Note: We can blend these sounds via the Group panel as well, if we want a little less of the pluckiness.
Here’s what we have now. Pretty cool, right?
Technique 3: Creating width
Alright, let’s leave those sounds behind for a moment and try something different – a thick, wide Reese bass. This kind of sound is a staple in drum and bass, dubstep, and other modern bass music styles.
Let’s use this sample from The Glitch Mob. We’ll import it in the same way as above. Right away, the sample sounds great, and Sampler even did a pretty solid job looping it so I can sustain it. But, how can we make this sound even bigger?
Well, basses are often monophonic, so let’s head up to the Synth panel (A), click on Details (B), and set the mode to Legato (C). Legato mode will let this bass slide around by keeping the envelopes from re-triggering on each key press.
Turn up the Glide time (D) for extra-smooth note transitions. While we’re here, we could try out Unison (E) to make this fatter. However, I’ll save you some time – Unison on its own isn’t going to do much, and the Random Detune (F) will make the sound smeary.

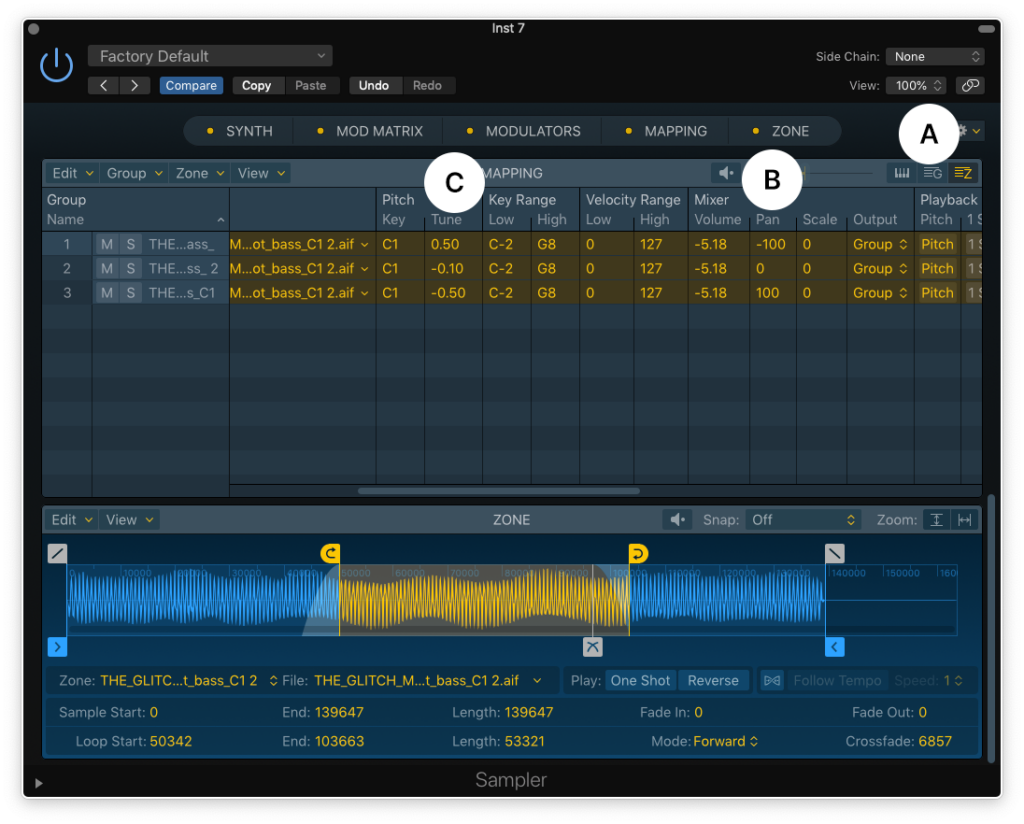
Instead, let’s head to the Mapping panel (A), and click on the Groups page (B). Then, select the Group containing this Zone, and Duplicate it twice. You can do this by going to Group (C), or selecting the zone and using the shortcut ‘command’ + ‘d.’
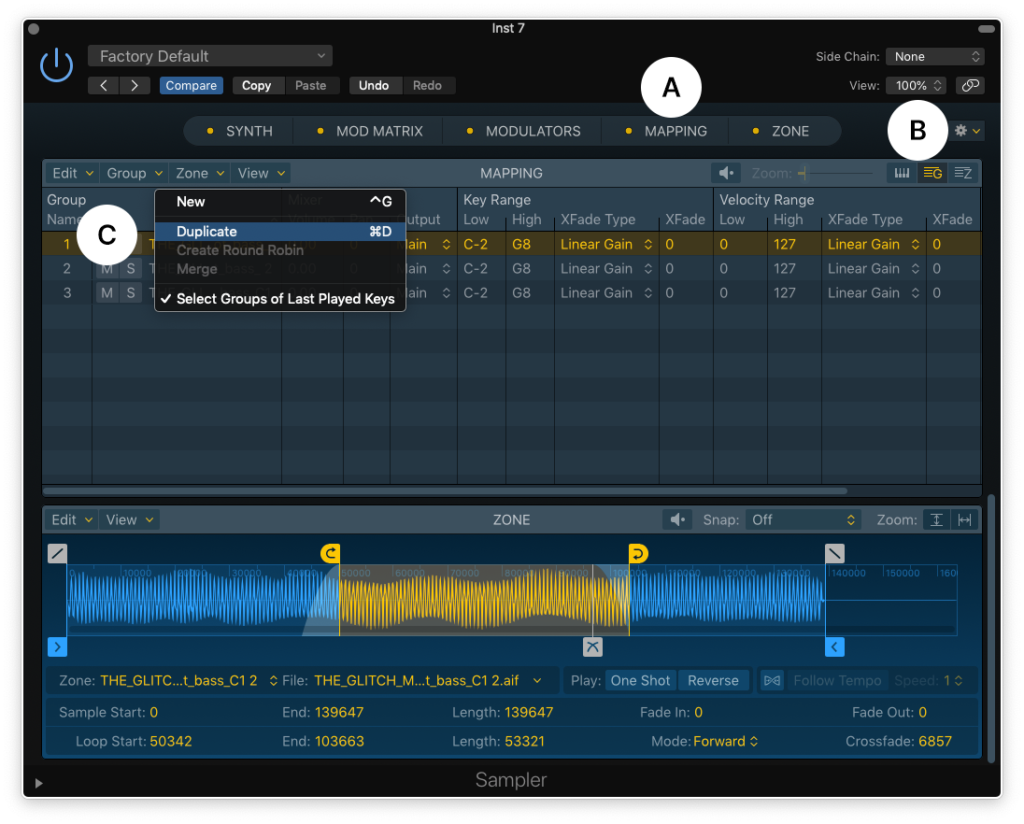
You should now have three Zones of the same sample. Click the Zones tab (A), and pan one of the duplicates all the way to the right. Then, pan the other one all the way left (B).
Now, tune one of them up slightly to something like .50, while setting the opposite side to the inverse, -.50 (C). This detuning method is a classic technique for making a big wide sound from an originally mono source.
Now take a listen to the big, wide, Reese-y goodness.
Hopefully, you found these three methods useful. With key mapping, your sampling options really are endless. For more learnings on synths, go check out Soundfly’s new online course, “Advanced Synths and Patch Design for Producers.”
Download the sounds used in this tutorial and more:
November 18, 2020


