.svg)
.svg)

Impulse is one of my favorite, go-to instruments in Ableton Live due to its ease of use and, mostly, because it’s a bit of an underdog. In this article I’d like to help breathe some new life into the simple drum machine by using Live’s flexible audio and MIDI routing system. Also, some other advanced topics will crop up that will receive more attention in future articles, such as Follow Actions and Dummy Clips.
Our goal: to break apart the components of a MIDI track into separate tracks in order to gain more control of Impulse. I recommend having the Splice file open and following along with the tutorial step by step.
Step 1: Create a new MIDI track (Shift+CTRL/CMD+T) and add Ableton Live Impulse to the track
Step 2: Add samples, create a new clip (Shift+CTRL/CMD+M), and program some MIDI notes to work with
You may want to edit the samples a bit before you drop them into Impulse’s sample slots. Once they’re in there, you won’t be able to see the waveforms again. As for the clip, anything will do. I went with a simple “four on the floor” drum beat accompanied by a couple pad sounds and a bass sample. Here’s where I started:

Step 3: Create eight new audio tracks (CTRL/CMD+T)
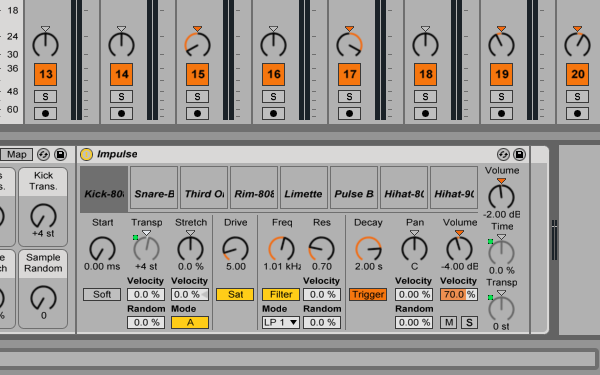
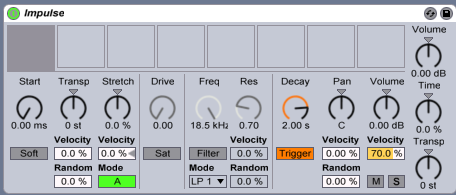
It depends on how you look at it, but one of the disadvantages of Impulse is that adding an audio effect after it will process the sum of the audio coming from the instrument. So, for example, what if you only wanted to add a Simple Delay on the closed hi-hat sound?
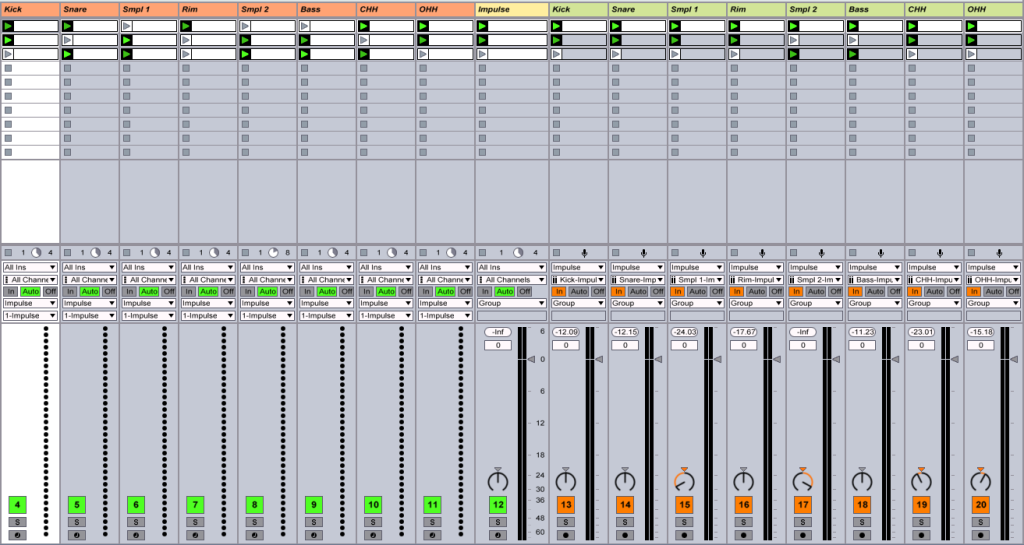
Here’s where we start to break the DAW a bit. These eight audio tracks will be set up to receive the audio from Impulse’s eight sample slots so we can process the audio signal separately.

Step 4: In the I/O of the mixer, go to the Audio From section of the new audio tracks and select Impulse and the appropriate sample slots
Be careful not to double up on a single sample slot here. It helps to name your samples clearly before completing this step.

Very important: the Monitor section needs to be set to “In” for all eight of the audio tracks. Once you do this, you’ll notice that you don’t see/hear audio coming from the Impulse track any longer.
Note: You could stop here if you wanted and use this set up to record the output of the different sample slots on individual audio tracks. But let’s see how far we can take this.
Step 5: Add audio effects to the new audio tracks and design the overall sound
Now that we’re all setup, add some audio effects to the audio tracks and start designing the composite, overall sound of the samples you’ve chosen. Take advantage of the fact that you can mix the different samples individually with tools like EQ Eight and the Compressor.

A good portion of Live users might have already known this trick (it is in the Live 9 reference manual), but let’s take it a step further.
Step 6: Add eight new MIDI tracks and route the MIDI to the Impulse track and its pads
We’re going to split the MIDI notes from the original clip into eight different MIDI tracks. At this point, you should be asking yourself, “Why? Why would I need to split the MIDI information this way?” Well, if you’re like me and have ever wanted to create minor variations in the sequencing of each individual sample, then this is the technique for you.

Unfortunately, you can’t send multiple pitches to a single sample slot in Impulse. If you could, you’d be able to change the pitch of a kick drum, for instance, with MIDI notes rather that clip modulation.
Step 7: Copy and paste the original clip to the new MIDI tracks and deactivate the original clip on the Impulse tracks
If you choose to adopt this technique as your own, you could of course program the MIDI notes in these eight MIDI tracks from the start. But for now, a little work is involved. You won’t need the original clip anymore, but I would hold onto it just in case.

Step 8: Edit the MIDI information in the new MIDI clips so there’s only one instrument per track
Basically, you only want one MIDI note being sent from a single MIDI track. Impulse deals with note C3, D3, E3, F3, G3, A3, B3 and C4. You might want to label the track by the MIDI note, the sample in Impulse that’s receiving the MIDI information, or both.

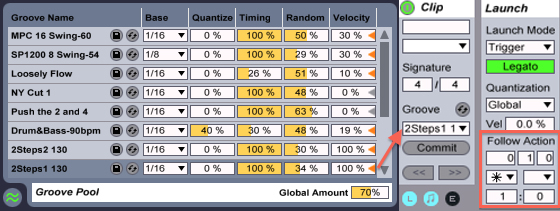
Step 9: Create new MIDI clips and add Follow Action settings
Just go for it: create some tiny variations to the separated MIDI clips or make something completely different and contrasting. Try setting up the Follow Actions a little differently on each clip via the Clip View. Also, each clip can hold it’s own groove from the Groove Pool. Push play and see what comes out–I promise you’ll get some unexpected results, so be sure to record them.
Step 10: Add Dummy Clips to the audio tracks and even the Impulse tracks
A Dummy Clip is a clip with no audio or MIDI information that is used only to modulate device parameters. Do a search in Live’s browser for a sample called “Silent” and add it to the Audio tracks that you create. These blank audio clips can now house clip modulation to control the Audio Effects that you’ve added. I recommend leaving one of these clips empty with no modulation, probably the first clip slot. Also, you can add Follow Action settings to these clips as well.

That was the audio version of Dummy Clips which you might have already known about, but what about the MIDI version? You may have noticed that the original MIDI track that houses Impulse does not have any running MIDI clips. Well, you can create some MIDI clips and add clip modulation that takes control of Impulse itself. And, again, these clips can have their own Follow Action settings.
The end result after following the steps above can be a bit random, but remember that you can resample the resulting audio and edit it afterwards.
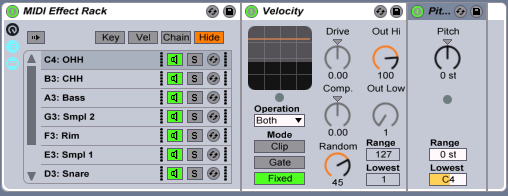
Bonus: Control the velocity going to each sample slot using a MIDI Effect Rack
Once you get to know Impulse, you’ll notice that it utilizes velocity data for sound design purposes. Try the following trick which you can see in action in the Splice file:
- Create a MIDI Effect Rack with eight chains on the Impulse track.
- Add the MIDI effects Velocity and Pitch to each chain.
- Pitch is there to route the MIDI information to the desired sample slot. For the first sample slot, C3, you’ll need to set up the Accepted Note Range of Pitch to Range: 0, Lowest: C3. Repeat the process for the remaining seven chains.
- Set up your desired amount of randomness to each Velocity device.
Everything explained above is in the Splice file, so feel free to take it apart and learn from it. I’ve went maximal and affected everything that I could, but that was for demonstration purposes. You might need or want to do this to just one of the samples in Impulse–whatever works for you.
Pat Cupo is a veteran studio musician and national award winning educator based in NYC. Having taught and guest lectured at premiere schools such as Dubspot, New York University and Columbia University, Cupo now dedicates his time to composing and performing with Ableton Live.
Browse, preview, and license Splice samples directly inside Ableton Live with our new in-DAW integration:
July 11, 2014


