.svg)
.svg)


MOVEMENT is a powerful effects engine that can add a unique and captivating rhythmic motion to any sound.
From adding subtleties to a synth pad in the studio to manipulating an entire track during a DJ live set, the possibilities of MOVEMENT are endless, confined only by your imagination. The unit allows you to inject rhythmic motion to an array of elements, from common parameters such as volume and panning to unique elements such as compressor warmth and filter resonance. This feature guide will overview some of the essential components of MOVEMENT that you’ll want to be aware of to get the most out of the versatile plugin.

The engines

The two engines on the left and right ends of the plugin’s GUI (see above) are where you’ll be accessing most of MOVEMENT’s controls. Any audio entering MOVEMENT is sent to these engines, which each have two rhythm sources, four fx slots, volume and pan controls, and a VU meter. The overall idea of using MOVEMENT is to create a sense of motion by modulating various effects using the rhythm sources. Note that the two engines behave independently of each other – rhythms from engine A can’t modulate parameters in engine B, and vice versa.
Let’s begin by taking a look at how the rhythm sources work, since they’re the heart and soul of the ultimate sound we’ll be getting. A rhythm source can be edited by hovering over its circular icon and clicking on it, which opens up an editor menu. This menu displays three tools that we can use to create rhythms for each source: a step sequencer, an LFO, and sidechaining.
1. The rhythm sources

The step sequencer can have 1 to 32 steps and the adjustable rate automatically locks with your DAW’s tempo. You can choose a pattern from a set of presets, generate one randomly, or build your own by clicking and dragging each orange bar.

Pro Tip: For additional nuance, try adjusting the step shape and swing values. The step shape changes the envelope of each step, customizing the attack and release characteristics of the modulation on a granular scale. Swing can be adjusted to divide the rhythmic pulse unevenly, creating a more human groove.
1.2 The LFO

The LFO also creates rhythmic motion through an adjustable rate. MOVEMENT offers a total of twelve waveshapes to choose from, spanning the saw wave seen above to much more obscure waveforms.
Pro Tip: The waveform can be offset by manipulating the start phase parameter.
1.3 Sidechaining

The third and final way to create a rhythm source is by sidechaining it to another track within your DAW. MOVEMENT analyzes the incoming signal and creates a corresponding envelope curve. Setting up sidechaining on plugins is different depending on your DAW, so check out this page if you’re not sure how to do so. The following four values can be adjusted via the rotary knobs:
- Gain adds volume to the input signal, increasing or decreasing the boosting / ducking.
- Attack controls how long it takes for the modulation to kick in.
- Release controls how long it takes for the modulation to return back to zero.
- Offset allows you to syncopate the sidechaining with the input signal.
2. Using the rhythm sources to modulate parameters
Although we now know how to set up a rhythm source, the source alone doesn’t do anything until we assign it to modulate a parameter. To do this, we simply drag our rhythm source onto the rotary knob of a different parameter (see below):
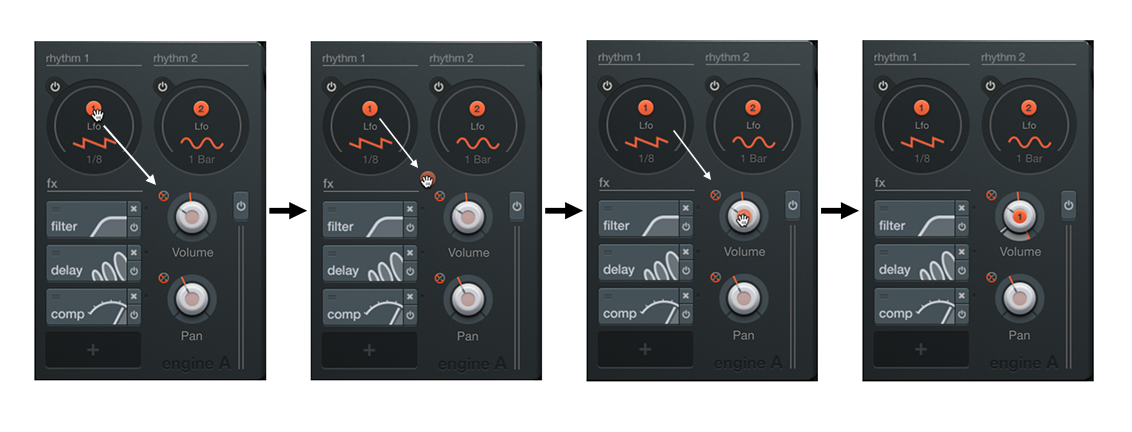
The example above shows us how to modulate volume using one of our rhythm sources. We can also just as easily modulate a range of other parameters within the effects units available (delay, filter, reverb, EQ, distortion, and compression), which can be accessed via the fx slots:

The gray slider underneath the knob is the rhythm slider, which allows you to fine-tune the intensity of the rhythmic modulation applied to the designated parameter.

Pro Tip: A cool parameter worth modulating is the rate of a different rhythm source, which can be done by turning on flux. This creates a fluctuating rhythmic rate that’s unique but still very musical in nature:

3. Using the XY Pad to automate modulation parameters
The XY Control feature can be applied to a parameter by right clicking over the rotary knob:

All parameters that are assigned the XY Control feature will have a small circular XY Control icon attached to them. This is important to be aware of, since many presets will have this icon already attached to a range of parameters:

These parameters will be automatically automated when you adjust the XY Pad in the center of the GUI:

Moving the XY Control icon on this pad vertically impacts the rotary knobs with XY Control in engine A, whereas moving the icon horizontally impacts the parameters with XY Control in engine B. This feature is a handy way to adjust a group of parameters with one motion. The dial above the pad is another useful global feature, allowing you to adjust the dry / wet ratio of the entire plugin.
This concludes our tour of MOVEMENT’s main features! The plugin might feel a little daunting at first, primarily because it operates on the principle of making every last detail customizable. At the end of the day the best way to get a hang of MOVEMENT is through firsthand experimentation, and hopefully this feature guide helps in getting you started.
April 18, 2018


