.svg)
.svg)

At Splice, we’re always really proud to hear when Splice sounds are featured on hit records, or when they appear in a movie or TV show soundtrack.
But, we know that not all of our users are making music for the masses. Many of you are just starting out on your production journeys, and if this resonates, we’re here for you.
In this article, we’ve compiled a checklist of the best ways to get started with Splice, so you can get up to speed quickly and make the most of your subscription. Check out our video on everything you need to know about Splice, which outlines these starting points—we’ll be referring to it throughout the piece. Not a Splice Subscriber yet? See which plan works best for you.
Use Splice search to find sounds you love
With more than 2.4 million sounds and presets at your fingertips, getting familiar with Splice’s search is the best way to get you to the sound you want. The Splice search experience behaves similarly on the web as it does on the Splice Desktop app, so you can use either one to browse the catalog and discover sounds you love. Click here to jump to the search section in the onboarding video.
If you know what kind of sound you’re looking for, you can start your Splice search by typing in the search bar. Alternatively, you can start by filtering by tags, such as instrument type, key, genre, or by loops and one-shots to make your search more specific.
While searching, you can exclude filters to narrow down your search by removing sounds tagged with specific tags from the results. Hover over the “-” to filter out sounds with the corresponding tag. It’s important to remember that most sounds have several tags. So, if you’re looking for an ‘electric bass,’ don’t filter out ‘guitar’ as it will likely have both tags.
During your sound search, you can also take advantage of Splice’s Similar Sounds feature, which locates sounds with similar sonic characteristics to the one you have selected. This feature is great if you’re looking for similar alternatives. That said, it’s also a really useful creative tool—you can layer similar sounds together to create rich soundscapes and textures, which add contrast to your compositions.
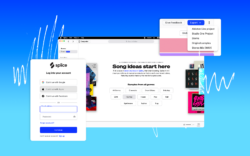
Use Create mode to start musical ideas quickly
Hands down, the best way to start an idea is with Create mode (check out the Create section in our getting started video). All you need is a couple of minutes to create a Stack to start your track.
There are three ways to create a Stack. For the first way, make sure you’re on the Sounds page, and then click on ‘Create.’ This lets you start from nothing, but you can pick a style / genre to choose the direction that best fits. From here, you can adjust your Stack in several ways, such as swapping out and adding new layers, adjusting volume, muting, soloing, changing the BPM, and changing the genre to flip the Stack into a different style.
The second way to create a Stack is to choose a loop from the library. Eligible loops will show the ‘Create a Stack’ icon. This allows you to use a loop you love and find complimentary sounds to start with. Your loop is locked so you can shuffle the Stack around it, or unlock it and replace it entirely.
Lastly, you can now also create a Stack by using your own audio as a starting point. To do this, hit “Start with your own loop” and select your desired audio file. Create will then serve up fresh Stacks of compatible sounds from our extensive catalog of high-quality, musician-made samples—all in perfect time and harmony. You can learn more about this feature in our dedicated guide.
Once you have a Stack you like, save it. Give it a memorable name or use the automatic name generator. You can find your saved Stacks in your Library. From here, you can export it as a DAW project (Ableton Live and Studio One), as Stems (with all the samples pitched and stretched as you hear in the Stack), or as Original Samples, which gives you the samples in their original state. You can also choose to download a mixed stereo .wav of your Stack.
Curate your Splice experience with Collections
Collections are a great way to curate your favorite sounds for later use or to share with other people. Think of it as a playlist, a mood board, or simply as an organizational tool that lets you personalize your Splice experience (check out the Collections section of the getting started video).
You can create and add to Collections from the left-hand sidebar, or by clicking on the three dots beside any sample. Don’t worry if your Collection has a lot of samples; you have access to the same search features as you do when browsing the library. Use the tags to find specific instruments, and use the search to find a filename that matches. If you want to share your Collection, make it public and add a description, and then share the link to your friends, followers, or collaborators.
Use Splice Desktop for a seamless sample-to-DAW workflow

When you’re in the flow, you don’t want to have your browser open looking for sounds. You want to be able to grab sounds just as quickly as inspiration comes. That’s where the Splice Desktop app comes in (watch our Desktop app walkthrough here).
When you first open Desktop, you’ll want to get familiar with the settings. Head to the Preferences window by clicking on your avatar in the top-right. Here, you can select between light mode and dark mode to match the look and feel of Desktop to your mood or surroundings.
Once in Desktop, you’ll find most of the same features as on the Splice website. You can start browsing the Splice library by searching for specific sounds and filtering your results. You can browse, create, and edit Collections just as you would on the web. Most importantly, you can drag-and-drop samples into your DAW from Desktop, and you can also create Stacks from scratch or from a loop—as well as export them to your DAW.
One big difference in Desktop, however, is the Companion mode. When you’re in a session and need the app to take up less screen space, click Companion to get a slimmer version of the window, with most of the same capabilities. Lastly, if you’re using plugins on our Rent-To-Own program, the Desktop app is what keeps them activated. This is also where you’ll update or reinstall plugins.
Audition sounds in your DAW with Bridge

Using Splice’s Bridge plugin alongside Desktop is one of the most powerful combos. Bridge lets you hear samples in the context of your current project to know if the vibe is right (watch how Bridge can help you work smarter).
To use Bridge, first make sure it’s installed from the Apps & Plugins section in Splice Desktop. Then, install the plugin on a MIDI track in your DAW. Bridge will sync with the Desktop app and, once it’s connected, you’ll see the Bridge icon in the app go blue. Now you can preview Splice sounds in the key and tempo of your DAW project.
One of the coolest features on all of Splice is associated with Bridge. Once you license the sample using the “+” button, a new button called “copy modified sample” appears. This is where you grab your tempo- and key-matched sample, which you can then paste (command + V) into your DAW. If you want the original, just go the old-fashioned way by grabbing the actual loop.
Bring Splice directly into your DAW with the Sounds Plugin (beta). Audition millions of samples, explore our latest search tools, and instantly create variations of any Splice sample.
Capture inspiration anywhere with Splice Mobile
With the Splice mobile app for iOS and Android, you have the power to browse the entire Splice catalog, organize your favorite sounds, discover hidden gems, and start countless new ideas with Create mode—from anywhere.
Whether you’re discovering new sounds or creating new loops, Splice Mobile seamlessly syncs with your Splice account. All of your ideas are waiting for you when you get back to the studio and you can easily share Stacks and samples with collaborators as audio files through text, AirDrop, and your favorite cloud services.
Give us your feedback
We love hearing from you about which features you value the most. In Splice Desktop, you can submit feedback via the help menu in the top-right corner. And if you’d like to give feedback specifically on Create mode, you can share your thoughts using the ‘Give Feedback’ button. Otherwise, you can get in touch through our support pages.
Take your music further with the new plugins, fresh sounds, and more available in the Splice Creator plan:
December 20, 2023